Sony RDR VX530 Operating Instructions - Page 62
Select Yes, and press ENTER
 |
UPC - 027242692268
View all Sony RDR VX530 manuals
Add to My Manuals
Save this manual to your list of manuals |
Page 62 highlights
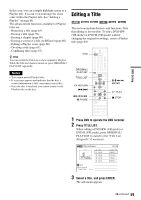
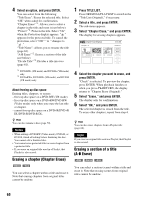
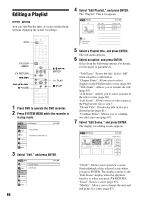
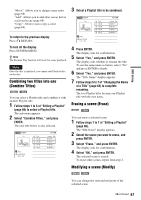
4 Press ENTER at the point where you want to divide the title. You can use H PLAY, , ./>, x STOP, and X PAUSE to find the point. "Divide" is selected. Divide Title (Original) 10:10 AM Title No.01 Start 00:00:00 00:00:10 T Title No. 01 May/02/2006 08:00 PM End 00:00:10 Point Divide 5 Press ENTER. The display asks for confirmation. To reset the dividing point, select "No" and press ENTER, then repeat from step 4. 6 Select "Yes," and press ENTER. The display asks whether to rename the title. To use the same name as before, select "No" and press ENTER to finish. 7 Select "Yes," and press ENTER. The "Title Name" display appears. 8 Follow steps 5 to 7 of "Changing the Name of a Title" (page 63) to complete renaming. The divided title appears in the Title List with the new name. Creating chapters manually +RW -RWVR -RVR You can manually insert a chapter mark at any point you like during playback. CHAPTER MARK ERASE CHAPTER MARK Press CHAPTER MARK at the point where you want to divide the title into chapters. Each time you press the button, "Marking..." appears on the screen, and the scenes before and after the mark become separate chapters. z Hint You can also divide a Playlist title (page 66). VR Marking... To erase chapter marks You can combine two chapters by erasing the chapter mark during playback. During playback, press CHAPTER MARK ERASE. The current chapter combines with the previous chapter. 62
-
 1
1 -
2
-
3
-
4
-
5
-
6
-
7
-
8
-
9
-
10
-
11
-
12
-
13
-
14
-
15
-
16
-
17
-
18
-
19
-
20
-
21
-
22
-
23
-
24
-
25
-
26
-
27
-
28
-
29
-
30
-
31
-
32
-
33
-
34
-
35
-
36
-
37
-
38
-
39
-
40
-
41
-
42
-
43
-
44
-
45
-
46
-
47
-
48
-
49
-
50
-
51
-
52
-
53
-
54
-
55
-
56
-
 57
57 -
 58
58 -
 59
59 -
 60
60 -
 61
61 -
 62
62 -
 63
63 -
 64
64 -
 65
65 -
 66
66 -
 67
67 -
68
-
69
-
70
-
71
-
72
-
73
-
74
-
75
-
76
-
77
-
78
-
79
-
80
-
81
-
82
-
83
-
84
-
85
-
86
-
87
-
88
-
89
-
90
-
91
-
92
-
93
-
94
-
95
-
96
-
97
-
98
-
99
-
100
-
101
-
102
-
103
-
104
-
105
-
106
-
107
-
108
-
109
-
110
-
111
-
112
-
113
-
114
-
115
-
116
-
117
-
118
-
119
-
120
-
121
-
122
-
123
-
124
-
125
-
126
-
127
-
128
-
129
-
130
-
131
-
132
 |
 |
