Sony STR-K790 Service Manual - Page 9
Notes, Function - guide
 |
View all Sony STR-K790 manuals
Add to My Manuals
Save this manual to your list of manuals |
Page 9 highlights
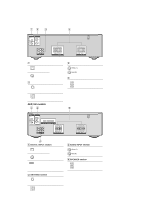
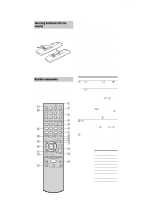
STR-K790 Name Q RETURN/ EXIT O R V/v/B/b S DISPLAY T -/->10/x CLEAR Function Press to return to the previous menu or exit the menu while the menu or on-screen guide of the VCR, DVD player, or satellite tuner is displayed on the TV screen. Press RETURN/EXIT O and TV (O) at the same time to return to the previous menu or exit the TV's menu while the menu is displayed on the TV screen. After pressing AMP MENU (E), DVD MENU (H), or MENU (M), press V, v, B or b to select the settings. Then, press to enter the selection for DVD MENU or MENU. Press also to enter the selection of the receiver, VCR, satellite tuner, Blu-ray disc player or DVD player. Press to select the information displayed on the TV screen of the VCR, satellite tuner, CD player, Blu-ray disc player or DVD player. Press DISPLAY and TV (O) at the same time to select TV information displayed on the TV screen. Press -/-- and TV (O) at the same time to select the channel entry mode, either one or two digits of the TV. Press to select track numbers over 10 of the VCR, satellite tuner or CD player or to select channel numbers of the Digital CATV terminal. Press to clear a mistake when you press the incorrect numeric buttons. Name U Numeric buttons (number 5*) V AUTO CAL W TV INPUT SLEEP Function Press to preset/tune to preset stations or to select track numbers of the CD player, Blu-ray disc player or DVD player or to select channel numbers of the VCR or satellite tuner. Press 0/10 to select track number 10. Press the numeric buttons and TV (O) at the same time to select the TV channels. Press to activate the Auto Calibration function. Press TV INPUT and TV (O) at the same time to select the input signal (TV input or video input). Press to activate the Sleep Timer function and the duration which the receiver turns off automatically. * The number 5, MASTER VOL +, TV VOL +, and H buttons have tactile dots. Use the tactile dots as references when operating the receiver. Notes • Some functions explained in this section may not work depending on the model. • The above explanation is intended to serve as an example only. Therefore, depending on the component, the above operation may not be possible or may operate differently than described. • The VIDEO 3 button on the remote is not available for receiver operation. 9
-
 1
1 -
2
-
3
-
 4
4 -
 5
5 -
 6
6 -
 7
7 -
 8
8 -
 9
9 -
 10
10 -
 11
11 -
 12
12 -
 13
13 -
 14
14 -
15
-
16
-
17
-
18
-
19
-
20
-
21
-
22
-
23
-
24
-
25
-
26
-
27
-
28
-
29
-
30
-
31
-
32
-
33
-
34
-
35
-
36
-
37
-
38
-
39
-
40
-
41
-
42
-
43
-
44
-
45
-
46
-
47
-
48
-
49
-
50
-
51
-
52
-
53
-
54
-
55
-
56
 |
 |