Sony UP-DP10 Operating Instructions / Mode d’emploi - Page 7
Setup and Connection, Attaching the Stands to the Printer, Connecting the Printer to a Computer - drivers
 |
View all Sony UP-DP10 manuals
Add to My Manuals
Save this manual to your list of manuals |
Page 7 highlights
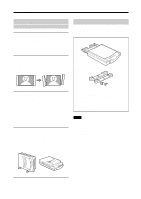
Setup and Connection Attaching the Stands to the Printer The stands can be attached by screws. The mounting of the stands depends on whether the printer is going to be used in the vertical position or the horizontal position. (Refer to the illustration.) Connecting the Printer to a Computer Notes • Before connecting the printer to a computer, be certain to first turn off the power for the printer, the computer, the monitor, etc. • Read the operating manual for the personal computer carefully. • When connecting to a printer port, we recommend using a shielded printer cable not more than 2m long and with a double-ended ferrite core. • Make sure that you insert the cable connectors all of the way when making the connections. • The driver provided with this printer does not support usage through a network. • Proper operation can not be assured when USB connection is made through a hub. • The printer cannot be connected using both a USB cable and a parallel cable. Connect it using one type of cable or the other. When connecting to a USB port To USB port (B connector end) USB cable (purchased separately) To USB port (A connector Windows 98 computer end) Macintosh Note Only the USB port can be used for connection to a Macintosh computer. (This printer cannot be used with a Macintosh that does not have a USB port as a standard feature.) 7
-
 1
1 -
 2
2 -
 3
3 -
 4
4 -
 5
5 -
 6
6 -
 7
7 -
 8
8 -
 9
9 -
 10
10 -
 11
11 -
 12
12 -
13
-
14
-
15
-
16
-
17
-
18
-
19
-
20
-
21
-
22
-
23
-
24
-
25
-
26
-
27
-
28
-
29
-
30
-
31
-
32
-
33
-
34
-
35
-
36
-
37
-
38
-
39
-
40
-
41
-
42
-
43
-
44
-
45
-
46
-
47
-
48
-
49
-
50
-
51
-
52
-
53
-
54
-
55
-
56
-
57
-
58
-
59
-
60
-
61
-
62
-
63
-
64
-
65
-
66
-
67
-
68
-
69
-
70
-
71
-
72
 |
 |
