Sony VPL-FHZ57 Operating Instructions - Page 44
Setting the LAN Network of the projector, Account Name, Password, Obtain an IP address automatically
 |
View all Sony VPL-FHZ57 manuals
Add to My Manuals
Save this manual to your list of manuals |
Page 44 highlights
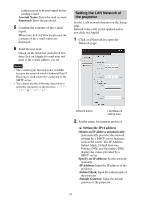
authentication to be performed before sending e-mail. Account Name: Enter the mail account. Password: Enter the password. 5 Confirm the contents of the e-mail report. When you click on [View] is pressed, the contents of the e-mail report are displayed. 6 Send the test mail. Check on the Send test mail check box then click on [Apply] to send your test mail to the e-mail address you set. Notes • The e-mail report function is not available because the network which Outbound Port25 Blocking is used cannot be connected to the SMTP server. • You cannot use the following characters to enter the characters in the text box Setting the LAN Network of the projector Set the LAN network function on the Setup page. Entered values will not be applied unless you click on [Apply]. 1 Click on [Network] to open the Network page. Network button LAN Network setting area 2 Set the items for internet protocol. (a) Setting the IPv4 address Obtain an IP address automatically: Automatically provides the network settings by a DHCP server function, such as the router. The IP Address, Subnet Mask, Default Gateway, Primary DNS, and Secondary DNS display the values provided by a DHCP server. Specify an IP address: Set the network manually. -IP Address: Input the IP address of the projector. -Subnet Mask: Input the subnet mask of the projector. -Default Gateway: Input the default gateway of the projector. 44
-
 1
1 -
2
-
3
-
4
-
5
-
6
-
7
-
8
-
9
-
10
-
11
-
12
-
13
-
14
-
15
-
16
-
17
-
18
-
19
-
20
-
21
-
22
-
23
-
24
-
25
-
26
-
27
-
28
-
29
-
30
-
31
-
32
-
33
-
34
-
35
-
36
-
37
-
38
-
 39
39 -
 40
40 -
 41
41 -
 42
42 -
 43
43 -
 44
44 -
 45
45 -
 46
46 -
 47
47 -
 48
48 -
 49
49 -
50
-
51
-
52
-
53
-
54
-
55
-
56
-
57
-
58
-
59
-
60
-
61
-
62
-
63
-
64
-
65
-
66
-
67
-
68
-
69
-
70
-
71
-
72
-
73
 |
 |
