Sony XAV-60 Operating Instructions - Page 47
Rear view camera, Rear view camera settings - parking brake
 |
UPC - 027242776739
View all Sony XAV-60 manuals
Add to My Manuals
Save this manual to your list of manuals |
Page 47 highlights
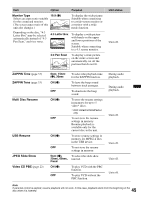
Setting the type of device By setting the type (video or audio) of each connected device, the background screen can be switched accordingly. 1 While the unit is off, touch "Source List," then . The general setting menu appears. If not, touch "General." 2 Touch v/V to scroll, then "AUX1 Input" or "AUX2 Input." 3 Touch "Audio" or "Video." The setting is complete. To deactivate the AUX input, select "OFF." To return to the previous display, touch "Back." Rear view camera By connecting the optional rear view camera to the CAMERA IN terminal, you can display the picture from the rear view camera. The picture from rear view camera appears when the back lamp lights up (or the shift lever is set to the R (reverse) position). Notes • When backing up your car, watch the surroundings carefully for safety. Do not depend on the rear view camera exclusively. • The picture from a rear view camera does not appear in the rear monitor. Tip Even if a rear view camera is connected, you can set to not display the picture from a rear view camera by deactivating the camera input (page 41). Rear view camera settings You can display setting items on the picture from the rear view camera to assist operation. This setting is available only when: - "Camera Input" is set to "ON" (page 41). - the parking brake is applied. 1 Touch "Source List," then . The general setting menu appears. If not, touch "General." 2 Touch v/V to scroll, then "Rear View Camera Setting." The setting items appear. Back Check surroundings for safety. Marker Mirror 1 2 3 Line Edit Displaying marker lines Touch "Marker." Touch "Marker" again to hide the marker lines. Reversing the picture Touch "Mirror." A mirror reversed picture appears. Editing lines 1 Touch "Line Edit." Back 1 Edit 2 Edit 3 Edit Check surroundings for safety. 1 2 3 Reset 2 Select the line to edit. Touch "1 Edit," "2 Edit" or "3 Edit" corresponding to the line to edit. 3 Edit the line. To increase the length, touch B b. To reduce the length, touch bB. To adjust the position, touch V or v. To restore the default setting, touch "Reset." 47 To return to the previous display, touch "Back."
-
 1
1 -
2
-
3
-
4
-
5
-
6
-
7
-
8
-
9
-
10
-
11
-
12
-
13
-
14
-
15
-
16
-
17
-
18
-
19
-
20
-
21
-
22
-
23
-
24
-
25
-
26
-
27
-
28
-
29
-
30
-
31
-
32
-
33
-
34
-
35
-
36
-
37
-
38
-
39
-
40
-
41
-
 42
42 -
 43
43 -
 44
44 -
 45
45 -
 46
46 -
 47
47 -
 48
48 -
 49
49 -
 50
50 -
 51
51 -
 52
52 -
53
-
54
-
55
-
56
-
57
-
58
-
59
-
60
-
61
-
62
-
63
-
64
-
65
-
66
-
67
-
68
-
69
-
70
-
71
-
72
-
73
-
74
-
75
-
76
-
77
-
78
-
79
-
80
-
81
-
82
-
83
-
84
-
85
-
86
-
87
-
88
-
89
-
90
-
91
-
92
-
93
-
94
-
95
-
96
-
97
-
98
-
99
-
100
-
101
-
102
-
103
-
104
-
105
-
106
-
107
-
108
-
109
-
110
-
111
-
112
-
113
-
114
-
115
-
116
-
117
-
118
-
119
-
120
-
121
-
122
-
123
-
124
-
125
-
126
-
127
-
128
-
129
-
130
-
131
-
132
-
133
-
134
-
135
-
136
-
137
-
138
-
139
-
140
-
141
-
142
-
143
-
144
-
145
-
146
-
147
-
148
-
149
-
150
-
151
-
152
-
153
-
154
-
155
-
156
-
157
-
158
-
159
-
160
-
161
-
162
-
163
-
164
-
165
-
166
-
167
-
168
-
169
-
170
-
171
-
172
-
173
-
174
-
175
-
176
-
177
-
178
-
179
-
180
 |
 |
