Sony XAV-V631BT Operating Instructions - Page 31
Connection/Installation, Cautions, Parts List for Installation - car stereo
 |
View all Sony XAV-V631BT manuals
Add to My Manuals
Save this manual to your list of manuals |
Page 31 highlights
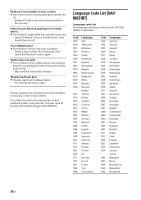
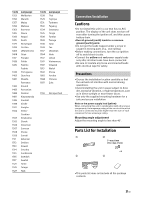
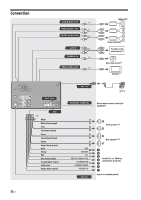
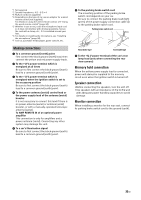
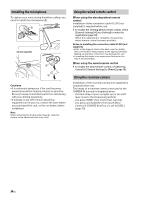
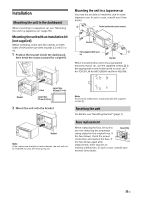
Code 1353 1356 1357 1358 1363 1365 1369 1376 1379 1393 1403 1408 1417 1428 1435 1436 1463 1481 1482 1483 1489 1491 1495 1498 1501 1502 1503 1505 1506 1507 1508 1509 1511 1512 1513 1514 1515 1516 1517 1521 1525 1527 Language Moldavian Marathi Malay Maltese Burmese Nauru Nepali Dutch Norwegian Occitan (Afan)Oromo Oriya Punjabi Polish Pashto; Pushto Portuguese Quechua RhaetoRomance Kirundi Romanian Russian Kinyarwanda Sanskrit Sindhi Sangho SerboCroatian Singhalese Slovak Slovenian Samoan Shona Somali Albanian Serbian Siswati Sesotho Sundanese Swedish Swahili Tamil Telugu Tajik Code 1528 1529 1531 1532 1534 1535 1538 1539 1540 1543 1557 1564 1572 1581 1587 1613 1632 1665 1684 1697 Language Thai Tigrinya Turkmen Tagalog Setswana Tonga Turkish Tsonga Tatar Twi Ukrainian Urdu Uzbek Vietnamese Volapük Wolof Xhosa Yoruba Chinese Zulu 1703 Not specified Connection/Installation Cautions • Do not install this unit in a car that has no ACC position. The display of the unit does not turn off even after turning the ignition off, and this causes battery drain. • Run all ground (earth) leads to a common ground (earth) point. • Do not get the leads trapped under a screw or caught in moving parts (e.g., seat railing). • Before making connections, turn the car ignition off to avoid short circuits. • Connect the yellow and red power supply leads only after all other leads have been connected. • Be sure to insulate any loose unconnected leads with electrical tape for safety. Precautions • Choose the installation location carefully so that the unit will not interfere with normal driving operations. • Avoid installing the unit in areas subject to dust, dirt, excessive vibration, or high temperature, such as in direct sunlight or near heater ducts. • Use only the supplied mounting hardware for a safe and secure installation. Note on the power supply lead (yellow) When connecting this unit in combination with other stereo components, the amperage rating of the car circuit to which the unit is connected must be higher than the sum of each component's fuse amperage rating. Mounting angle adjustment Adjust the mounting angle to less than 45°. Parts List for Installation 5 × max. 8 mm (7/32 × max. 5/16 in) × 6 • This parts list does not include all the package contents. 31GB
-
 1
1 -
2
-
3
-
4
-
5
-
6
-
7
-
8
-
9
-
10
-
11
-
12
-
13
-
14
-
15
-
16
-
17
-
18
-
19
-
20
-
21
-
22
-
23
-
24
-
25
-
 26
26 -
 27
27 -
 28
28 -
 29
29 -
 30
30 -
 31
31 -
 32
32 -
 33
33 -
 34
34 -
 35
35 -
 36
36 -
37
-
38
-
39
-
40
-
41
-
42
-
43
-
44
-
45
-
46
-
47
-
48
-
49
-
50
-
51
-
52
-
53
-
54
-
55
-
56
-
57
-
58
-
59
-
60
-
61
-
62
-
63
-
64
-
65
-
66
-
67
-
68
-
69
-
70
-
71
-
72
-
73
-
74
-
75
-
76
-
77
-
78
-
79
-
80
-
81
-
82
-
83
-
84
-
85
-
86
-
87
-
88
-
89
-
90
-
91
-
92
-
93
-
94
-
95
-
96
-
97
-
98
-
99
-
100
-
101
-
102
-
103
-
104
-
105
-
106
-
107
-
108
 |
 |
