Stihl MS 310 Product Instruction Manual - Page 48
Checking and Replacing, Chain Sprocket
 |
View all Stihl MS 310 manuals
Add to My Manuals
Save this manual to your list of manuals |
Page 48 highlights
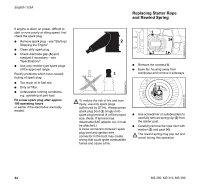
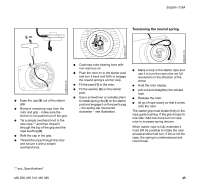
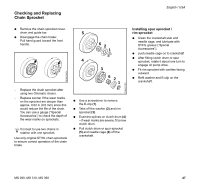
Checking and Replacing Chain Sprocket English / USA : Remove the chain sprocket cover, chain and guide bar. : Disengage the chain brake: Pull hand guard toward the front handle. - Replace the chain sprocket after using two Oilomatic chains. - Replace sooner if the wear marks on the sprocket are deeper than approx. 0.02 in (0,5 mm) since this would reduce the life of the chain. You can use a gauge ("Special Accessories") to check the depth of the wear marks on sprockets. It is best to use two chains in rotation with one sprocket. Use only original STIHL chain sprockets to ensure correct operation of the chain brake. 001BA121 KN 001BA122 KN 5 62 1 4 3 62 1 : Use a screwdriver to remove the E-clip (1). : Take off the washer (2) and rim sprocket (3). : Examine splines on clutch drum (4) - if wear marks are severe, fit a new clutch drum. : Pull clutch drum or spur sprocket (5) and needle cage (6) off the crankshaft. Installing spur sprocket / rim sprocket : Clean the crankshaft stub and needle cage, and lubricate with STlHL grease ("Special Accessories"). : push needle cage on to crankshaft : After fitting clutch drum or spur sprocket, rotate it about one turn to engage oil pump drive. : Fit rim sprocket with cavities facing outward. : Refit washer and E-clip on the crankshaft. MS 290, MS 310, MS 390 47
-
 1
1 -
2
-
3
-
4
-
5
-
6
-
7
-
8
-
9
-
10
-
11
-
12
-
13
-
14
-
15
-
16
-
17
-
18
-
19
-
20
-
21
-
22
-
23
-
24
-
25
-
26
-
27
-
28
-
29
-
30
-
31
-
32
-
33
-
34
-
35
-
36
-
37
-
38
-
39
-
40
-
41
-
42
-
 43
43 -
 44
44 -
 45
45 -
 46
46 -
 47
47 -
 48
48 -
 49
49 -
 50
50 -
 51
51 -
 52
52 -
 53
53 -
54
-
55
-
56
-
57
-
58
-
59
-
60
-
61
-
62
-
63
-
64
-
65
-
66
-
67
-
68
-
69
-
70
-
71
-
72
-
73
-
74
-
75
-
76
-
77
-
78
-
79
-
80
-
81
-
82
-
83
-
84
-
85
-
86
-
87
-
88
-
89
-
90
-
91
-
92
-
93
-
94
-
95
-
96
-
97
-
98
-
99
-
100
-
101
-
102
-
103
-
104
-
105
-
106
-
107
-
108
-
109
-
110
-
111
-
112
-
113
-
114
-
115
-
116
-
117
-
118
-
119
-
120
-
121
-
122
-
123
-
124
-
125
-
126
 |
 |
