Stihl MSE 140 C-BQ Product Instruction Manual - Page 22
Plunge-cut method, Warning, Limbing
 |
View all Stihl MSE 140 C-BQ manuals
Add to My Manuals
Save this manual to your list of manuals |
Page 22 highlights
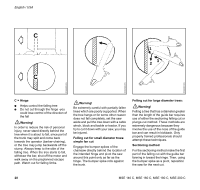
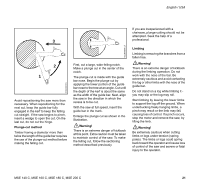
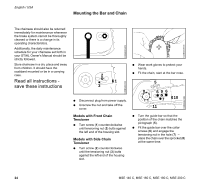
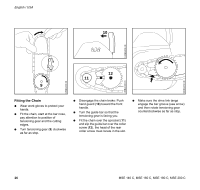
English / USA 3 2 1 Avoid repositioning the saw more than necessary. When repositioning for the next cut, keep the guide bar fully engaged in the kerf to keep the felling cut straight. If the saw begins to pinch, insert a wedge to open the cut. On the last cut, do not cut the hinge. Plunge-cut method Timber having a diameter more than twice the length of the guide bar requires the use of the plunge-cut method before making the felling cut. 001BA048 KN 001BA089 LÄ First, cut a large, wide felling notch. Make a plunge cut in the center of the notch. The plunge cut is made with the guide bar nose. Begin the plunge cut by applying the lower portion of the guide bar nose to the tree at an angle. Cut until the depth of the kerf is about the same as the width of the guide bar. Next, align the saw in the direction in which the recess is to be cut. With the saw at full speed, insert the guide bar in the trunk. Enlarge the plunge cut as shown in the illustration. !Warning! There is an extreme danger of kickback at this point. Extra caution must be taken to maintain control of the saw. To make the felling cut, follow the sectioning method described previously. If you are inexperienced with a chainsaw, plunge-cutting should not be attempted. Seek the help of a professional. Limbing Limbing is removing the branches from a fallen tree. !Warning! There is an extreme danger of kickback during the limbing operation. Do not work with the nose of the bar. Be extremely cautious and avoid contacting the log or other limbs with the nose of the guide bar. Do not stand on a log while limbing it you may slip or the log may roll. Start limbing by leaving the lower limbs to support the log off the ground. When underbucking freely hanging limbs, a pinch may result or the limb may fall, causing loss of control. If a pinch occurs, stop the motor and remove the saw, by lifting the limb. !Warning! Be extremely cautious when cutting limbs or logs under tension (spring poles). The limbs or logs could spring back toward the operator and cause loss of control of the saw and severe or fatal injury to the operator. MSE 140 C, MSE 160 C, MSE 180 C, MSE 200 C 21
-
 1
1 -
2
-
3
-
4
-
5
-
6
-
7
-
8
-
9
-
10
-
11
-
12
-
13
-
14
-
15
-
16
-
 17
17 -
 18
18 -
 19
19 -
 20
20 -
 21
21 -
 22
22 -
 23
23 -
 24
24 -
 25
25 -
 26
26 -
 27
27 -
28
-
29
-
30
-
31
-
32
-
33
-
34
-
35
-
36
-
37
-
38
-
39
-
40
-
41
-
42
-
43
-
44
-
45
-
46
-
47
-
48
-
49
-
50
-
51
-
52
-
53
-
54
-
55
-
56
-
57
-
58
-
59
-
60
-
61
-
62
-
63
-
64
-
65
-
66
-
67
-
68
-
69
-
70
-
71
-
72
-
73
-
74
-
75
-
76
-
77
-
78
-
79
-
80
-
81
-
82
-
83
-
84
-
85
-
86
-
87
-
88
-
89
-
90
-
91
-
92
-
93
-
94
 |
 |
