Stihl MSE 140 C-BQ Product Instruction Manual - Page 26
Models with Quick Chain, Tensioner
 |
View all Stihl MSE 140 C-BQ manuals
Add to My Manuals
Save this manual to your list of manuals |
Page 26 highlights
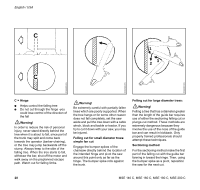
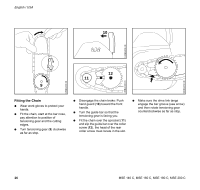
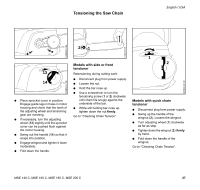
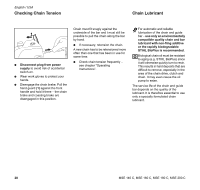
135BA005 KN English / USA : Now turn tensioning screw (9 or 10) clockwise until there is very little chain sag on the underside of the bar and the drive link tangs are located in the bar groove. : Refit the sprocket cover and screw on the nut fingertight. Arrow (11) indicates direction of chain rotation. Go to "Tensioning the Saw Chain". Models with Quick Chain Tensioner 1 3 2 100BA028 KN : Disconnect plug from power supply. : Swing up the hinged handle (1) so that it snaps into position. : Turn the wingnut (2) counterclockwise until it hangs loose in the chain sprocket cover (3). : Remove the sprocket cover. 5 : Take out the screw (5). 6 7 4 8 135BA006 KN 135BA007 KN 100BA007 KN : Remove the tensioning gear (4) and turn it over. : Position the tensioning gear (6) against the guide bar (7). : Fit and tighten down the screw (8). MSE 140 C, MSE 160 C, MSE 180 C, MSE 200 C 25
-
 1
1 -
2
-
3
-
4
-
5
-
6
-
7
-
8
-
9
-
10
-
11
-
12
-
13
-
14
-
15
-
16
-
17
-
18
-
19
-
20
-
 21
21 -
 22
22 -
 23
23 -
 24
24 -
 25
25 -
 26
26 -
 27
27 -
 28
28 -
 29
29 -
 30
30 -
 31
31 -
32
-
33
-
34
-
35
-
36
-
37
-
38
-
39
-
40
-
41
-
42
-
43
-
44
-
45
-
46
-
47
-
48
-
49
-
50
-
51
-
52
-
53
-
54
-
55
-
56
-
57
-
58
-
59
-
60
-
61
-
62
-
63
-
64
-
65
-
66
-
67
-
68
-
69
-
70
-
71
-
72
-
73
-
74
-
75
-
76
-
77
-
78
-
79
-
80
-
81
-
82
-
83
-
84
-
85
-
86
-
87
-
88
-
89
-
90
-
91
-
92
-
93
-
94
 |
 |
