Sub-Zero BI-36R Built-In Installation Guide - Page 19
Built-In Installation, Door Adjustment, Panel Installation
 |
View all Sub-Zero BI-36R manuals
Add to My Manuals
Save this manual to your list of manuals |
Page 19 highlights
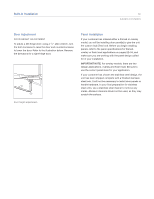
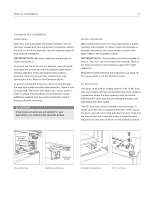
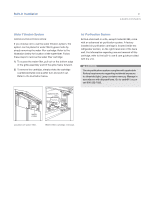
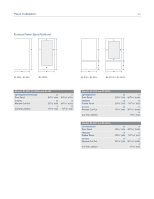
Built-In Installation 19 subzero.com/specs Door Adjustment DOOR HEIGHT ADJUSTMENT To adjust a left-hinge door; using a 1/4" allen wrench, turn the bolt clockwise to raise the door and counterclockwise to lower the door. Refer to the illustration below. Reverse the directions for a right-hinge door. Door height adjustment. Panel Installation If your customer has ordered either a framed or overlay model, you will be installing door panel(s) to give the unit the custom Sub-Zero look. Before you begin installing panels, refer to the panel specifications for framed, overlay or flush inset applications on pages 22-34, and make sure you are working with the panel design called for in your installation. IMPORTANT NOTE: For overlay models, there are two design applications, overlay and flush inset. Be sure to use the correct panel sizes for your application. If your customer has chosen the stainless steel design, the unit has been shipped complete with a finished stainless steel look. It will not be necessary to install door panels or handle hardware. In your final preparation for stainless steel units, use a stainless steel cleaner to remove any marks. Abrasive cleaners should not be used, as they may scratch the surface.
-
 1
1 -
2
-
3
-
4
-
5
-
6
-
7
-
8
-
9
-
10
-
11
-
12
-
13
-
 14
14 -
 15
15 -
 16
16 -
 17
17 -
 18
18 -
 19
19 -
 20
20 -
 21
21 -
 22
22 -
 23
23 -
 24
24 -
25
-
26
-
27
-
28
-
29
-
30
-
31
-
32
-
33
-
34
-
35
-
36
-
37
-
38
-
39
-
40
 |
 |
