Sub-Zero BI-36R Built-In Installation Guide - Page 20
Built-In Installation, Complete the Installation
 |
View all Sub-Zero BI-36R manuals
Add to My Manuals
Save this manual to your list of manuals |
Page 20 highlights
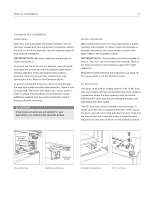
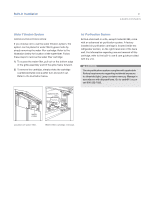
Built-In Installation 20 Complete the Installation ANCHORING After door and side panels have been installed, the unit has been leveled and door adjustment completed, anchor the built-in unit to the opening. This will assure a proper fit and a secure installation. IMPORTANT NOTE: Be sure to level and square the unit before anchoring it. To anchor the top of the unit to cabinetry, open the grille, and install the screws provided through the grille frame into the cabinetry. There are several hole locations provided. Check for proper door clearance by fully opening the door. Refer to the illustration below. To anchor the bottom of the unit, drive a screw through the side hole inside the roller base assembly. There is one on each side. The screw will need to go in at an angle in order to attach properly. Refer to the illustration below. Additional material may be needed behind the cleat to ensure sufficient anchoring. If the screws provided are not suitable for your application, you must provide adequate screws. INSTALL KICKPLATE Make sure the drain pan is in the proper position before installing the kickplate. To install, screw the kickplate to brackets attached to the inside surface of each roller base. Refer to the illustration below. IMPORTANT NOTE: The kickplate must be removable for service. The floor cannot interfere with removal. Refer to the label mounted on the kickplate support for height clearance. Reinstall the grille following the instructions on page 16. Turn power back on to the electrical outlet. 90° DOOR STOP The doors of all built-in models open to 110°. A 90° door stop is provided with the unit (located behind the grille) for installations where the door opening must be limited. Additional 90° door stop kits are available through your authorized Sub-Zero dealer. The 90° door stop will be installed in the top hinge. To install, open the door to approximately 90°. At the top of the door, insert the door stop between the door hinge and the door closer arm. Insert the screw through the door stop and into the door as shown in the illustration below. ANCHORING SCREWS Top anchoring. ANCHORING SCREW Bottom anchoring. Kickplate installation. 90° door stop.
-
 1
1 -
2
-
3
-
4
-
5
-
6
-
7
-
8
-
9
-
10
-
11
-
12
-
13
-
14
-
 15
15 -
 16
16 -
 17
17 -
 18
18 -
 19
19 -
 20
20 -
 21
21 -
 22
22 -
 23
23 -
 24
24 -
 25
25 -
26
-
27
-
28
-
29
-
30
-
31
-
32
-
33
-
34
-
35
-
36
-
37
-
38
-
39
-
40
 |
 |
