Sub-Zero BI-36R Built-In Installation Guide - Page 23
Raised Panels
 |
View all Sub-Zero BI-36R manuals
Add to My Manuals
Save this manual to your list of manuals |
Page 23 highlights
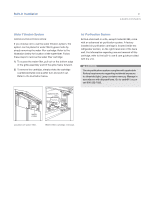
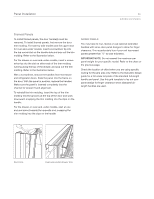
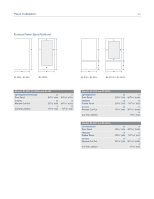
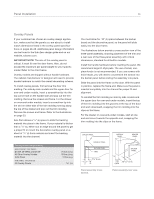
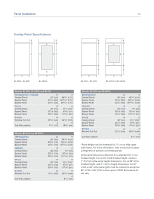
Panel Installation 23 subzero.com/specs Framed Panels To install framed panels, the door handle(s) must be removed. To install framed panels, first remove the door trim molding. For side-by-side models and the upper door for over-and-under models, insert a screwdriver tip into the top corner slot on the handle side and pop out the trim molding. Refer to the illustration below. For the drawer on over-and-under models, insert a screwdriver tip into the slot on either side of the trim molding running along the top of the drawer, and pop out the trim molding. Refer to the illustration below. With a screwdriver, remove the handles from the freezer and refrigerator doors. Slide the panel into the frame on the door. With the panel in position, replace the handles. Make sure the panel is inserted completely into the channel for proper fit and alignment. To reinstall the trim molding, insert the top of the trim molding into the grooves at the top of the door and work downward, snapping the trim molding into the clips on the handle. For the drawer on over-and-under models, start at one end and move towards the opposite end, snapping the trim molding into the clips on the handle. RAISED PANELS You may have to rout, recess or use optional extended handles with some door panel designs to allow for finger clearance. This is particularly true if your unit has raised panels greater than 1/4" (6) total thickness. IMPORTANT NOTE: Do not exceed the maximum per panel weight for your specific model. Refer to the chart on the previous page. Check the location of offset when you are using specific routing for the grip area only. Refer to the Sub-Zero design guide for a full-scale template of the standard full-length handle and panel. Use this grid template to lay out your panel design for finger clearance when standard fulllength handles are used. Door trim. Over-and-under drawer trim.
-
 1
1 -
2
-
3
-
4
-
5
-
6
-
7
-
8
-
9
-
10
-
11
-
12
-
13
-
14
-
15
-
16
-
17
-
 18
18 -
 19
19 -
 20
20 -
 21
21 -
 22
22 -
 23
23 -
 24
24 -
 25
25 -
 26
26 -
 27
27 -
 28
28 -
29
-
30
-
31
-
32
-
33
-
34
-
35
-
36
-
37
-
38
-
39
-
40
 |
 |
