Sub-Zero BI-36S Sub-Zero Design Guide - Page 24
Built-In Refrigeration, Flush Inset Panels - bi 36r
 |
View all Sub-Zero BI-36S manuals
Add to My Manuals
Save this manual to your list of manuals |
Page 24 highlights
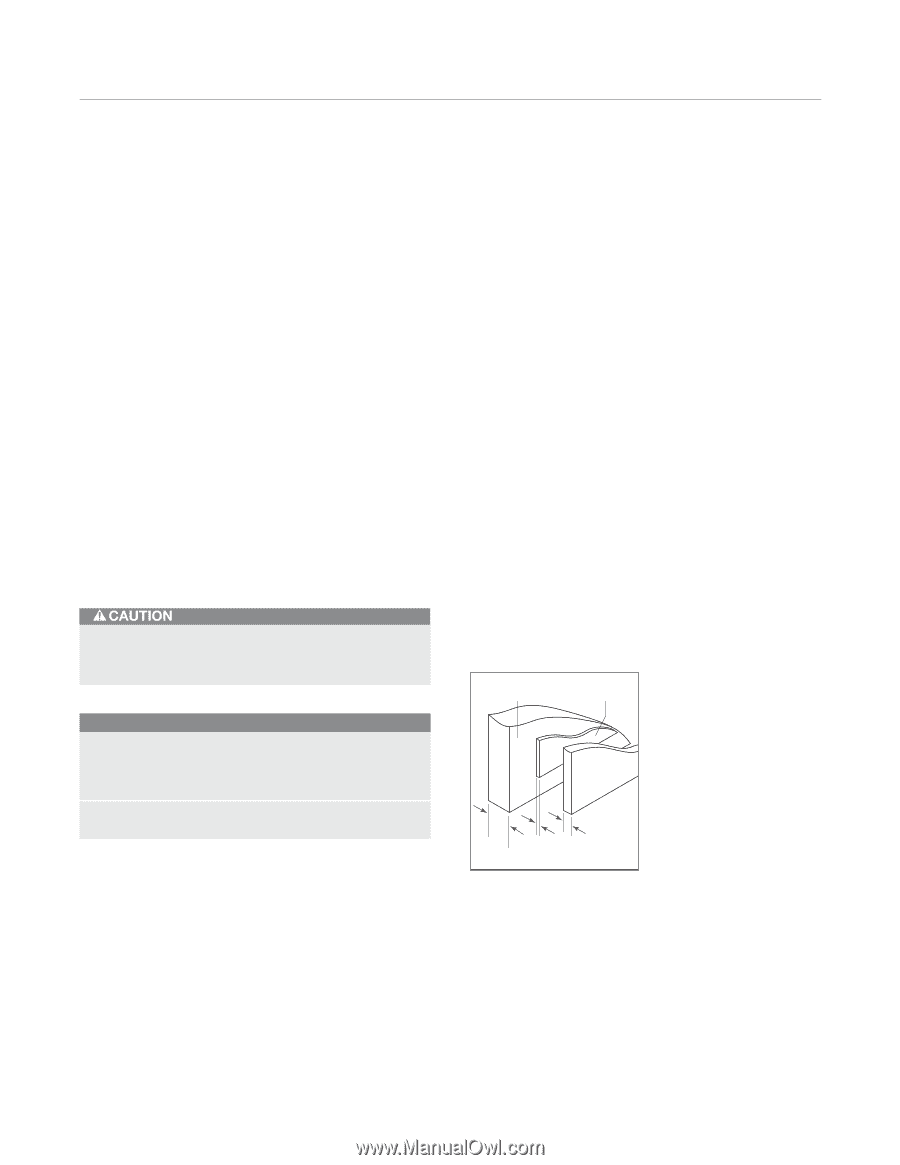
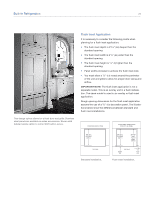
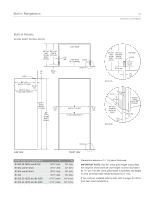
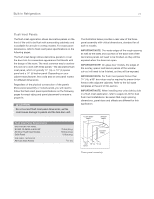
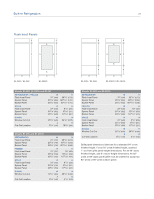
Built-In Refrigeration 24 Flush Inset Panels The flush inset application allows decorative panels on the front of the unit to be flush with surrounding cabinetry and is available for all built-in overlay models. For exact panel dimensions, refer to flush inset panel specifications on the following pages. The flush inset design allows decorative panels to cover the door trim for a seamless appearance that blends with the design of the room. The most common way to achieve this look is to work with three panels-the decorative flush inset panel, which is typically 3/4" (19), a .10" (3) spacer panel and a 1/4" (6) backer panel. Depending on your cabinet manufacturer, this could also be one panel routed for different dimensions. Regardless of the physical construction of the panels (three-panel assembly or routed panel), you will need to follow the flush inset panel specifications on the following pages for exact sizing and panel placement to ensure a proper fit. Do not exceed flush inset panel dimensions, as this could cause damage to panels and the Sub-Zero unit. Flush Inset Panel Requirements MAX WEIGHT PER PANEL BI-36R, BI-36RG and BI-36F All Other Flush Inset Models Grille Panel MIN PANEL THICKNESS All Flush Inset Panels 75 lbs (34 kg) 50 lbs (23 kg) 13 lbs (6 kg) 5/8" (16) The illustration below provides a rear view of the threepanel assembly with critical dimensions, standard for all built-in models. IMPORTANT NOTE: The inside edges of the rough opening as well as the sides and a portion of the back side of the decorative panels will need to be finished, as they will be exposed when the doors are open. IMPORTANT NOTE: On glass door models, the edges of the overlay, spacer and backer panels of the window cut-out will need to be finished, as they will be exposed. IMPORTANT NOTE: For flush inset panels thicker than 3/4" (19), a 90° door stop may be required to prevent interference with adjacent cabinets. Refer to the full-scale templates at the end of this section. IMPORTANT NOTE: When installing two units side by side in a flush inset application, refer to pages 32-36 for dual flush inset installations. Be aware that rough opening dimensions, panel sizes and offsets are different for this application. FLUSH INSET PANEL SPACER PANEL BACKER PANEL 3/4" (19) .10" (3) 1/4" (6) typical Three-panel assembly.
-
 1
1 -
2
-
3
-
4
-
5
-
6
-
7
-
8
-
9
-
10
-
11
-
12
-
13
-
14
-
15
-
16
-
17
-
18
-
 19
19 -
 20
20 -
 21
21 -
 22
22 -
 23
23 -
 24
24 -
 25
25 -
 26
26 -
 27
27 -
 28
28 -
 29
29 -
30
-
31
-
32
-
33
-
34
-
35
-
36
-
37
-
38
-
39
-
40
-
41
-
42
-
43
-
44
-
45
-
46
-
47
-
48
-
49
-
50
-
51
-
52
-
53
-
54
-
55
-
56
-
57
-
58
-
59
-
60
-
61
-
62
-
63
-
64
-
65
-
66
-
67
-
68
-
69
-
70
-
71
-
72
-
73
-
74
-
75
-
76
-
77
-
78
-
79
-
80
-
81
-
82
-
83
-
84
-
85
-
86
-
87
-
88
-
89
-
90
-
91
-
92
-
93
-
94
 |
 |