Synology DS220j Hardware Installation Guide - Page 9
Hardware Setup, For 2.5 drives
 |
View all Synology DS220j manuals
Add to My Manuals
Save this manual to your list of manuals |
Page 9 highlights
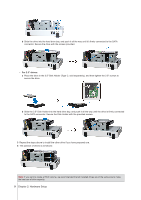
b Slide the drive into the hard drive bay, and push it all the way until it's firmly connected to the SATA connector. Secure the drive with the screws provided. • For 2.5" drives: a Place the drive in the 2.5" Disk Holder (Type C, sold separately), and then tighten the 2.5" screws to secure the drive. b Slide the 2.5" Disk Holder into the hard drive bay, and push it all the way until the drive is firmly connected to the SATA connector. Secure the Disk Holder with the provided screws. 3 Repeat the steps above to install the other drive if you have prepared one. 4 The position of drives is as follows: Note: If you want to create a RAID volume, we recommended that all installed drives are of the same size to make the best use of drive capacity. 9 Chapter 2: Hardware Setup
-
 1
1 -
2
-
3
-
 4
4 -
 5
5 -
 6
6 -
 7
7 -
 8
8 -
 9
9 -
 10
10 -
 11
11 -
 12
12 -
 13
13 -
 14
14 -
15
-
16
-
17
-
18
-
19
-
20
 |
 |
