Synology DS220j Synology NAS Users Guide - Based on DSM 7.1 - Page 19
Manage files via DS file, this article, Specify Your QuickConnect ID
 |
View all Synology DS220j manuals
Add to My Manuals
Save this manual to your list of manuals |
Page 19 highlights
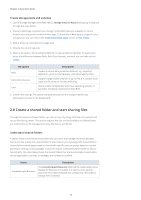
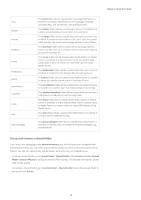
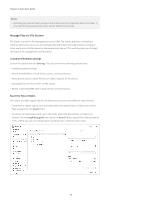
Chapter 2: Quick Start Guide Notes: • For a quick search, it is recommended that you index shared folder contents. For detailed instructions, please refer to this article. Manage files and folders Select a file or folder and click Action or simply right-click it to perform the following actions: • To send a file as email attachments: Right-click a file and select Send as email attachments. You can directly send and share files as email attachments in File Station once you have set up email delivery settings in the pop-up Personal window. • To view or rotate pictures: Double-click a picture to open it in a viewer window, where you can view and rotate pictures. • To edit the access permissions: Right-click a file or folder and select Properties. You can edit access permissions at the Permission tab. • To generate file-sharing links: Right-click a file or folder and select Share. A shared link will be automatically generated. You can further specify validity periods or enable secure sharing. Manage files via DS file DS file is an app available on Android and iOS devices, which allows you to access and manage files stored on your Synology NAS. With DS file, you can browse pictures, watch videos, and check work documents on the go. This section guides you through the process of installing and using DS file. Install and sign in to DS file 1. Install DS file on your mobile device. 2. Enter the following information on the login page: • Address or QuickConnect ID: This can be either an internal or external IP address, DDNS hostname, or Synology QuickConnect ID. You have to enable QuickConnect in Control Panel first to sign in via QuickConnect ID. For detailed information, please refer to the Specify Your QuickConnect ID section. • Account and Password • HTTPS: Enable HTTPS connections if you want to make a secure HTTPS login. Please note that playing multimedia content over HTTPS requires port forwarding configurations and a valid SSL/TLS certificate. For detailed information, please refer to this article. Manage files and folders You can perform general file management by tapping the More options icon in the upper-right corner or the icon next to a file or folder. • To copy, delete, download, share, rename, compress, extract, or open an item: Long press an item and tap the More options icon to select an action to perform. • To add a folder: Enter its parent folder, tap the More options icon, and choose Add > Create Folder. 16
-
 1
1 -
2
-
3
-
4
-
5
-
6
-
7
-
8
-
9
-
10
-
11
-
12
-
13
-
 14
14 -
 15
15 -
 16
16 -
 17
17 -
 18
18 -
 19
19 -
 20
20 -
 21
21 -
 22
22 -
 23
23 -
 24
24 -
25
-
26
-
27
-
28
-
29
-
30
-
31
-
32
-
33
-
34
-
35
-
36
-
37
-
38
-
39
-
40
-
41
-
42
-
43
-
44
-
45
-
46
-
47
-
48
-
49
-
50
-
51
-
52
-
53
-
54
-
55
-
56
-
57
-
58
-
59
-
60
-
61
-
62
-
63
-
64
-
65
-
66
-
67
-
68
-
69
-
70
-
71
-
72
-
73
-
74
-
75
-
76
-
77
-
78
-
79
-
80
-
81
-
82
-
83
 |
 |