TASCAM DM-24 Downloads Update Instructions - Page 9
Upgrading With Mac Os, Press Enter To Confirm, Or A Cursor
 |
View all TASCAM DM-24 manuals
Add to My Manuals
Save this manual to your list of manuals |
Page 9 highlights
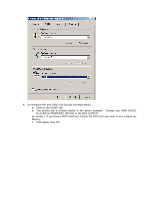
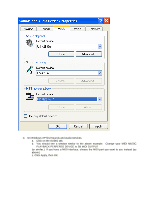
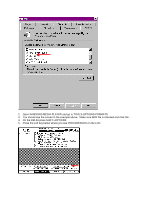
13. The DM-24 MIDI FILE DUMP screen should now show you the name of the file it is receiving and the packet column should show data movement. 14. When the file transfer is complete, the DM-24 screen will show "SOFTWARE DATA RECEIVE COMPLETE! DO YOU EXECUTE ROM WRITE? PRESS ENTER TO CONFIRM, OR A CURSOR KEY TO CANCLE." 15. Press ENTER on the DM-24. The DM-24 will think for a moment and then reboot back to the BULK screen again. 16. Now repeat these steps to load the next six files. Some files will take 30 seconds to load while others will take 15 minutes. These files must be loaded in the following order or damage will be done to your DM-24's EPROMs and the DM-24 will be unusable. 2. remote.mid 3. main.mid 4. preset.mid 5. diag.mid 6. start.mid 7. panel.mid 17. Once these files have been loaded, press SHIFT+OPTION on the DM-24. 18. Press the soft key below where you see PREFERENCES on the LCD. 19. Use the cursor keys to point to VERSION INFO and press ENTER. You will see a list of different files. All of them should be labeled with the upgraded version you just loaded. If not, you will need go through the procedure again. 20. Once finished, you will need to initialize your DM-24. Please see the end of this document for that procedure. UPGRADING WITH Mac OS This process will take approximately 45 minutes. You will need a MIDI interface with a MIDI cable coming from the interface's MIDI output to the DM-24's MIDI input. You can use printer, modem, or USB ports. 1. Once you've downloaded MIDIGraphy, launch the application. The first thing it will ask you for is your MIDI interface information. If you use OMS, check the "Use OMS" box and the ports from your OMS setup will be available in the IN and OUT pull down menus. You will need to download OMS and use it if you have a MIDI interface that connects via USB. http://www.opcode.com/downloads/ If your MIDI interface is connected to your PRINTER or MODEM port, choose that port. Once you have made these settings, click OK.
-
 1
1 -
2
-
3
-
 4
4 -
 5
5 -
 6
6 -
 7
7 -
 8
8 -
 9
9 -
 10
10 -
 11
11 -
 12
12 -
 13
13 -
 14
14 -
15
-
16
 |
 |
