TASCAM DR-10L Owners Manual English - Page 9
Power supply status indicator, Connecting a Microphone, Turning the unit on and off, Shutting down
 |
View all TASCAM DR-10L manuals
Add to My Manuals
Save this manual to your list of manuals |
Page 9 highlights
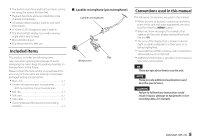
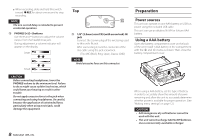
Power supply status indicator When operating on battery power, a battery icon appears at the top right of the display. The battery icon shows the amount of power remaining in bars ( q q ). The battery is almost dead and the power will soon turn off if the icon with no bars blinks. When operating on USB bus power, the icon appears. Connecting a Microphone • Insert the connector of the included Lavelier (Pin) microphone into the IN jack. • Set the 15:MIC BIAS item on the Menu Screen to ON. (See "Making menu settings" on page 12.) NOTE •• After inserting the Microphone's cable connector, gently turn the Screw Lock clockwise to lock the connector in place to prevent accidental removal. •• If you use a mic made by a different manufacturer, proper recording might not be possible. Turning the unit on and off CAUTION Do not wear connected headphones when turning the unit on and off. A loud noise could damage to the speakers or harm your ears. Turning the unit on When the unit is off, slide the ¤?o-0REC switch toward ¤ and hold it for about one second until the TASCAM DR-10L startup screen appears and the unit starts. The Home Screen shown below appears after the unit starts up. NOTE If the unit is not used for a few minutes, the display will appear as below in screensaver mode. Shutting down When the unit is on, slide the ¤?o-0REC switch toward ¤ and hold it for about one second until the display becomes unlit and the unit turns off. CAUTION Always use the ¤?o-0REC switch to turn the unit off. When the unit is on, do not remove the battery or disconnect the USB cable if using USB bus power. Doing so will cause all recordings, settings and other data to be lost. Lost data and settings cannot be restored. Turning off automatically When operating on battery power and the 11:POWER SAVE item on the Menu Screen is set to ON, if the unit is stopped and no operation has occurred for about 10 minutes, the unit will turn itself off automatically. NOTE When the unit is turned on for the first time (or when the built-in clock is reset after being left unused without a battery), the Menu Screen 17:DATE/TIME item appears after the start-up screen to allow the date and time to be set. For details about how to set it, see the 17:DATE/TIME item in "Menu structure" on page 13. 9 TASCAM DR-10L
-
 1
1 -
2
-
3
-
 4
4 -
 5
5 -
 6
6 -
 7
7 -
 8
8 -
 9
9 -
 10
10 -
 11
11 -
 12
12 -
 13
13 -
 14
14 -
15
-
16
-
17
-
18
-
19
-
20
-
21
-
22
-
23
-
24
 |
 |
