TP-Link AC1900 Archer C9 V2 User Guide - Page 103
System Routing Table
 |
View all TP-Link AC1900 manuals
Add to My Manuals
Save this manual to your list of manuals |
Page 103 highlights
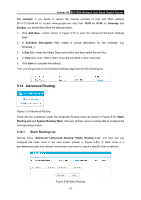
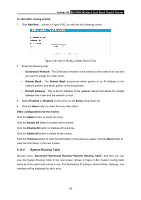
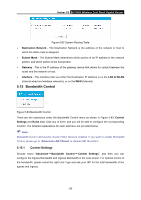
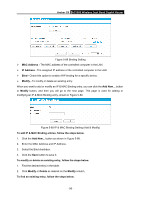
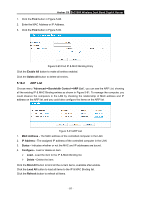
Archer C9 AC1900 Wireless Dual Band Gigabit Router To add static routing entries: 1. Click Add New... shown in Figure 5-80, you will see the following screen. Figure 5-81 Add or Modify a Static Route Entry 2. Enter the following data: Destination Network - The Destination Network is the address of the network or host that you want to assign to a static route. Subnet Mask - The Subnet Mask determines which portion of an IP Address is the network portion, and which portion is the host portion. Default Gateway - This is the IP Address of the gateway device that allows for contact between the router and the network or host. 3. Select Enabled or Disabled for this entry on the Status drop-down list. 4. Click the Save button to make the entry take effect. Other configurations for the entries: Click the Delete button to delete the entry. Click the Enable All button to enable all the entries. Click the Disable All button to disable all the entries. Click the Delete All button to delete all the entries. Click the Previous button to view the information in the previous screen, click the Next button to view the information in the next screen. 5.14.2 System Routing Table Choose menu "Advanced→Advanced Routing→System Routing Table", and then you can view the System Routing Table in the next screen (shown in Figure 5-82). System routing table views all of the valid route entries in use. The Destination IP address, Subnet Mask, Gateway, and Interface will be displayed for each entry. - 92 -
-
 1
1 -
2
-
3
-
4
-
5
-
6
-
7
-
8
-
9
-
10
-
11
-
12
-
13
-
14
-
15
-
16
-
17
-
18
-
19
-
20
-
21
-
22
-
23
-
24
-
25
-
26
-
27
-
28
-
29
-
30
-
31
-
32
-
33
-
34
-
35
-
36
-
37
-
38
-
39
-
40
-
41
-
42
-
43
-
44
-
45
-
46
-
47
-
48
-
49
-
50
-
51
-
52
-
53
-
54
-
55
-
56
-
57
-
58
-
59
-
60
-
61
-
62
-
63
-
64
-
65
-
66
-
67
-
68
-
69
-
70
-
71
-
72
-
73
-
74
-
75
-
76
-
77
-
78
-
79
-
80
-
81
-
82
-
83
-
84
-
85
-
86
-
87
-
88
-
89
-
90
-
91
-
92
-
93
-
94
-
95
-
96
-
97
-
 98
98 -
 99
99 -
 100
100 -
 101
101 -
 102
102 -
 103
103 -
 104
104 -
 105
105 -
 106
106 -
 107
107 -
 108
108 -
109
-
110
-
111
-
112
-
113
-
114
-
115
-
116
-
117
-
118
-
119
-
120
-
121
-
122
-
123
-
124
-
125
-
126
-
127
-
128
-
129
-
130
-
131
-
132
-
133
-
134
-
135
-
136
-
137
-
138
-
139
-
140
-
141
-
142
-
143
 |
 |
