TP-Link AD7200 AD7200 V1 User Guide - Page 50
Offline Download
 |
View all TP-Link AD7200 manuals
Add to My Manuals
Save this manual to your list of manuals |
Page 50 highlights
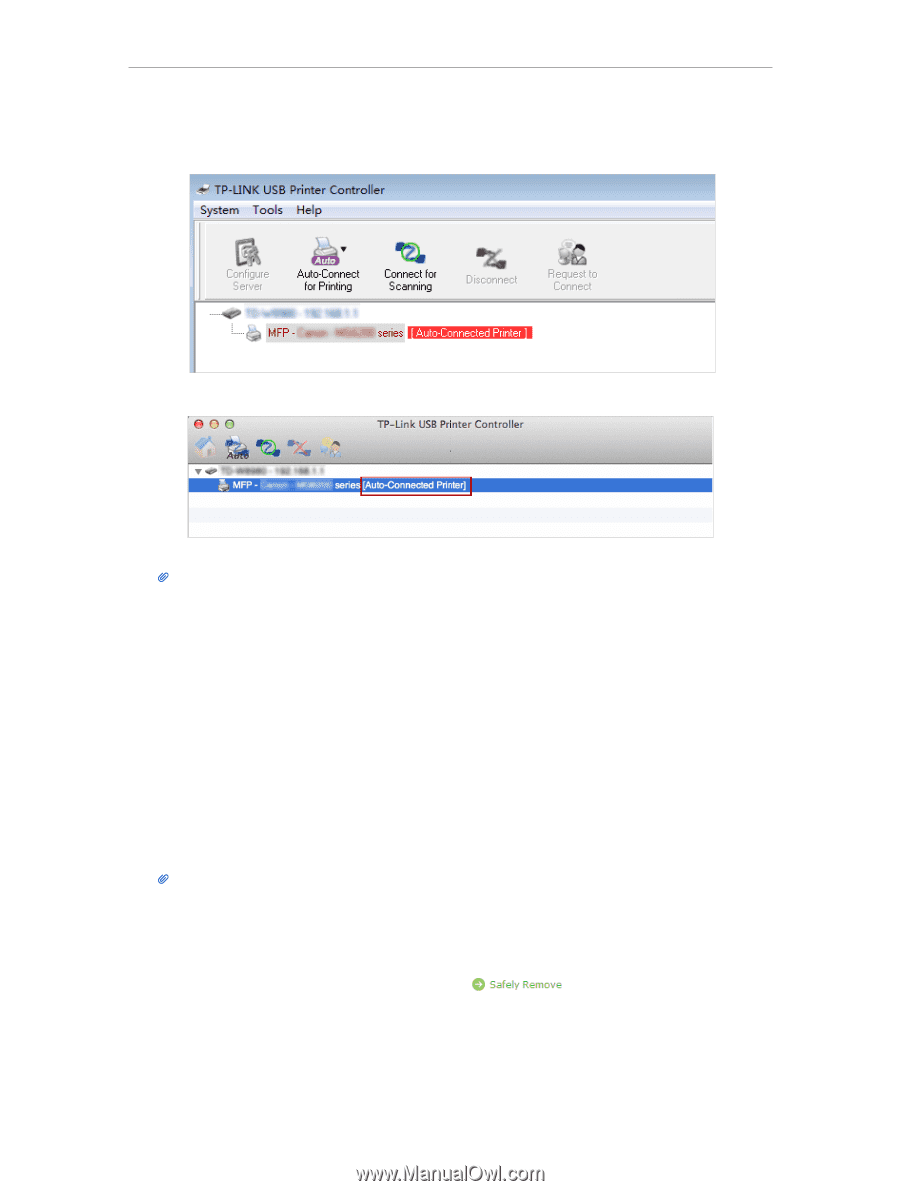
Chapter 6 5 ) You will see the printer marked as Auto-Connect Printer. Now you can print with this printer. Windows Mac Tips: The Print Server also allows different clients to share the scan feature of MFPs (Multi-Function Printers). To scan with TP-LINK USB Printer Controller, right-click the printer and select Network Scanner. Then, a scanning window will pop up. Finish the scanning process by following the on-screen instructions. 6. 5. Offline Download With Offline Download enabled, the router can download files without keeping your computer powered on all the time. Follow the steps below to add offline download tasks: 1. Insert your USB storage device into the router's USB port directly or using a USB cable. Wait several seconds until the USB LED becomes solid on. Tips: • If you use USB hubs, make sure no more than 4 devices are connected to the router. • If the USB storage device requires using bundled external power, make sure the external power has been connected. • If you use a USB hard drive, make sure its file system is FAT32, exFat, NTFS or HFS+. • Before you physically disconnect a USB device from the router, safely remove it to avoid data damage: Go to Advanced > USB Settings > Device Settings and click . 2. Visit http://tplinkwifi.net, then log in with the username and password you set for the router. 46
-
 1
1 -
2
-
3
-
4
-
5
-
6
-
7
-
8
-
9
-
10
-
11
-
12
-
13
-
14
-
15
-
16
-
17
-
18
-
19
-
20
-
21
-
22
-
23
-
24
-
25
-
26
-
27
-
28
-
29
-
30
-
31
-
32
-
33
-
34
-
35
-
36
-
37
-
38
-
39
-
40
-
41
-
42
-
43
-
44
-
 45
45 -
 46
46 -
 47
47 -
 48
48 -
 49
49 -
 50
50 -
 51
51 -
 52
52 -
 53
53 -
 54
54 -
 55
55 -
56
-
57
-
58
-
59
-
60
-
61
-
62
-
63
-
64
-
65
-
66
-
67
-
68
-
69
-
70
-
71
-
72
-
73
-
74
-
75
-
76
-
77
-
78
-
79
-
80
-
81
-
82
-
83
-
84
-
85
-
86
-
87
-
88
-
89
-
90
-
91
-
92
-
93
-
94
-
95
-
96
-
97
-
98
-
99
-
100
-
101
-
102
-
103
-
104
-
105
-
106
-
107
-
108
-
109
-
110
-
111
-
112
-
113
-
114
-
115
-
116
-
117
-
118
-
119
-
120
-
121
-
122
-
123
-
124
-
125
-
126
 |
 |