TP-Link Auranet EAP110 EAP Controller Software V1 User Guide - Page 6
Software Installation - setup
 |
View all TP-Link Auranet EAP110 manuals
Add to My Manuals
Save this manual to your list of manuals |
Page 6 highlights
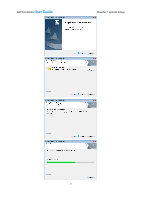
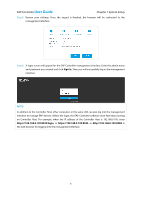
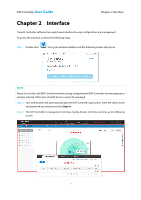
EAP Controller User Guide A DHCP Server Chapter 1 System Setup To deploy EAPs in your local network, a DHCP server is required to assign IP addresses to the EAP devices and clients. Typically, a router acts as the DHCP server. It's assumed that the IP address of the LAN of the router is 192.168.0.1. Management Hosts In the LAN, only one management host needs to install the EAP Controller software, called Controller Host. For other hosts' convenient login to the EAP Controller interface, it's recommended to set a static IP address to the Controller Host. The IP address must be in the same subnet with the DHCP server. We take 192.168.0.100 as an example in the topology figure. PC 1 and PC 2 do not need to install the EAP Controller software. After you have configured the wireless network with the EAP Controller on the Controller Host, other computers (PC 1 and PC 2) in the same LAN can use the way of "IP:port" to log into the EAP Controller to monitor the wireless network. For the details, please refer to the note of Step 6 at Quick Setup. 1.3 Software Installation The EAP Controller software just needs to be installed once when you initially create an EAP network. You can get the installation software of EAP Controller on the resource CD provided with your EAP device or download it from our website http://www.tp-link.com/en/support/download/. Perform the following installation steps to properly install the EAP Controller software: Step 1: Launch EAP Controller.exe. The InstallShield Wizard will install the EAP Controller shown as the following windows. 2
-
 1
1 -
 2
2 -
 3
3 -
 4
4 -
 5
5 -
 6
6 -
 7
7 -
 8
8 -
 9
9 -
 10
10 -
 11
11 -
 12
12 -
13
-
14
-
15
-
16
-
17
-
18
-
19
-
20
-
21
-
22
-
23
-
24
-
25
-
26
-
27
-
28
-
29
-
30
-
31
-
32
-
33
-
34
-
35
-
36
-
37
-
38
-
39
-
40
-
41
-
42
-
43
-
44
-
45
-
46
-
47
-
48
-
49
-
50
-
51
-
52
-
53
-
54
-
55
-
56
-
57
-
58
-
59
-
60
-
61
-
62
-
63
 |
 |
