TP-Link N300 User Guide - Page 10
Position Your Modem Router, to a power source. - range
 |
View all TP-Link N300 manuals
Add to My Manuals
Save this manual to your list of manuals |
Page 10 highlights
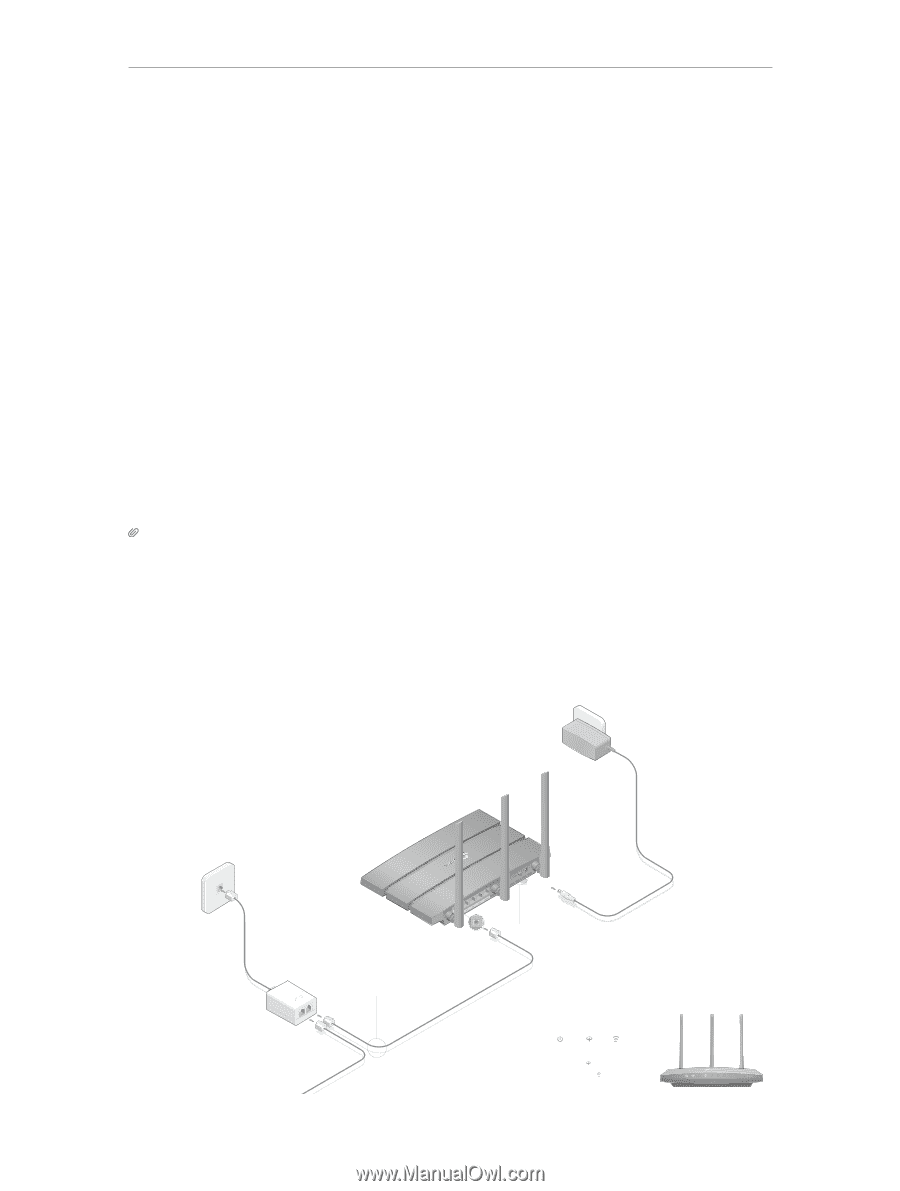
Chapter 2 Connect the Hardware 2. 1. Position Your Modem Router With the modem router, you can access your network from anywhere within the wireless network coverage. However, the wireless signal strength and coverage vary depending on the actual environment of your modem router. Many obstacles may limit the range of the wireless signal, for example, concrete structures or thick walls. For your safety and best Wi-Fi performance, please: • Do Not locate the modem router in the place where it will be exposed to moisture or excessive heat. • Keep away from the strong electromagnetic radiation and the device of electromagnetic sensitive. • Place the modem router where it can be connected to the various devices as well as to a power source. • Make sure the cables and power cord are safely placed out of the way to avoid a tripping hazard. • Keep the outside two antennas be outward at about 30 degrees (recommended). Tips: The modem router can be placed on a shelf or desktop. 2. 2. Connect Your Modem Router Follow the steps below to connect your modem router. 1. Connect the DSL line and power adapter. The electrical outlet shall be installed near the device and shall be easily accessible. If you don't need the phone service, just directly connect the modem router to the phone jack with a phone cable, then follow steps 3 and 4 to complete the hardware connection. Power Adapter Phone Jack 1 Connect the DSL splitter to the phone jack. Modem Router 3 Connect the power adapter to the modem router and push in to turn on the modem router. LINE MODEM PHONE DSL Splitter 2 Connect the modem router to the DSL splitter. Connect to the phone (Optional) 4 Verify that the hardware connection is correct by checking these LEDs. Power On DSL On Wireless On Notes: 1. The DSL LED takes about 1 to 2 minutes to stabilize. 2. If the Wireless LED is off, please press the Wi-Fi button on the rear panel, then the LED should turn on in a few seconds. 7
-
 1
1 -
2
-
3
-
4
-
 5
5 -
 6
6 -
 7
7 -
 8
8 -
 9
9 -
 10
10 -
 11
11 -
 12
12 -
 13
13 -
 14
14 -
 15
15 -
16
-
17
-
18
-
19
-
20
-
21
-
22
-
23
-
24
-
25
-
26
-
27
-
28
-
29
-
30
-
31
-
32
-
33
-
34
-
35
-
36
-
37
-
38
-
39
-
40
-
41
-
42
-
43
-
44
-
45
-
46
-
47
-
48
-
49
-
50
-
51
-
52
-
53
-
54
-
55
-
56
-
57
-
58
-
59
-
60
-
61
-
62
-
63
-
64
-
65
-
66
-
67
-
68
-
69
-
70
-
71
-
72
-
73
-
74
-
75
-
76
-
77
-
78
-
79
-
80
-
81
-
82
-
83
-
84
-
85
-
86
 |
 |