TP-Link TD-8840T User Guide - Page 53
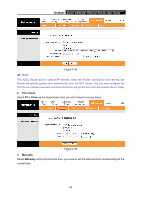
TD-8840T, To back up the Router's current settings, Step 1, ROMFILE SAVE, Step 2 - reset
 |
UPC - 845973060176
View all TP-Link TD-8840T manuals
Add to My Manuals
Save this manual to your list of manuals |
Page 53 highlights
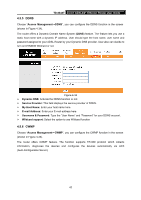
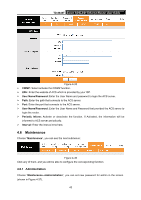
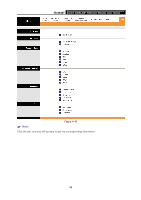
TD-8840T 4-port ADSL2/2+ Ethernet Router User Guide the router is not experiencing difficulties, there is no need to download a more recent firmware version, unless the version has a new feature that you want to use. 2) When you upgrade the router's firmware, you may lose its current configurations, so please back up the router's current settings before you upgrade its firmware. 3) Do not turn off the router or press the Reset button while the firmware is being upgraded. 4) The router will reboot after the upgrading has been finished. To back up the Router's current settings: Step 1: Click the ROMFILE SAVE button (shown in Figure 4-41), click Save button in the next screen (shown in Figure 4-42) to proceed. Figure 4-42 Step 2: Save the file as the appointed file (shown in Figure 4-43). Figure 4-43 47
-
 1
1 -
2
-
3
-
4
-
5
-
6
-
7
-
8
-
9
-
10
-
11
-
12
-
13
-
14
-
15
-
16
-
17
-
18
-
19
-
20
-
21
-
22
-
23
-
24
-
25
-
26
-
27
-
28
-
29
-
30
-
31
-
32
-
33
-
34
-
35
-
36
-
37
-
38
-
39
-
40
-
41
-
42
-
43
-
44
-
45
-
46
-
47
-
 48
48 -
 49
49 -
 50
50 -
 51
51 -
 52
52 -
 53
53 -
 54
54 -
 55
55 -
 56
56
 |
 |
