TP-Link TL-SC3171G User Guide - Page 23
Enhancement, General Setting:, Filter Setting, Save Video, Visibility, Sharpen, Brightness, Contrast
 |
UPC - 845973054038
View all TP-Link TL-SC3171G manuals
Add to My Manuals
Save this manual to your list of manuals |
Page 23 highlights
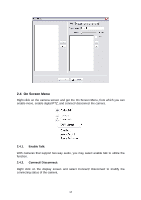
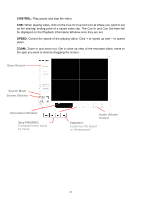
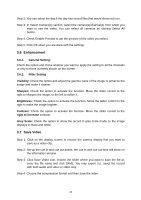
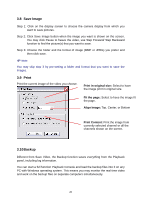
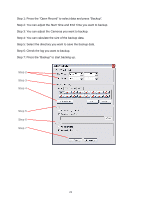
Step 2: You can select the day.If the day has record files,that would show red icon. Step 3: In Select Camera(s) section, select the camera(s)/channel(s) from which you want to see the video. You can select all cameras by clicking Select All button. Step 4: Check Enable Preview to get the preview of the video you select. Step 5: Click OK when you are done with the settings. 3.6 Enhancement 3.6.1. General Setting: Check the option and chose whether you want to apply the setting to all the channels or only to those currently shown on the screen. 3.6.2. Filter Setting Visibility: Check the option and adjust the gamma value of the image to enhance the image and make it cleaner. Sharpen: Check the option to activate the function. Move the slider control to the right to sharpen the image, to the left to soften it. Brightness: Check the option to activate the function. Move the slider control to the right to make the image brighter. Contrast: Check the option to activate the function. Move the slider control to the right to increase contrast. Grey Scale: Check the option to show the record in grey scale mode so the image displays in black and white. 3.7 Save Video Step 1: Click on the display screen to choose the camera display that you want to save as a video clip. Step 2: Set up the cue in and cue out points; the cue in and cue out time will show on the information window. Step 3: Click Save Video icon, choose the folder where you want to save the file at, enter the file name and click SAVE. You may export (i.e. save) the record with both audio and video or video only. Step 4: Choose the compression format and then save the video. 19
-
 1
1 -
2
-
3
-
4
-
5
-
6
-
7
-
8
-
9
-
10
-
11
-
12
-
13
-
14
-
15
-
16
-
17
-
 18
18 -
 19
19 -
 20
20 -
 21
21 -
 22
22 -
 23
23 -
 24
24 -
 25
25 -
 26
26 -
 27
27 -
 28
28 -
29
-
30
-
31
-
32
-
33
-
34
-
35
-
36
-
37
-
38
-
39
-
40
-
41
-
42
-
43
-
44
-
45
-
46
-
47
-
48
-
49
-
50
-
51
-
52
-
53
-
54
-
55
-
56
-
57
-
58
-
59
-
60
-
61
-
62
-
63
-
64
 |
 |
