TP-Link TL-WPA8630 KIT tpPLC Utility for Windows V1 User Guide - Page 17
Add a Device to the Network, 4. 2. Set a New Powerline Network Name, Add Device
 |
View all TP-Link TL-WPA8630 KIT manuals
Add to My Manuals
Save this manual to your list of manuals |
Page 17 highlights
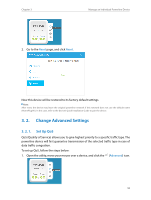
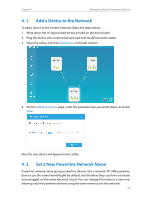
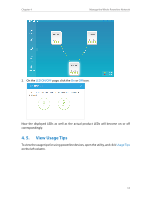
Chapter 4 Manage the Whole Powerline Network 4. 1. Add a Device to the Network To add a device to the current network, follow the steps below: 1. Write down the 16-digit powerline key printed on the device label. 2. Plug the device into a wall socket and wait until its LEDs become stable. 3. Open the utility, and click Add Device on the left column. 4. On the Add New Device page, enter the powerline key you wrote down, and click Save. Now the new device will appear on the utility. 4. 2. Set a New Powerline Network Name Powerline network name groups powerline devices into a network. TP-LINK powerline devices use the name HomePlugAV by default, and therefore they can form a network once plugged on the same electrical circuit. You can change this name to a new one, allowing only the powerline devices using the same name to join this network. 15
-
 1
1 -
2
-
3
-
4
-
5
-
6
-
7
-
8
-
9
-
10
-
11
-
 12
12 -
 13
13 -
 14
14 -
 15
15 -
 16
16 -
 17
17 -
 18
18 -
 19
19 -
 20
20 -
 21
21
 |
 |
