TP-Link TL-WR740N User Guide - Page 58
Common Service Port, IP Address
 |
UPC - 813120016543
View all TP-Link TL-WR740N manuals
Add to My Manuals
Save this manual to your list of manuals |
Page 58 highlights
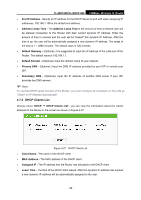
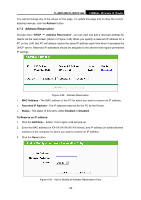
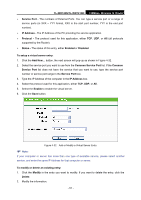
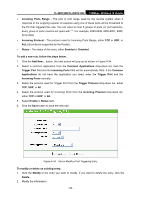
TL-WR740N/TL-WR741ND 150Mbps Wireless N Router ¾ Service Port - The numbers of External Ports. You can type a service port or a range of service ports (in XXX - YYY format, XXX is the start port number, YYY is the end port number). ¾ IP Address - The IP Address of the PC providing the service application. ¾ Protocol - The protocol used for this application, either TCP, UDP, or All (all protocols supported by the Router). ¾ Status - The status of this entry, either Enabled or Disabled. To setup a virtual server entry: 1. Click the Add New... button, the next screen will pop-up as shown in Figure 4-32. 2. Select the service port you want to use from the Common Service Port list. If the Common Service Port list does not have the service that you want to use, type the service port number or service port range in the Service Port box. 3. Type the IP Address of the computer in the IP Address box. 4. Select the protocol used for this application, either TCP, UDP, or All. 5. Select the Enable to enable the virtual server. 6. Click the Save button. Figure 4-32 Add or Modify a Virtual Server Entry ) Note: If your computer or server has more than one type of available service, please select another service, and enter the same IP Address for that computer or server. To modify or delete an existing entry: 1. Click the Modify in the entry you want to modify. If you want to delete the entry, click the Delete. 2. Modify the information. - 51 -
-
 1
1 -
2
-
3
-
4
-
5
-
6
-
7
-
8
-
9
-
10
-
11
-
12
-
13
-
14
-
15
-
16
-
17
-
18
-
19
-
20
-
21
-
22
-
23
-
24
-
25
-
26
-
27
-
28
-
29
-
30
-
31
-
32
-
33
-
34
-
35
-
36
-
37
-
38
-
39
-
40
-
41
-
42
-
43
-
44
-
45
-
46
-
47
-
48
-
49
-
50
-
51
-
52
-
 53
53 -
 54
54 -
 55
55 -
 56
56 -
 57
57 -
 58
58 -
 59
59 -
 60
60 -
 61
61 -
 62
62 -
 63
63 -
64
-
65
-
66
-
67
-
68
-
69
-
70
-
71
-
72
-
73
-
74
-
75
-
76
-
77
-
78
-
79
-
80
-
81
-
82
-
83
-
84
-
85
-
86
-
87
-
88
-
89
-
90
-
91
-
92
-
93
-
94
-
95
-
96
-
97
-
98
-
99
-
100
-
101
-
102
-
103
-
104
-
105
-
106
-
107
-
108
-
109
-
110
 |
 |