TRENDnet TV-IP121WN User's Guide
TRENDnet TV-IP121WN Manual
 |
UPC - 710931303742
View all TRENDnet TV-IP121WN manuals
Add to My Manuals
Save this manual to your list of manuals |
TRENDnet TV-IP121WN manual content summary:
- TRENDnet TV-IP121WN | User's Guide - Page 1
- TRENDnet TV-IP121WN | User's Guide - Page 2
Preface Thank you for purchasing the TV-IP121WN, a powerful and high-quality image SecurView Wireless Day/Night Internet Camera. The infrared LEDs and light sensor enable the camera to capture images even in dark environments. The camera can be installed as a standalone system within your - TRENDnet TV-IP121WN | User's Guide - Page 3
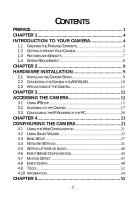
INSTALLATION 9 2.1 INSTALLING THE CAMERA STAND 9 2.2 CONNECTING THE CAMERA TO LAN/WLAN 10 2.3 APPLICATIONS OF THE CAMERA 11 CHAPTER 3 12 ACCESSING THE CAMERA 12 3.1 USING IPSETUP 12 3.2 ACCESSING TO THE CAMERA 17 3.3 CONFIGURING THE IP ADDRESS OF THE PC 20 CHAPTER 4 21 CONFIGURING THE CAM - TRENDnet TV-IP121WN | User's Guide - Page 4
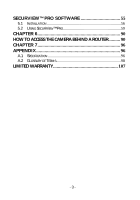
SECURVIEW™ PRO SOFT WARE 55 5.1 INSTALLATION 56 5.2 USING SECURVIEW™ PRO 59 CHAPTER 6 90 HOW TO ACCESS THE CAMERA BEHIND A ROUTER.......... 90 CHAPTER 7 96 APPENDIX 96 A.1 SPECIFICATION 96 A.2 GLOSSARY OF TERMS 98 LIMITED WARRANTY 107 - 3 - - TRENDnet TV-IP121WN | User's Guide - Page 5
in the package carefully. You should have the following: TV-IP121WN 1 x CD-ROM (Utility & User's Guide) 1 x Multi-Language Quick Installation Guide 1 x External antenna 1 x 5V 2.5A power adapter 1 x Network cable 1 x Camera stand. NOTE: If there is any packaging content missing, please - TRENDnet TV-IP121WN | User's Guide - Page 6
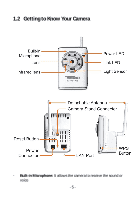
1.2 Getting to Know Your Camera - Built-in Microphone: It allows the camera to receive the sound or voice - 5 - - TRENDnet TV-IP121WN | User's Guide - Page 7
RJ-45 cable, which supports the Auto-MDIX so that the camera can detect the network speed automatically. - Reset Button: Rest will be initiated when the reset button is pressed once. The power LED begins to flash. Factory Reset will be initiated when the reset button is pressed continuously for - TRENDnet TV-IP121WN | User's Guide - Page 8
bundled SecurView™ Pro software application, the administrator can easily change the configuration, upgrade the firmware. The users are allowed to monitor the images and taking the snap via network. Multiple Platforms Supported The camera supports multiple network protocols, including TCP/IP, SMTP - TRENDnet TV-IP121WN | User's Guide - Page 9
RAM: 512MB Resolution: 800x600 or above User Interface: Microsoft® Internet Explorer 6.0 or above Accessing the Camera using SecurView Pro Platform: Microsoft® Windows® 7/Vista/XP Hardware Requirement: 1 ~ 8 cameras: Intel Core 2 Duo; 2GB RAM 9 ~ 32 cameras: Intel Core 2 Quad; 4GB RAM NOTE - TRENDnet TV-IP121WN | User's Guide - Page 10
CHAPTER 2 HARDWARE INSTALLATION 2.1 Installing the Camera Stand The camera comes with a camera stand, which uses a swivel ball screw head to lock to the camera's screw hole. When the camera stand is attached, you can place the camera anywhere by mounting the camera through the three screw holes - TRENDnet TV-IP121WN | User's Guide - Page 11
the included detachable antenna to the camera. If your wireless network has set encryption, you can use WPS button or configure the wireless connection via a LAN connection. NOTE: If the camera cannot connect to your wireless network, you need to install the camera in LAN and proceed with WLAN - TRENDnet TV-IP121WN | User's Guide - Page 12
and objects via Internet or Intranet. Capture still images and video clips remotely. Upload images or send email messages with the still images attached. The following diagram explains one of the typical applications for your camera and provides a basic example for installing the camera. - 11 - - TRENDnet TV-IP121WN | User's Guide - Page 13
CHAPTER 3 ACCESSING THE CAMERA 3.1 Using IPSetup The camera comes with a convenient utility, IPSetup, which is included in the Installation CD-ROM, allowing you to search the camera on your network easily. 1. Insert the Installation CD-ROM into your computer's CD-ROM drive to initiate the Auto-Run - TRENDnet TV-IP121WN | User's Guide - Page 14
. Then the IPSetup Wizard will appear. Click Next when the Welcome to the IPSetup Wizard appears. 3. Click Browse to choose the desired destination location. By default, the destination location is C:\Program Files\TRENDnet\IPSetup. Then click Next. - 13 - - TRENDnet TV-IP121WN | User's Guide - Page 15
4. Click Next to confirm the IPSetup software to be installed to the computer. 5. When the Installation Complete window appears, click Close. - 14 - - TRENDnet TV-IP121WN | User's Guide - Page 16
installed to your computer, and creates a folder in Start\Program\TRENDnet\IPSetup. 7. Click Start>Programs>TRENDnet>IPSetup, and then click IPSetup. 8. The IPSetup window will appear. It will search for the camera within the same network Camera Display Area - Camera Display Area: By default, the IP - TRENDnet TV-IP121WN | User's Guide - Page 17
window. It allows you to change the IP Address. You can select either Static IP or click DHCP. Then, enter the Administrator ID & Password. By default the ID/Password is: admin. When complete, click Change. - Search: Click this button to search the connected camera in the same network - Exit: Click - TRENDnet TV-IP121WN | User's Guide - Page 18
example showed in the User's Guide is based on the Internet Explorer). 2. Type the default IP address (192.168.10.30) or the IP address found by IPSetup in the Address bar, and then press [Enter]. 3. When the login window appears, enter the default User name (admin) and Password (admin) and press OK - TRENDnet TV-IP121WN | User's Guide - Page 19
time. The information can be modified in the Web Configuration. Live View Image - Displays the real-time image of the connected camera. Live View/Setup Switch - Click Setup to configure the camera. For details, see Chapter 4. Function Buttons - Use these buttons to control the video functions - TRENDnet TV-IP121WN | User's Guide - Page 20
Record. You will need to disable the protected mode of Security in the IE Browser before manual record video file or taking a snapshot. Please follow the below Steps: 1. Open IE Browser 2. Select ToolsInternet Options 3. Select Security 4. Uncheck the "Enable Protected Mode" then press OK - 19 - - TRENDnet TV-IP121WN | User's Guide - Page 21
is within the segment of the camera, select the Use the following IP address option. Then, enter an IP address into the empty field. The suggested IP address is 192.168.10.x (x is 0~254 except 30), and the suggested Subnet mask is 255.255.255.0. The TV-IP121WN default IP address is 192.168.10.30 - TRENDnet TV-IP121WN | User's Guide - Page 22
through the Web browser and the provided software application SecurView™ Pro (see chapter 5 in more detail). This chapter describes the Web Configuration, and guides you through the configuration of the camera by using the web browser. To configure the camera, click Setup on the main page of Web - TRENDnet TV-IP121WN | User's Guide - Page 23
4.2 Using Smart Wizard The camera's Smart Wizard lets you configure your camera easily and quickly. The wizard will guide you through the necessary settings with detailed instructions on each step. To start the wizard, click Smart Wizard in the left menu bar. - 22 - - TRENDnet TV-IP121WN | User's Guide - Page 24
Setup Wizard main screen will pop up. Step 1. Camera Settings Enter Camera name, Location, new Admin password and enter the password again to confirm the new password, then click NEXT. - 23 - - TRENDnet TV-IP121WN | User's Guide - Page 25
Step 2. IP Settings Select the IP setting corresponding to your network, then click NEXT. Step 3. Email Settings Enter the required information on the Email setting, then click NEXT. - 24 - - TRENDnet TV-IP121WN | User's Guide - Page 26
Step 4. Wireless Networking Click Site Survey to select your wireless network's SSID, and complete all required encryption information, then click NEXT. - 25 - - TRENDnet TV-IP121WN | User's Guide - Page 27
Step 5. Confirm Settings This page shows all configuration of your camera. Click Apply to finish the wizard and reboot the camera. Click Prev to change the previous setting. Click Cancel to exit the Wizard without saving the setting. - 26 - - TRENDnet TV-IP121WN | User's Guide - Page 28
4.3 Basic Setup The Basic menu contains three sub-menus that provide the system settings for the camera, such as the Camera Name, Location, Date & Time, and User management. - 27 - - TRENDnet TV-IP121WN | User's Guide - Page 29
Basic >> System Basic - Camera Name: Enter a descriptive name for the camera. - Location: Enter a descriptive name for the location used by the camera. Indication LED This item allows you to set the LED illumination as desired. There are two options: Normal and OFF. Basic >> Date & Time - 28 - - TRENDnet TV-IP121WN | User's Guide - Page 30
following two boxes. - Manual: Select this option to set the date and time manually. Basic >> User Administrator To prevent unauthorized access to the camera's Web Configuration, you are strongly recommend to change the default administrator password. Type the administrator password twice to set - TRENDnet TV-IP121WN | User's Guide - Page 31
the one you want to delete and click Delete. Guest - User Name: Enter the guest's name you want to add to use the camera. - Password: Enter the password for the new guest. - User List: Display the existing guests of the camera. To delete a user, select the one you want to delete and click Delete - TRENDnet TV-IP121WN | User's Guide - Page 32
4.4 Network Settings The Network menu contains three sub-menus that provide the network settings for the camera, such as the IP Setting, DDNS Setting, IP Filter, and Wireless network. - 31 - - TRENDnet TV-IP121WN | User's Guide - Page 33
starts up, it will be assigned an IP address from the DHCP server automatically. - Static IP: Select this option to assign the IP address for the camera directly. You can use IP Setup to obtain the related setting values. IP Enter the IP address of the camera. The default setting is 192.168.10.30 - TRENDnet TV-IP121WN | User's Guide - Page 34
Internet service provider. Enter the User Name and Password. The camera will get an IP Address from the ISP as starting up. NOTE Once the camera get an IP -to-device interoperability. In addition, it supports port auto mapping function so that you can access the camera if it is behind an NAT router - TRENDnet TV-IP121WN | User's Guide - Page 35
the network. The default RTSP (Real Time Streaming Protocol) port is 554. NOTE: If the camera is behind an NAT router of firewall, the suggested to be used is from 1024 to 65535. Network >> IP Filter The IP Filter setting allows the administrator of the camera to limit the users within a certain - TRENDnet TV-IP121WN | User's Guide - Page 36
the setting, select a range of IP addresses from the list and click Delete. Network >> Wireless Setting Wireless The camera supports WLAN while you use the wireless network. Select the Enable option to enable this feature. - Network ID (SSID}: Keep the default setting of this option to connect - TRENDnet TV-IP121WN | User's Guide - Page 37
WEP settings. WPA-PSK/WPA2-PSK is specially designed for the users who do not have access to network authentication servers. The user has to manually enter the starting password in their access point or gateway, as well as in each PC on the wireless network. If you select Open or Shared-key as the - TRENDnet TV-IP121WN | User's Guide - Page 38
Encryption: Select the WEP option to enable the data encryption feature to secure the camera within the wireless network. Format: Once you enable the Encryption feature, you need to determine the encryption format by selecting ASCII or HEX. ASCII format causes each character - TRENDnet TV-IP121WN | User's Guide - Page 39
, providing a simplified secure network setup solution for the end users. Once the required settings have been completed, your wireless network can be protected by simply pressing the WPS button on the camera. PROTECTED SETUP Press the Reset to Unconfigured button to reset the WPS configuration of - TRENDnet TV-IP121WN | User's Guide - Page 40
supports WPS, you can directly build a WPS connection between the camera and the device by simply pressing its WPS button. - PBC Mode: The PBC (Push Button Configuration) mode builds the connection by scanning the devices in the wireless network. Once you press the camera's WPS button, it starts to - TRENDnet TV-IP121WN | User's Guide - Page 41
4.5 Setting up Video & Audio The Video & Audio menu contains three sub-menus that provide the video and audio settings for the camera. Video & Audio >> Camera - 40 - - TRENDnet TV-IP121WN | User's Guide - Page 42
to restore the default settings of the three options above. - Mirror: Select the Horizontal option to mirror the image horizontally. Select the Vertical option to mirror the image vertically. - Light Frequency: Select the proper frequency according to the camera's location: 50Hz, 60Hz, or Outdoor - TRENDnet TV-IP121WN | User's Guide - Page 43
levels: Lowest, Low, Medium, High, and Highest. - Frame Rate: Select Auto or a proper setting depending on your network status. Video & Audio >> Audio Camera Microphone In Select the Enable option to enable the camera's audio function, so that you can receive the on-site sound and voice from the - TRENDnet TV-IP121WN | User's Guide - Page 44
FTP, and send emails that include still images. When you complete the required settings on HTTP Notify for Motion Trigger, or FTP, or Email, click Test to test the related configuration is correct or not. Once the camera connects to the server successfully, click Apply. - 43 - - TRENDnet TV-IP121WN | User's Guide - Page 45
via an HTTP notification when an event is triggered. - Host: Enter the IP of the HTTP server - Port: Enter the Port number of the HTTP server - User Name: Enter the username of the HTTP server - Password: Enter the password of the HTTP server - Query: Enter the query parameter for the request if - TRENDnet TV-IP121WN | User's Guide - Page 46
port number used for the FTP server. - User Name: Enter the user name to login into the FTP server. - Password: Enter the password to login into the FTP server. - Directory Path: Enter the destination folder for uploading the images. For example, \test. - Passive Mode: Select the Enable option to - TRENDnet TV-IP121WN | User's Guide - Page 47
the authentication feature, or select SMTP and then enter the User Name and Password according to the mail server configuration. - Sender User Name: Enter the user name to login the mail server. - Sender Password: Enter the password to login the mail server. - Receiver #1 Email Address: Enter the - TRENDnet TV-IP121WN | User's Guide - Page 48
Motion Detect The Motion Detect menu contains the command and option that allow you to enable and set up the motion detection feature of the camera. The camera provides two detecting areas. To enable the detecting area, select Window 1 or 2 from the pull-down list, and then select Enable. When the - TRENDnet TV-IP121WN | User's Guide - Page 49
4.8 Event Config The Event Config menu contains four sub-menus that provide the commands to configure event profiles. Event Configuration >> General Setting - 48 - - TRENDnet TV-IP121WN | User's Guide - Page 50
- Snapshot/Recording Subfolder: You can assign a given sub-folder for captured file. Otherwise, leave this option blank to use the default setting. Event Configuration >> Arrange Schedule Profile This sub-menu displays the scheduled profile(s). To customize the profile, click Add and then enter a - TRENDnet TV-IP121WN | User's Guide - Page 51
- Profile Name: Display the profile name that you select in the Schedule Profiles list. - Weekdays: Select the weekday(s) that you want to separately assign in the schedule profile. The weekday that has been assigned will be displayed with green color. - Time List: Display the time period that you - TRENDnet TV-IP121WN | User's Guide - Page 52
images will be sent to: Send Email, or FTP Upload. Event Configuration >> Schedule Trigger You can separately configure the schedule for trigger function of the camera by Email, or FTP. Select the Enable option on each item, and then select a Schedule Profile from the pull-down list and set the - TRENDnet TV-IP121WN | User's Guide - Page 53
allow you to restart or reset the camera. You can also backup and restore your configuration, and upgrade the firmware for the camera. Factory Reset Click Reset to restore all factory default settings for the camera. System Reboot Click Reboot to restart the camera just like turning the device - TRENDnet TV-IP121WN | User's Guide - Page 54
Browse to locate the backup file and then click Restore. Update Firmware This item displays the current firmware version. You can upgrade the firmware for your camera once you obtained a latest version of firmware. - Select the firmware: Click Browse to locate the backup file and then click Update - TRENDnet TV-IP121WN | User's Guide - Page 55
4.10 Information The Information menu displays the current configuration and events log of the camera. Device Info Display the Basic, Video, Network, and Wireless settings of the camera. System Log The Logs table displays the events log recorded by the system. - 54 - - TRENDnet TV-IP121WN | User's Guide - Page 56
chapter describes detailed instructions on using SecurView Pro, a customized software application with a user-friendly interface that allows you to access your cameras. The Software can monitor and record up to 36 cameras. It also let you change some basic settings of the camera, such as schedule - TRENDnet TV-IP121WN | User's Guide - Page 57
, you must have Microsoft .NET Framework 2.0 installed in the computer. The setup wizard will detect it and, if the program is not installed yet, it will ask you to install it during the process of installing SecurView™ Pro. NOTE: Microsoft Windows Installer 3.0 or above is a required component to - TRENDnet TV-IP121WN | User's Guide - Page 58
3. Then SecurView Pro Setup Wizard will appear. Click "Install". 4. Wait until the program finish the installation. By default, the destination location is C:\Program Files\TRENDnet\SecurView Pro. 5. Click "Finish" to finish the installation. - 57 - - TRENDnet TV-IP121WN | User's Guide - Page 59
6. After installing the SecurView Pro, the application is automatically installed to your computer, and creates a folder in " Start \Program\TRENDnet\SecurView Pro ". - 58 - - TRENDnet TV-IP121WN | User's Guide - Page 60
Pro, click Start > All Programs > TRENDnet >SecurView Pro > SecurView Pro. You can also start the program by double-click the SecurView Pro icon on your desktop. On the login window, enter the User name/Password and click OK to login. The default User name/Password is admin/admin. If you wish to - TRENDnet TV-IP121WN | User's Guide - Page 61
5.2.2 Main Window and Features When you start and login to SecurView Pro, the Main window will display as below: The Main window provides you with the on the screen when launching the program. Live View Window displays the live video of the connected camera(s). - 60 - - TRENDnet TV-IP121WN | User's Guide - Page 62
/Remove email address for event notification Event Trigger: Setup event trigger configuration Device Setting : Set up the camera Recording Setting: Set up the recording path Account information: Setup administrator password Version: Display software version System Setting: Software settings - 61 - - TRENDnet TV-IP121WN | User's Guide - Page 63
major view. Display the connected camera(s) in a 17-camera view mode using a split window. The first camera is displayed as the major view. Display the connected camera(s) in a N x N grid view mode, supporting up to 36 cameras. Display the live view of the selected camera in full screen mode. Click - TRENDnet TV-IP121WN | User's Guide - Page 64
the view from the map easily. Please note that you have to set up the eMap for monitoring in advance. Camera Control Buttons provides the control buttons that allow you to control the selected camera. Buttons / Functions Talk On/Off. Click to enable/disable the speaker function of the connected - TRENDnet TV-IP121WN | User's Guide - Page 65
5.2.3 Manage the Cameras Before adding the cameras, please setup the recording setting first. Configure Recording Settings 1. Click the button and then select Record Setting. 2. Default path is C:\, click Browse and select the desire directory then click Save to complete the configuration. To - TRENDnet TV-IP121WN | User's Guide - Page 66
Add a Camera 1. Click the button and select Device Setting to display the Device Setting window. 2. Click New. - 65 - - TRENDnet TV-IP121WN | User's Guide - Page 67
3. Click on Search, all cameras that's connected to your network would appear. 4. Select the camera you would like to add and then click Add. - 66 - - TRENDnet TV-IP121WN | User's Guide - Page 68
will display on the screen. It will auto detect the IP address/port number and display the stream type of the camera. Please type in the correct user name and password, then select Preview to view live image. 6. To setup recording style, select Yes on Record option. These four recording types will - TRENDnet TV-IP121WN | User's Guide - Page 69
schedule and select the time to record. Click on Save when finish. Motion: Record video by Motion Detection. Motion detection recording required to setup a motion detection area. If you are adding a new camera, you must save the camera information first before setup the motion detection area. - 68 - - TRENDnet TV-IP121WN | User's Guide - Page 70
To use motion detection record, please enable the detection areas first. Click on Motion detection area to setup Enable motion detection windows, set up the senstivity and click on Save. Motion by Schedule: same requirement as Motion & Schedule recording. Digital Input: - 69 - - TRENDnet TV-IP121WN | User's Guide - Page 71
Recording triggered when there I/O port is triggered. After all recording methods are configured, click Save to apply the settings. 7. Camera list will appear with recording type notification. - 70 - - TRENDnet TV-IP121WN | User's Guide - Page 72
to the main windows. The cameras will display here. NOTE Divx/Xvid codec is required for viewing the image of camera. If the image cannot be displayed in the Live View/Preview window normally, click the following path to download and install the required component: http://download.divx.com/divx - TRENDnet TV-IP121WN | User's Guide - Page 73
Edit / Delete a Camera 1. To edit a camera: From the Device Setting window, highlight the camera you would like to edit then click on Modify button. 2. To delete a camera: select the desired one and then click Remove. Click Yes to confirm. - 72 - - TRENDnet TV-IP121WN | User's Guide - Page 74
icon ( ) on the top-right corner of the window provides you with the options to connect/disconnect the camera, select a camera to be displayed in the window, capture a still image of the camera live video, or switch to eMap mode. Click the Information icon to pop up the shortcut menu and select - TRENDnet TV-IP121WN | User's Guide - Page 75
Playback the Recorded Files 1. Click the button to display the Playback window. 2. On the Playback window, select the camera and setup the begin/end date and begin/end time, then click Search. The search result will be displayed in the Record File list. - 74 - - TRENDnet TV-IP121WN | User's Guide - Page 76
3. To playback the video clip, select the desired file and click Play. - 75 - - TRENDnet TV-IP121WN | User's Guide - Page 77
5.2.4 eMap Setup & Camera Status Manage eMap Click the button and select View Setting to manage eMap. eMap refers to the geography and device scope in the SecurView Pro, which visually presents the devices in your security system. It uses a background of the area (e.g. a picture or a map) as the - TRENDnet TV-IP121WN | User's Guide - Page 78
2. Enter an eMap name. 3. Click Browse to select a Picture File from your computer. Picture will display in the Preview window. - 77 - - TRENDnet TV-IP121WN | User's Guide - Page 79
4. Click Save and click OK to apply the settings. 5. Click Camera Location to assign the camera location. - 78 - - TRENDnet TV-IP121WN | User's Guide - Page 80
6. The following screen appears. 7. Select the camera from the list and then click the position on the map. The camera icon will be displayed on map. - 79 - - TRENDnet TV-IP121WN | User's Guide - Page 81
8. Click Save when complete. To modify/remove an eMap 1. To edit the eMap: In the eMap List, select the map name from eMap list, and click Modify. The map's information will display on the preview windows. After changes the setting information, click Save to save the setting. - 80 - - TRENDnet TV-IP121WN | User's Guide - Page 82
2. To delete the eMap: In the eMap List, select the desired one and click Remove. The selected map will be removed from the list. View eMap a. Click the button and select eMap View. - 81 - - TRENDnet TV-IP121WN | User's Guide - Page 83
b. Select the map from the eMap Name list. Camera Status Click the camera icon , the camera Live Monitor window will display live image on that camera. - 82 - - TRENDnet TV-IP121WN | User's Guide - Page 84
5.2.5 System Info Account Click the System button and select Account to change the administrator password of the system. Enter the Current password, and then enter the new password twice (in the Type new password and Retype password boxes). Then click Save. - 83 - - TRENDnet TV-IP121WN | User's Guide - Page 85
Version Click the System button and select Version to view the current firmware version of the system. System Setting Click the System button and select System Setting. Auto Scan period can be set from 30 seconds to 100 seconds. - 84 - - TRENDnet TV-IP121WN | User's Guide - Page 86
5.2.6 Event Settings Setting up Event Server Click the button and select Event Server to configure the SMTP settings for email notification use. Select the Enable SMTP option and configure the following information correctly to start the email feature. - 85 - - TRENDnet TV-IP121WN | User's Guide - Page 87
configuration. Sender User Name: Enter the user name to login the mail server. Sender Password: Enter the password to login the users, please select this option. When completed, click Save and then select OK. The system will automatically start the Event Service. TIP The status of Event Service - TRENDnet TV-IP121WN | User's Guide - Page 88
the Address Book of the camera. The user will receive a realtime notification from the system while triggering out. 1. On the Address Book window, click New. 2. In the Address Book Information field, enter the Name and Email of the user. 3. When completed, click Save. The user will be displayed in - TRENDnet TV-IP121WN | User's Guide - Page 89
click Save when completed. 5. To delete the user: In the Address Book List, select the desired user and click Remove. The selected user will be removed from the list. Configuring Event Trigger Click the button and select Event Trigger to configure the trigger out function of the camera. - 88 - - TRENDnet TV-IP121WN | User's Guide - Page 90
1. On the Event Trigger window, select the desired camera from the Camera List. 2. Do one of the following: SMTP: Select this option and enter the Subject and Message, the system will send an email message to the selected user(s) in the Address Book List. Play Sound: Select this option select a - TRENDnet TV-IP121WN | User's Guide - Page 91
An account from any of the listed DDNS providers is required prior to this operation. Configure DDNS on your Camera 1. Go to Camera's DDNS Setting page, click Enable to activate the feature. Then select a DDNS provider from the list. 2. Enter your DDNS's the Host Name, User Name and Password. - 90 - - TRENDnet TV-IP121WN | User's Guide - Page 92
section, assign an HTTP port of the camera. The default HTTP Port on the camera is 80. The example shows above is using port number 9000. 4. Open another web browser and go to your Router's Web Configuration page. (In the example, TRENDnet's TEW-651BR Wireless N router is used) 5. Go to Virtual - TRENDnet TV-IP121WN | User's Guide - Page 93
access to your Camera. LAN Server: The local IP address of your Camera. Then click Add to add the application. * Please refer to your router's user's manual for detail Virtual Server setting. Some router might use Port Forwarding or Special applications for this function. The setup steps should be - TRENDnet TV-IP121WN | User's Guide - Page 94
another web browser and enter your DDNS domain and camera's port number. http://yourDomainName:PortNumber 7. Camera's login page will appear. Configure DDNS on your router 1. Go to Camera's DDNS Ports Number section, assign a HTTP port for your camera and click Apply. 2. Login to your router's web - TRENDnet TV-IP121WN | User's Guide - Page 95
3. Find the Dynamic DNS configuration section. 4. Enable DDNS, fill out the following information and then click Apply. - 94 - - TRENDnet TV-IP121WN | User's Guide - Page 96
to access to your Camera. LAN Server: The local IP address of your Camera. Click Add to add the application. * Please refer to your router's user's manual for detail Virtual Server setting. Some router might use Port Forwarding or Special applications for this function. The setup steps should be - TRENDnet TV-IP121WN | User's Guide - Page 97
A.1 Specification Image Sensor Sensor Resolution 1/4" color CMOS 640x480 Video Compression Video resolution MJPEG VGA/QVGA/QQVGA; up to 30fps System Hardware Processor RAM ROM Power ARM9 base 32MB SDRAM 4MB NOR Flash DC 5V Communication LAN WLAN Protocol support 10/100Mbps Fast - TRENDnet TV-IP121WN | User's Guide - Page 98
Reset LEDs One Reset button Power LED (amber); Link LED (green) Audio Input Codec Built-in MIC PCM Software OS Support Windows 7/Vista/XP Browser Internet Explorer 6.0 or above Software SecurView Pro for playback/recording/ configuration features Operating Environment Temperature - - TRENDnet TV-IP121WN | User's Guide - Page 99
, allowing a maximum of 256 characters. Address Resolution Protocol. ARP is a protocol that resides at the TCP/IP Internet layer that delivers data on the same network by translating an IP address to a physical address. Audio Video Interleave, it is a Windows platform audio and video file type - TRENDnet TV-IP121WN | User's Guide - Page 100
the hassle of manually assigning it a unique IP address. DHCP allows the specification for the service provided by a router, gateway, or other network device that automatically assigns an IP address to any device that requests one. Domain Name System is an Internet service that translates domain - TRENDnet TV-IP121WN | User's Guide - Page 101
prevent unauthorized access to or from a private network. Firewalls are frequently used to prevent unauthorized Internet users from accessing private networks connected to the Internet, especially Intranets all messages entering or leaving the intranet pass through the firewall, which examines each - TRENDnet TV-IP121WN | User's Guide - Page 102
Internet service provider controls the IP address of any device it connects to the Internet. The IP addresses in your network must conform to IP is specially designed for writing programs that can be safely downloaded to your computer through the Internet without the fear of viruses. It is an object- - TRENDnet TV-IP121WN | User's Guide - Page 103
be valid outside your network. NAT solves the problem. When devices within your network request information from the Internet, the requests are forwarded to the Internet under the router's IP address. NAT distributes the responses to the proper IP addresses within your network. A network consists of - TRENDnet TV-IP121WN | User's Guide - Page 104
determine whether a specific IP address is accessible. It functions by sending a packet to the specified address and waits for a reply. It is primarily used to troubleshoot Internet connections. Point-to-Point Protocol over Ethernet. PPPoE is a specification for connecting the users on an Ethernet - TRENDnet TV-IP121WN | User's Guide - Page 105
SNMP Station Subnet mask Transmission Control Protocol/Internet Protocol (TCP/IP) suite, forwards packets from one network to another using the same network protocol. RJ-45 connector is used for Ethernet cable connections. A router is the network software or hardware entity charged with routing - TRENDnet TV-IP121WN | User's Guide - Page 106
T (TCP/IP) Transceiver U UDP User Name Utility UTP W WAN WEP Windows Transmission Control Protocol/Internet Protocol is a widely used transport protocol that connects diverse computers of various transmission methods. It was developed y the Department of Defense to connect different computer - TRENDnet TV-IP121WN | User's Guide - Page 107
WPA WPA2 WPA (Wi-Fi Protected Access) is used to improve the security of Wi-Fi networks, replacing the current WEP standard. It uses its own encryption, Temporal Key Integrity Protocol (TKIP), to secure data during transmission. Wi-Fi Protected Access 2, the latest security specification that - TRENDnet TV-IP121WN | User's Guide - Page 108
TRENDnet shall not be responsible for any software, firmware, information, or memory data of customer contained in, stored on, or integrated with any products returned to TRENDnet pursuant to any warranty. There are no user serviceable manual. Warranty service may be obtained by contacting TRENDnet - TRENDnet TV-IP121WN | User's Guide - Page 109
service support for all TRENDnet products. Products that are sent to TRENDnet for RMA service must have the RMA number marked on the outside of return packages and sent to TRENDnet prepaid, insured and packaged appropriately for safe shipment. Customers shipping from outside of the USA and Canada - TRENDnet TV-IP121WN | User's Guide - Page 110
OF OR IN CONNECTION WITH THE SALE, INSTALLATION, MAINTENANCE, USE, PERFORMANCE, FAILURE, OR INTERRUPTION OF THE POSSIBILITY OF SUCH DAMAGES, AND LIMITS ITS LIABILITY TO REPAIR, REPLACEMENT, OR REFUND OF THE PURCHASE PRICE PAID, AT TRENDNET'S OPTION. THIS DISCLAIMER OF LIABILITY FOR DAMAGES WILL NOT - TRENDnet TV-IP121WN | User's Guide - Page 111
- 110 -
-
 1
1 -
 2
2 -
 3
3 -
 4
4 -
 5
5 -
 6
6 -
 7
7 -
8
-
9
-
10
-
11
-
12
-
13
-
14
-
15
-
16
-
17
-
18
-
19
-
20
-
21
-
22
-
23
-
24
-
25
-
26
-
27
-
28
-
29
-
30
-
31
-
32
-
33
-
34
-
35
-
36
-
37
-
38
-
39
-
40
-
41
-
42
-
43
-
44
-
45
-
46
-
47
-
48
-
49
-
50
-
51
-
52
-
53
-
54
-
55
-
56
-
57
-
58
-
59
-
60
-
61
-
62
-
63
-
64
-
65
-
66
-
67
-
68
-
69
-
70
-
71
-
72
-
73
-
74
-
75
-
76
-
77
-
78
-
79
-
80
-
81
-
82
-
83
-
84
-
85
-
86
-
87
-
88
-
89
-
90
-
91
-
92
-
93
-
94
-
95
-
96
-
97
-
98
-
99
-
100
-
101
-
102
-
103
-
104
-
105
-
106
-
107
-
108
-
109
-
110
-
111
 |
 |
