TRENDnet TV-IP321PI User's Guide - Page 13
Fasten the lower dome back to the camera evenly and tightly.
 |
View all TRENDnet TV-IP321PI manuals
Add to My Manuals
Save this manual to your list of manuals |
Page 13 highlights
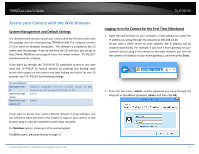
TRENDnet User's Guide Fix the mounting base on the ceiling with the screws that come with the package. Route the cables into the ceiling or route it through the hole on the side. Cable TV-IP321PI Fasten the lower dome back to the camera evenly and tightly. This step is important to block the water and dust. Loosen the tilt lock screws, adjust the tilting position in a range from 15 to 90, and tighten the tilt lock screws. Screw © Copyright 2014 TRENDnet. All Rights Reserved. 13
-
 1
1 -
2
-
3
-
4
-
5
-
6
-
7
-
 8
8 -
 9
9 -
 10
10 -
 11
11 -
 12
12 -
 13
13 -
 14
14 -
 15
15 -
 16
16 -
 17
17 -
 18
18 -
19
-
20
-
21
-
22
-
23
-
24
-
25
-
26
-
27
-
28
-
29
-
30
-
31
-
32
-
33
-
34
-
35
-
36
-
37
-
38
-
39
-
40
-
41
-
42
-
43
-
44
-
45
-
46
-
47
-
48
-
49
-
50
-
51
-
52
-
53
-
54
-
55
-
56
-
57
-
58
-
59
-
60
 |
 |

TRENDnet User’s Guide
TV-IP321PI
© Copyright 2014 TRENDnet. All Rights Reserved.
13
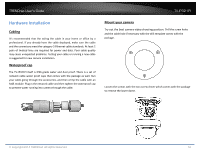
Fix the mounting base on the ceiling with the screws that come with the
package. Route the cables into the ceiling or route it through the hole on
the side.
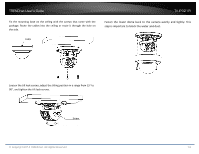
Loosen the tilt lock screws, adjust the tilting position in a range from 15
to
90
, and tighten the tilt lock screws.
Fasten the lower dome back to the camera evenly and tightly. This
step is important to block the water and dust.
Screw
Cable