Thermador PCG366W Installation Instructions
Thermador PCG366W Manual
 |
View all Thermador PCG366W manuals
Add to My Manuals
Save this manual to your list of manuals |
Thermador PCG366W manual content summary:
- Thermador PCG366W | Installation Instructions - Page 1
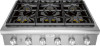
Installation INSTRUCTIONS Professional Series Rangetops THERMADOR.COM - Thermador PCG366W | Installation Instructions - Page 2
- Thermador PCG366W | Installation Instructions - Page 3
Installation INSTRUCTIONS Professional Series Rangetops Table of contents (English 2 Table de matières (Français 19 Índice de materias (Español 38 Models | Modèles | Modelos: PCG305W PCG366W PCG364WD PCG364WL PCG486WL PCG486WD THERMADOR.COM - Thermador PCG366W | Installation Instructions - Page 4
instructions 3 Installation instructions 5 Planning information 5 Ventilation requirements 5 Installation clearances 6 Unpacking and setting the rangetop This alerts you to important information and/or tips. This THERMADOR® appliance is made by BSH Home Appliances Corporation 1901 Main Street, - Thermador PCG366W | Installation Instructions - Page 5
breaker or fuse. Mark it for easy reference. OWNER: Please retain these instructions for future reference. Before using your appliance, be sure to read this manual. WARNING If the information in this manual is not followed exactly, a fire or explosion may result causing property damage, personal - Thermador PCG366W | Installation Instructions - Page 6
AND SAVE THESE INSTRUCTIONS Always keep appliance • CAN1-1.1-M81, Domestic Gas Ranges • CSA C22.2 No. 61, Household Cooking Ranges Check local building codes for the surface, a Thermador® Low Backguard is required for a 0'' rear clearance to the combustible surface. A Thermador Low Backguard must - Thermador PCG366W | Installation Instructions - Page 7
sure to read this manual. Pay special attention to the Important Safety Instructions located at the beginning of the manual. Any opening in minimum, equal the width of the range/rangetop. Where space permits, a hood larger in width than the range/rangetop may be desirable for improved ventilation - Thermador PCG366W | Installation Instructions - Page 8
island hood. • See the Ventilation Planning Guide for recommended hood options. Due to the high manual for clearances. • The rangetop is designed to hang from the countertop by its flanges. The countertop however must be strong enough to support this rangetop. It may be necessary to add a supporting - Thermador PCG366W | Installation Instructions - Page 9
Clearance requirements with a Low Backguard (purchased separately) (1333"0) 0" 18" (457) 4300""(1(706126))- ( 91346"oro1r,4281"9 ) 5" (127) 0" 0" inches (mm) as defined in the "National Fuel Gas Code" (ANSI Z223.1, Current Edition). Clearances from non-combustible materials are not part of - Thermador PCG366W | Installation Instructions - Page 10
Clearance requirements with the island trim (included) (1333"0) 6" (152) 4300""(1(706126))- 18" (457) (91346o"ro1r,24189" ) 5" (127) 0" 0" inches (mm) as defined in the "National Fuel Gas Code" (ANSI Z223.1, Current Edition). Clearances from non-combustible materials are not part of the - Thermador PCG366W | Installation Instructions - Page 11
and/or by the local authority having jurisdiction. • 30" (762 mm) minimum to non-combustible material above the Cooking Surface. • * Refer to OTR manufacturer's installation manual for clearances. Page. 9 - Thermador PCG366W | Installation Instructions - Page 12
minimum D Detail A 2213/16" (580) A inches (mm) Detail A: front face of cabinet C B Corner Notch Detail 2 x 4 Corner Support 7 11/16" (195) inches (mm) inches (mm) 30'' Rangetop 36'' Rangetop 48'' Rangetop A 29-15/16'' (760 mm) 35-15/16'' (913 mm) 47-15/16'' (1,218 mm) B 3/8'' (10 - Thermador PCG366W | Installation Instructions - Page 13
/16" (20) Front projects outward 13/16" (20) as shown from standard 24" deep base. Installation of rangetop above Thermador warming drawers 7 5/8" (194) Plywood support Install additional wood support along front edge of cutout 2¾" (70) min. between cutouts inches (mm) inches (mm) Unpacking and - Thermador PCG366W | Installation Instructions - Page 14
Guide. Gas requirements and hookup 9 CAUTION The appliance must be isolated from the gas supply piping system by closing its individual manual at the installation site. Make certain the range matches the type of gas available at the gas supply to the rangetop. High altitude This appliance has service, - Thermador PCG366W | Installation Instructions - Page 15
the manual LP) gas connection Rangetops are shipped by the Thermador® to purchase a conversion kit. Obey all instructions service personnel only. 9 WARNING If a gas conversion kit is used, the kit shall be installed by a qualified service personnel in accordance with the manufacturer's instructions - Thermador PCG366W | Installation Instructions - Page 16
service panel before servicing the appliance. 9 WARNING This product must be properly grounded. 9 WARNING Electrical grounding instructions wire must be provided from the power source (breaker) because critical range components, including the surface burner spark reignition modules, require it to - Thermador PCG366W | Installation Instructions - Page 17
while sliding the backguard down onto the range. 9 WARNING To reduce the risk of need. Before you begin read these instructions carefully. Observe all local codes and rangetop with 2 or 3 x ½'' (12.7 mm) screws. 9½" (239) 2. Slide the support brackets of the Low Backguard between the two - Thermador PCG366W | Installation Instructions - Page 18
manual gas shut-off valve to the open position. The burner caps must be properly placed on the burner bases for the cooktop to function properly. If the burner cap is not properly placed, one or more of the following problems -side down and align into the rangetop recess. 2. Grates should rest flush - Thermador PCG366W | Installation Instructions - Page 19
that the burner cap is positioned properly on the burner base, then re-test. If flame characteristics do not improve, call Thermador service. To test burner ignition 1. Select a rangetop burner knob. Push in and turn the knob to HI. • The igniter will produce a clicking sound. Once the air has been - Thermador PCG366W | Installation Instructions - Page 20
LP gas, refer to LP Conversion Instructions for details. Manual gas shut off valve installed in an , use the Thermador Stainless Steel Conditioner, which can be purchased in the Thermador eShop (store.thermador.com/us). Troubleshooting See Use and Care Guide for troubleshooting information. Page. 18 - Thermador PCG366W | Installation Instructions - Page 21
Table des MATIÈRES Définitions de SÉCURITÉ Sécurit 20 Instructions importants de sécurit 20 Consignes d'installation 23 Renseignements de planification 23 Exigences en Drive, Unit 3 Mississauga, ON L5N 7J6 Des questions? 1-800-735-4328 www.thermador.ca Nous attendons de vos nouvelles! - Thermador PCG366W | Installation Instructions - Page 22
. • La mise à la terre inadéquate de l'appareil peut entraîner un risque de décharge électrique. • Le non-respect des présentes instructions peut entraîner la mort, causer un incendie ou provoquer une décharge électrique. Les réglementations locales varient. L'installation, le branchement au gaz et - Thermador PCG366W | Installation Instructions - Page 23
IMPORTANTS DE SÉCURITÉ LIRE TOUTES LES INSTRUCTIONS AVANT DE PROCÉDER Vérifiez le type d' dosseret bas pour un manque de dégagement (0 po). Il faudrait acheter séparément un dosseret bas THERMADOR. • Quand une surface est couverte d'une matière non combustible (métal, céramique, brique, - Thermador PCG366W | Installation Instructions - Page 24
IMPORTANTS DE SÉCURITÉ LIRE TOUTES LES INSTRUCTIONS AVANT DE PROCÉDER ATTENTION Cet appareil est conçu pour une utilisation culinaire. Pour des raisons de sécurité, ne l'utilisez jamais pour chauffer une piè - Thermador PCG366W | Installation Instructions - Page 25
matériaux doivent être en mesure de supporter des températures pouvant atteindre 90 °C toutes les instructions avant d'utiliser Guide de Planification de ventilation pour connaître les combinaisons de ventilation approuvées. Il est fortement recommandé d'installer une hotte de ventilation Thermador - Thermador PCG366W | Installation Instructions - Page 26
grand pour y loger la hotte de l'îlot. • Consultez le Guide de Planification de ventilation pour connaître les combinaisons de ventilation approuvé voir à la page 29). L'autre possibilité est de construire un plan de support pour y installer la table de cuisson. • La table de cuisson peut être - Thermador PCG366W | Installation Instructions - Page 27
de dégagement (0 po). Il faudrait acheter séparément un dosseret bas Thermador. • Quand une surface est couverte d'une matière non combustible (métal, la partie frontale de la table de cuisson. • Si vous construisez un plan de support, les côtés ou le bas de la découpe peuvent être en matériau plein - Thermador PCG366W | Installation Instructions - Page 28
Armoires avec dosseret bas (acheter séparément) (1333"0) 0" 18" (457) 4300""(1(706126))- ( 91346"oro1r,4281"9 ) 5" (127) 0" 0" pounces (mm) Les dégagements pour matériaux non-combustibles ne sont pas abordés dans la norme ANSI Z21.1 ni certifiés par la CSA. *Un dégagement de moins de 152 mm - Thermador PCG366W | Installation Instructions - Page 29
Espace libre - Armoires avec garniture d'ilot incluse (1333"0) 6" (152) 4300""(1(706126))- 18" (457) (91346o"ro1r,24189" ) 5" (127) 0" 0" pounces (mm) Les dégagements pour matériaux non-combustibles ne sont pas abordés dans la norme ANSI Z21.1 ni certifiés par la CSA. *Un dégagement de - Thermador PCG366W | Installation Instructions - Page 30
Espaces libres des armoires avec four à micro-ondes installé au-dessus de la cuisinière - PCG305 seulement (1333"0) * 30" (762) 18" (457) 5" (127) 0" 30" (762) 0" 0" pounces (mm) Les dégagements pour matériaux non-combustibles ne sont pas abordés dans la norme ANSI Z21.1 ni certifiés par - Thermador PCG366W | Installation Instructions - Page 31
Préparation du plan de travail Installation de supports latéraux (des deux côtés) Vis à tête fraisée 38 mm (1½ po) devant le panneau frontal de l'armoire de C support, 18 mm (11/16 po) Encoche nécessaire pour armoire de support standard de 610 mm (24 po) de profondeur. Panneau de commande projet - Thermador PCG366W | Installation Instructions - Page 32
standard de 60,9 cm (24 po) de profondeur. Installation d'une table de cuisson de tiroirs chauffe-plats 7 5/8" (194) Support en contreplaqué Istallez un tasseau supplémentaire le long du bord avant de la découpe 2¾" (70) min. entre découpes pounces (mm) Déballage et mise en - Thermador PCG366W | Installation Instructions - Page 33
ce que la surface de cuisson soit en position finale. 4. Utilisez un tournevis étoile pour retirer les vis des supports de palette sur les côtés gauche et droit de l'appareil. Jetez les vis et les supports après leur retrait. Réglage de la cuisinière 5. Posez la plaque de protection avant de glisser - Thermador PCG366W | Installation Instructions - Page 34
avec le marchand où l'appareil a été acheté ou avec Thermador. Suivez toutes les instructions du this kit pour convertir correctement le détendeur de gaz et dommages à la propriété, des blessures ou la mort. L'agence de service qualité est responsable de l'installation appropriée de ce nécessaire. - Thermador PCG366W | Installation Instructions - Page 35
doit être effectué conformément au Code national de l'électricité. 9 AVERTISSEMENT INSTRUCTIONS DE MISE À LA TERRE L'électroménager est doté d'une fiche à trois l'installation, mettre l'alimentation HORS CIRCUIT au panneau de service, le verrouiller pour empêcher la mise en circuit accidentelle - Thermador PCG366W | Installation Instructions - Page 36
(51 mm) du mur arrière. NOTE : Le type de prise peut varier. 2. Faites glisser les pattes des supports entre les deux panneaux arrière des boîtiers des cuisinières. Fixez chaque support avec quatre vis de 1½ po (38 mm). 3. Fixez l'avant de la plaque de protection à la cuisinière avec - Thermador PCG366W | Installation Instructions - Page 37
Test de brûleurs 9 AVERTISSEMENT Pour prévenir toute brûlure, éviter de toucher les chapeaux et les grilles des brûleurs lorsqu'ils sont chauds. Éteignez la table de cuisson et laissez les brûleurs refroidir. Installer tout composant lâche, tels capuchons et grilles de brûleurs, ayant été retirés pr - Thermador PCG366W | Installation Instructions - Page 38
Si les caractéristiques de flamme ne s'améliorent pas, communiquer avec Thermador entretien. Vérifier l'allumage de brûleur 1. Choisir un bouton de avoir d'intervalle d'air entre la flamme et le port du brûleur. Communiquer avec Thermador entretien si : • Tout brûleurs ne s'allume pas. • Si tout brû - Thermador PCG366W | Installation Instructions - Page 39
signalétique dans le Guide d'utilisation et d'entretien. Laissez la GUIDE D'UTILISATION ET D'ENTRETIEN et les INSTRUCTIONS D'INSTALLATION au propriétaire acier inoxydable, utilisez le conditionneur Thermador en acier inoxydable, disponible dans le Thermador eShop (store.thermador.com/us). • NE - Thermador PCG366W | Installation Instructions - Page 40
o a la propiedad como resultado de la falta de cumplimiento de este aviso. Nota: Esto lo alerta sobre información y/o consejos importantes. Este electrodoméstico de THERMADOR® está hecho por BSH Home Appliances Corporation 1901 Main Street, Suite 600 Irvine, CA 92614 ¿Preguntas? 1-800-735-4328 www - Thermador PCG366W | Installation Instructions - Page 41
. • Una toma de tierra inadecuada para el aparato puede aumentar los riesgos de descarga eléctrica. • El hecho de no seguir las instrucciones de este manual puede causar la muerte o provocar un incendio o una descarga eléctrica. Examine el aparato después de desembalar lo. En el caso de que se hayan - Thermador PCG366W | Installation Instructions - Page 42
baja para una separación trasera de 0'' para todos los modelos. Se debe comprar por separado una consola trasera de protección baja de THERMADOR. • Una separación trasera respecto a una superficie cubierta con un material no combustibles (metal, baldosas de cerámica, ladrillo, mármol o piedra)* es - Thermador PCG366W | Installation Instructions - Page 43
9 INSTRUCCIONES IMPORTANTES DE SEGURIDAD LEA TODAS LAS INSTRUCCIONES ANTES DE CONTINUAR ADVERTENCIA El aparato sirve para cocinar. Basado en consideraciones de seguridad, nunca debe usarlo para calentar una habitación. PRECAUCIÓN Para eliminar el riesgo de sufrir quemaduras o que se produzca un - Thermador PCG366W | Installation Instructions - Page 44
capacidades de las campanas que se recomiendan usar con todas las estufas Thermador. Debido al alto calor de los quemadores de la placa de cocci nada que no sea la placa de 5 quemadores de 30". Consulte el manual de instalación del fabricante OTR para obtener información sobre los espacios que deben - Thermador PCG366W | Installation Instructions - Page 45
con un sistema de ventilación sobre la placa de cocción ni tampoco nada que no sea la placa de 5 quemadores de 30". Consulte el manual de instalación del fabricante OTR para obtener información sobre los espacios que deben quedar libres. • El suministro de gas y la alimentación eléctrica deben - Thermador PCG366W | Installation Instructions - Page 46
baja para una separación trasera de 0'' para todos los modelos. Se debe comprar por separado una consola trasera de protección baja de Thermador. • Una separación trasera respecto a una superficie cubierta con un material no combustibles (metal, baldosas de cerámica, ladrillo, mármol o piedra)* es - Thermador PCG366W | Installation Instructions - Page 47
Espacios libres con la consola trasera baja (1333"0) 0" 18" (457) 4300""(1(706126))- ( 91346"oro1r,4281"9 ) 5" (127) 0" 0" pulg. (mm) Las separaciones de materiales no combustibles no son parte del alcance ANSI Z21.1 y no están certificadas por CSA. Las separaciones de menos de 6'' (152 mm) - Thermador PCG366W | Installation Instructions - Page 48
Espacios libres con la adorno tipo isla incluida (1333"0) 6" (152) 4300""(1(706126))- 18" (457) (91346o"ro1r,24189" ) 5" (127) 0" 0" pulg. (mm) pulg. (mm) Las separaciones de materiales no combustibles no son parte del alcance ANSI Z21.1 y no están certificadas por CSA. Las separaciones de - Thermador PCG366W | Installation Instructions - Page 49
los códigos locales y/o por la autoridad local competente. • 30 pulg. (762 mm) min. parte inferior de la campana y la superficie de la estufa. • *Consulte el manual de instalación del microondas para conocer los espacios libres requeridos. Página. 47 - Thermador PCG366W | Installation Instructions - Page 50
Preparar la cubierta Instalar los soportes laterales (ambos lados) Tornillos embutidos Instalación tipo isla ¾" (19) mínimo D 22 13/16" (580) Detalle A A pulgadas (mm Instalación de pared con salpicadero trasero en la cubierta B D 23 5/16" (59) Detalle A A Detalle A: Cara del gabinete - Thermador PCG366W | Installation Instructions - Page 51
Profundidad de la entalladura Entrada de gas Se debe instalar una válvula manual externa al aparato, en un lugar de fácil acceso desde el 24" de profundidad. Instalación de una parrilla arriba cajones calentadores Thermador 7 5/8" (194) Tablita de soporte Instalar soporte de madera adicional - Thermador PCG366W | Installation Instructions - Page 52
ANSI Z223.1/NFPA54- edición actual. • Se debe instalar una válvula manual externa de cierre de gas, en un lugar accesible desde el frente para Asegúrese de cerrar el suministro de gas en la válvula de cierre manual antes de conectar el aparato • El instalador debe informar al consumidor de - Thermador PCG366W | Installation Instructions - Page 53
(LP), contacte al distribuidor donde compró la unidad o contacte a Thermador®. Observe todas las instrucciones en el esta unidad para una conversión aislado del sistema de tubería de suministro de gas cerrando la válvula manual de cierre durante cualquier prueba de presión de la línea de suministro - Thermador PCG366W | Installation Instructions - Page 54
9 PRECAUCIÓN Cuando conecte la unidad a gas propano, asegúrese que el tanque de gas propano venga con su propio regulador de alta presión además del regulador de presión que se incluye con la estufa. La presión de gas suministrada a este aparato no debe exceder 14.0 pulgadas de columna de agua (34.9 - Thermador PCG366W | Installation Instructions - Page 55
Instalación de la consola trasera de protección (opcional) 3. Fije la parte delantera de la consola trasera a la estufa con tres o cuatro tornillos e ½ pulg. (12,7 mm). Instale la consola trasera de protección antes de deslizar la parrilla a su posición final. 1. Según el modelo, quite los tres o - Thermador PCG366W | Installation Instructions - Page 56
para saber si hay fugas y que la unidad haya sido conectada con la fuente de la corriente eléctrica. Dar vuelta a la válvula de cierre manual del gas a la posición abierta. Para asegurar un funcionamiento correcto, se deben colocar correctamente las tapas de los quemadores STAR® sobre su base. Si la - Thermador PCG366W | Installation Instructions - Page 57
: • Debe haber una flama en el puerto de cada quemador. • No debe haber un espacio de aire entre la flama y el quemador. Llame a Thermador mantenimiento si: • Algún quemador no se enciende. • Algún quemador sigue quemándose con color amarillo. Puntas amarillas sobre conos: Normal para Gas LP - Thermador PCG366W | Installation Instructions - Page 58
a las Instrucciones de Conversión a LP. Se instaló la válvula de cierre manual de gas en un lugar accesible (sin tener que mover la parrilla). Se comprobó el producto Stainless Steel Conditioner de Thermador, disponible en la tienda en línea de Thermador (thermador.com/customer-care). • NO permita - Thermador PCG366W | Installation Instructions - Page 59
- Thermador PCG366W | Installation Instructions - Page 60
to help you with cleaning and care instructions, cooking tips, accessories, troubleshooting, and more. USA: 1-800-735-4328 thermador.com/customer-care Canada: 1-800-735-4328 thermador.ca/support Accessories and parts Filters, Thermador cleaners, teppanyaki pans, griddles, replacement parts, and
-
 1
1 -
 2
2 -
 3
3 -
 4
4 -
 5
5 -
 6
6 -
 7
7 -
8
-
9
-
10
-
11
-
12
-
13
-
14
-
15
-
16
-
17
-
18
-
19
-
20
-
21
-
22
-
23
-
24
-
25
-
26
-
27
-
28
-
29
-
30
-
31
-
32
-
33
-
34
-
35
-
36
-
37
-
38
-
39
-
40
-
41
-
42
-
43
-
44
-
45
-
46
-
47
-
48
-
49
-
50
-
51
-
52
-
53
-
54
-
55
-
56
-
57
-
58
-
59
-
60
 |
 |

Installation
INSTRUCTIONS
THERMADOR.COM
Professional Series Rangetops