Thermador PCG366W Installation Instructions - Page 15
Natural gas connection, Propane LP gas connection, To connect the gas, DO NOT, WARNING, CAUTION - lp conversion kit
 |
View all Thermador PCG366W manuals
Add to My Manuals
Save this manual to your list of manuals |
Page 15 highlights
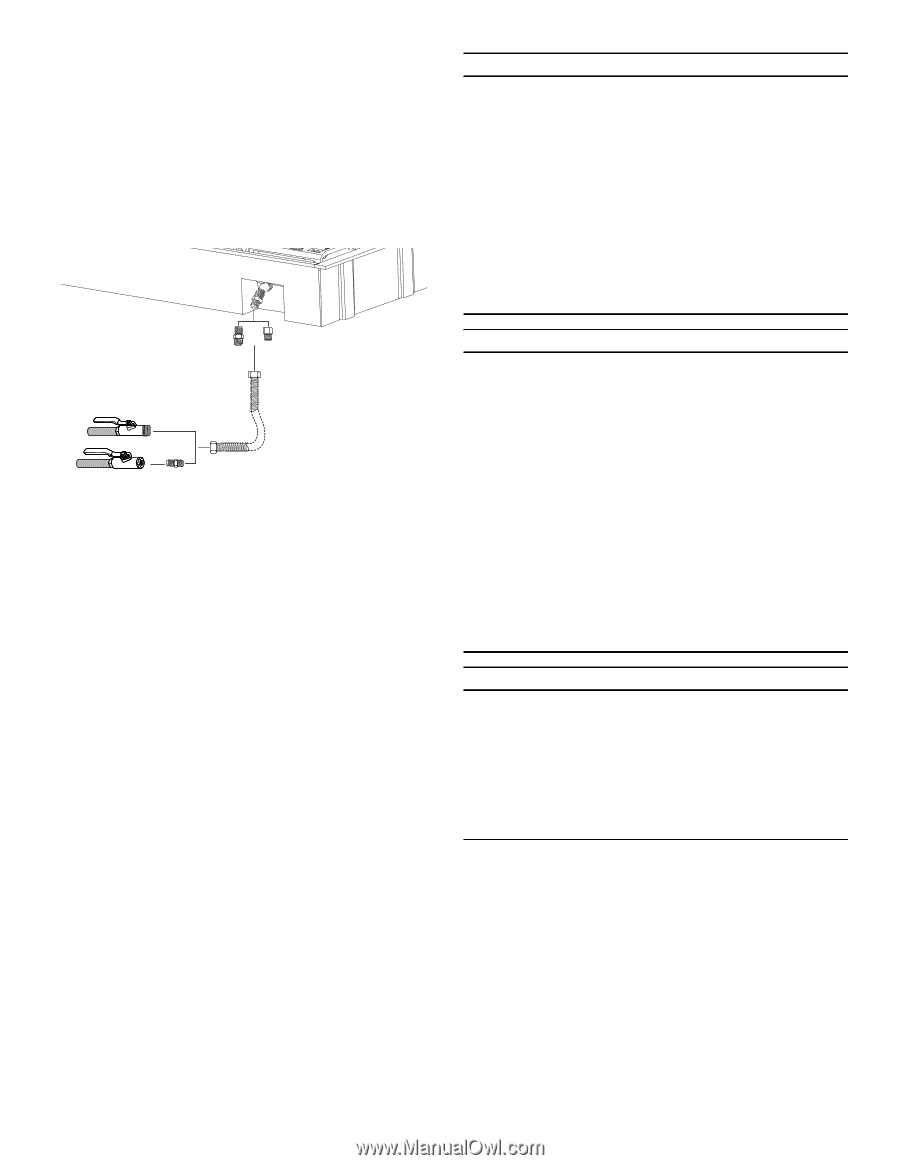
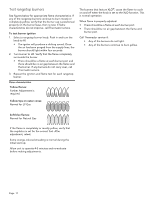
Natural gas connection To connect the gas 1. Make sure the gas supply is turned off at the manual shut-off valve before connecting the appliance. 2. Use a ¾'' (19 mm) flex line to connect between the gas supply and the appliance gas inlet. The gas supply line connection is located at the left rear of the appliance. The appliance gas inlet connection is ½'' (12.7 mm) NPT. ¾" (19) external threads ½" (12.7) internal threads { ¾" (19) Flex line inches (mm) • Use caution to avoid crimping the ¾'' (19 mm) flex line when making bends. Suggested length of flex line is 48" (1,219 mm); however, please check local codes for your area's requirements before installation. 3. Use pipe sealing compound or Teflon® tape on the pipe threads. DO NOT apply sealing compound or tape to flare fittings. Take care not to apply excessive pressure when tightening the fittings. 4. Leak testing of the appliance shall be in accordance with the following instructions. • Turn on gas and check supply line connections for leaks using a soap and water solution. • Bubbles forming indicate a gas leak. Repair all leaks immediately after finding them. Propane (LP) gas connection Rangetops are shipped by the factory to operate on natural gas. They must be converted for use with propane. Verify the type of gas being used at the installation site matches the type of gas used by the appliance. If the location site requires conversion from natural gas to propane (LP), contact the dealer where the unit was purchased or contact Thermador® to purchase a conversion kit. Obey all instructions in this kit for correct conversion of the gas regulator and settings for the gas valves. Field conversion must be done by qualified service personnel only. 9 WARNING If a gas conversion kit is used, the kit shall be installed by a qualified service personnel in accordance with the manufacturer's instructions and all applicable codes and requirements of the authority having jurisdiction. If the information in the instructions is not followed exactly, a fire, explosion or production of carbon monoxide may result causing property damage, personal injury or loss of life. The qualified service personnel is responsible for the proper installation of the kit. The installation is not proper and complete until the operation of the converted appliance is checked as specified in the manufacturer's instructions supplied with the kit. 9 CAUTION The appliance must be isolated from the gas supply piping system by closing its individual manual shut-off valve during any pressure testing of the gas supply piping system at test pressures equal to or less than 1/2 psig (3.5kPa). The appliance and its individual shut off valve must be disconnected from the gas supply piping system during any pressure testing of the system at test pressures in excess of 1/2 psig (3.5kPa.). When checking the manifold gas pressure, the inlet pressure to the regulator should be at least 7.0" (17.4 mb) W.C. for natural gas or 11.0" (27.4 mb) for propane. DO NOT attempt any adjustment of the pressure regulator. 9 CAUTION Save the orifices removed from the appliance for future use. When connecting unit to propane gas, make certain the propane gas tank is equipped with its own high pressure regulator in addition to the pressure regulator supplied with the appliance. The pressure of the gas supplied to the appliance regulator must not exceed a 14'' water column (34.9 mb). Page. 13
-
 1
1 -
2
-
3
-
4
-
5
-
6
-
7
-
8
-
9
-
 10
10 -
 11
11 -
 12
12 -
 13
13 -
 14
14 -
 15
15 -
 16
16 -
 17
17 -
 18
18 -
 19
19 -
 20
20 -
21
-
22
-
23
-
24
-
25
-
26
-
27
-
28
-
29
-
30
-
31
-
32
-
33
-
34
-
35
-
36
-
37
-
38
-
39
-
40
-
41
-
42
-
43
-
44
-
45
-
46
-
47
-
48
-
49
-
50
-
51
-
52
-
53
-
54
-
55
-
56
-
57
-
58
-
59
-
60
 |
 |