TomTom ONE 140 Quick Start Guide - Page 5
Installation - gps
 |
UPC - 636926029711
View all TomTom ONE 140 manuals
Add to My Manuals
Save this manual to your list of manuals |
Page 5 highlights
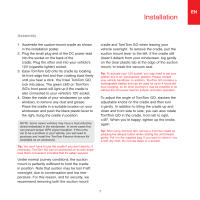
EN Installation Assembly 1. Assemble the suction-mount cradle as shown in the installation poster. 2. Plug the small plug end of the DC power lead into the socket on the back of the cradle. Plug the other end into your vehicle's 12V (cigarette lighter) socket. 3. Ease TomTom GO onto its cradle by locating its front edge first and then rotating back firmly until you hear a click. You'll feel TomTom GO lock into place. The green LED on TomTom GO's front panel will light up if the cradle is also connected to your vehicle's 12V socket. 4. Clean the inside of your windscreen (or side window), to remove any dust and grease. Place the cradle in a suitable location on your windscreen and push the black plastic lever to the right, fixing the cradle in position. NOTE: Some newer vehicles may have a heat reflective shield embedded in the windscreen. In some cases this can prevent proper GPS signal reception. If this turns out to be a problem in your vehicle, you will need to purchase and install the TomTom External Antenna Kit (available as an accessory). Tip: You don't have to use the cradle if you don't want to. If necessary, TomTom GO can be positioned on its own anywhere that's convenient, provided that it's safely secured. cradle and TomTom GO when leaving your vehicle overnight. To remove the cradle, pull the suction mount lever to the left. If the cradle still doesn't detach from your windscreen, tug gently on the clear plastic tab at the edge of the suction mount, to break the vacuum seal. Tip: To activate your 12V socket, you may need to set your ignition key in an 'Accessories' position. Please consult your vehicle handbook. In addition, TomTom GO contains a rechargeable battery and can be used for up to 4 hours without charging, so for short journeys it may be possible to do without the DC power lead for simpler and tidier operation. To adjust the angle of TomTom GO, slacken the adjustable knobs on the cradle and then turn it gently. In addition to tilting the cradle up and down and from side to side, you can also rotate TomTom GO in the cradle, from left to right, ±45°. When you're happy, tighten up the knobs again. Tip: After using TomTom GO, remove it from the cradle by pressing the release button while rotating the unit forward gently. Put it in the supplied bag. If you want to clean it, use a soft, dry cloth. Do not use water or a solvent. Under normal journey conditions, the suction mount is perfectly sufficient to hold the cradle in position. Note that suction may be lost if left overnight, due to condensation and low temperature. For this reason, and for security, we recommend removing both the suction mount TR 7
-
 1
1 -
 2
2 -
 3
3 -
 4
4 -
 5
5 -
 6
6 -
 7
7 -
 8
8 -
 9
9 -
 10
10 -
 11
11 -
12
-
13
-
14
-
15
-
16
-
17
-
18
-
19
-
20
-
21
-
22
 |
 |