Toshiba 32WL66 Owners Manual - Page 31
Input selection and, AV connections
 |
View all Toshiba 32WL66 manuals
Add to My Manuals
Save this manual to your list of manuals |
Page 31 highlights
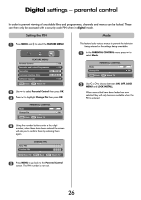
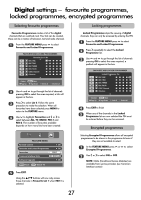
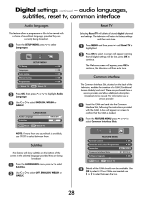
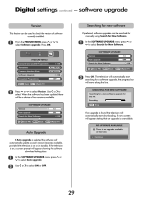
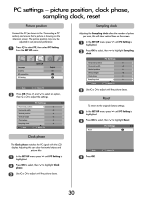
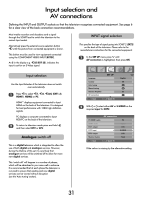
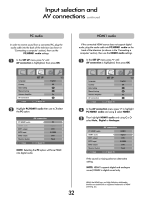
Input selection and AV connections Defining the INPUT and OUTPUT sockets so that the television recognises connected equipment. See page 6 for a clear view of the back connection recommendations. Most media recorders and decoders send a signal through the SCART lead to switch the television to the correct Input socket. Alternatively press the external source selection button B until the picture from connected equipment is shown. This button must be used to view equipment connected using the COMPONENT VIDEO INPUT (EXT3C). B An S in the display e.g. 2S (EXT 2S), indicates the input is set for an S-Video signal. INPUT signal selection This specifies the type of signal going into SCART 2 (EXT2) on the back of the television. Please refer to the manufacturers instructions for the connected equipment. 1 In the SET UP menu press Q until AV connection is highlighted, then press OK. Input selection Use the Input Selection if the television does not switch over automatically. B B B B 1 Press to select 1, 2, 3(C) (EXT1-3), HDMI1, HDMI2 or PC. HDMI™ displays equipment connected to Input HDMI on the back of the television. It is designed for best performance with 1080i high definition signals. PC displays a computer connected to Input RGB/PC on the back of the television. B 2 To return to television mode press and hold and then select DTV or ATV. Analogue switch-off This is a digital television which is integrated to allow the use of both digital and analogue services. However, during the lifetime of this set it is very likely that analogue services will be switched off to allow for more new digital services. This 'switch-off' will happen in a number of phases, which will be advertised in your area well in advance. It is recommended that at each phase the television is re-tuned to ensure that existing and new digital services can be viewed without disruption (see the 'Auto tuning' section). Language Country Auto tuning Manual tuning Antenna Amplifier AV connection SET UP MENU Back EXIT Watch TV 1/2 English UK OK OK On OK 2 With S or R select either AV or S-VIDEO as the required input for EXT2. PC/HDMI1 audio HDMI1 audio EXT1 output EXT2 input EXT2 output Monitor (Audio) MENU Back AV connection EXIT Watch TV PC Digital DTV S-VIDEO DTV Fixed If the colour is missing try the alternative setting. 31
-
 1
1 -
2
-
3
-
4
-
5
-
6
-
7
-
8
-
9
-
10
-
11
-
12
-
13
-
14
-
15
-
16
-
17
-
18
-
19
-
20
-
21
-
22
-
23
-
24
-
25
-
 26
26 -
 27
27 -
 28
28 -
 29
29 -
 30
30 -
 31
31 -
 32
32 -
 33
33 -
 34
34 -
 35
35 -
 36
36 -
37
-
38
-
39
-
40
 |
 |