Toshiba 32WL66 Owners Manual - Page 32
HDMI1 audio, PC audio - 32
 |
View all Toshiba 32WL66 manuals
Add to My Manuals
Save this manual to your list of manuals |
Page 32 highlights
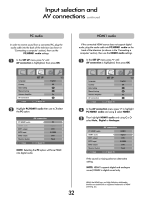
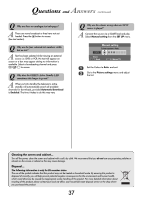
Input selection and AV connections continued PC audio In order to receive sound from a connected PC, plug the audio cable into the back of the television (as shown in 'Connecting a computer' section), then use the PC/HDMI1 audio settings. 1 In the SET UP menu press Q until AV connection is highlighted, then press OK. HDMI1 audio If the connected HDMI source does not support digital audio, plug the audio cable into PC/HDMI1 audio on the back of the television (as shown in the 'Connecting a computer' section), then use the HDMI1 audio settings. 1 In the SET UP menu press Q until AV connection is highlighted, then press OK. Language Country Auto tuning Manual tuning Antenna Amplifier AV connection SET UP MENU Back EXIT Watch TV 1/2 English UK OK OK On OK 2 Highlight PC/HDMI1 audio then use to R select the PC option. PC/HDMI1 audio HDMI1 audio EXT1 output EXT2 input EXT2 output Monitor (Audio) MENU Back AV connection EXIT Watch TV PC Digital DTV S-VIDEO DTV Fixed NOTE: Selecting the PC option will force HDMI into digital audio. Language Country Auto tuning Manual tuning Antenna Amplifier AV connection SET UP MENU Back EXIT Watch TV 1/2 English UK OK OK On OK 2 In the AV connection menu press Q to highlight PC/HDMI1 audio and using R select HDMI1. 3 Then highlight HDMI1 audio and using S or R select Auto., Digital or Analogue. PC/HDMI1 audio HDMI1 audio EXT1 output EXT2 input EXT2 output Monitor (Audio) MENU Back AV connection EXIT Watch TV HDMI1 Digital DTV S-VIDEO DTV Fixed If the sound is missing select an alternative setting. NOTE: HDMI1 supports digital and analogue sound, HDMI2 is digital sound only. 32 HDMI, the HDMI logo, and High-Definition Multimedia Interface are trademarks or registered trademarks of HDMI Licensing, LLC.
-
 1
1 -
2
-
3
-
4
-
5
-
6
-
7
-
8
-
9
-
10
-
11
-
12
-
13
-
14
-
15
-
16
-
17
-
18
-
19
-
20
-
21
-
22
-
23
-
24
-
25
-
26
-
 27
27 -
 28
28 -
 29
29 -
 30
30 -
 31
31 -
 32
32 -
 33
33 -
 34
34 -
 35
35 -
 36
36 -
 37
37 -
38
-
39
-
40
 |
 |