Toshiba 42HM66 Owner's Manual - English - Page 33
Lamp unit replacement and care continued
 |
UPC - 022265251430
View all Toshiba 42HM66 manuals
Add to My Manuals
Save this manual to your list of manuals |
Page 33 highlights
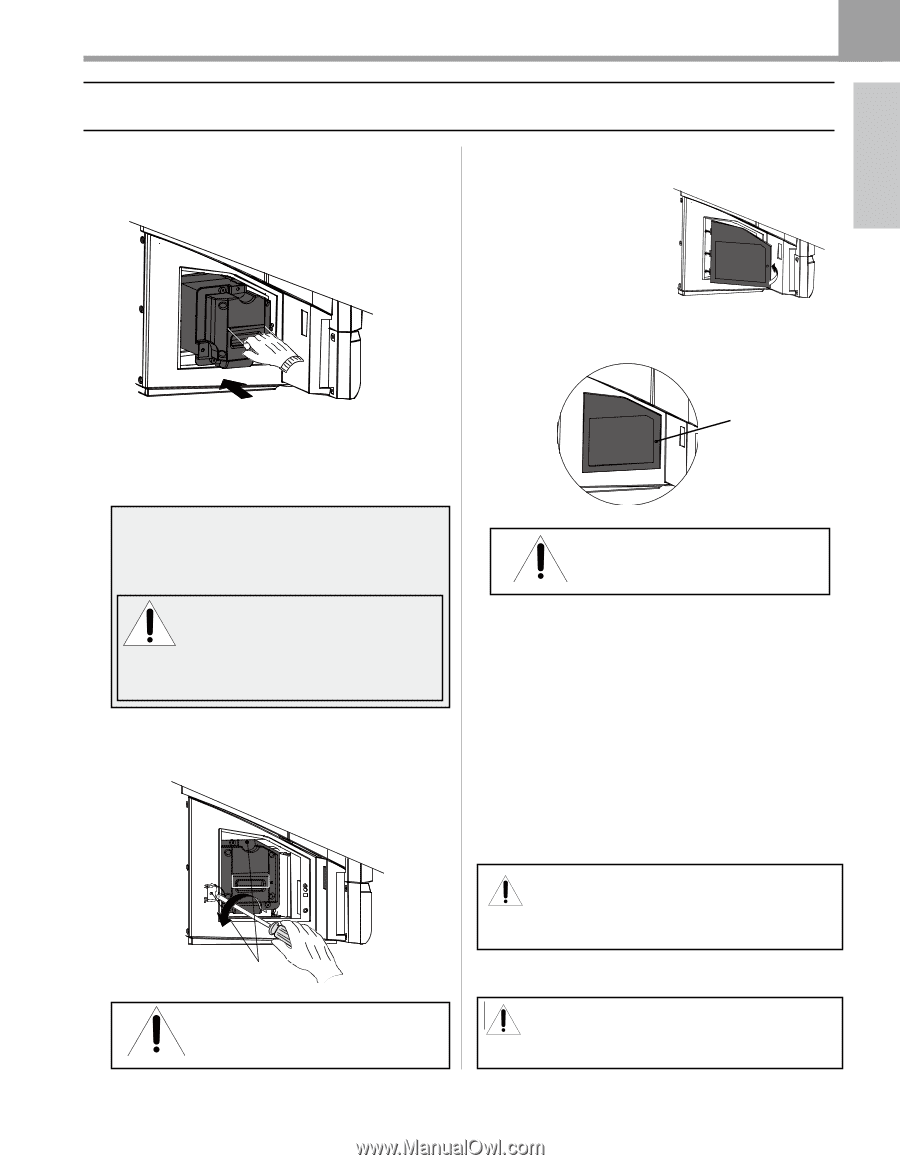
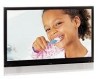
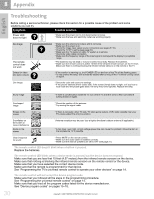
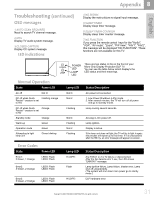
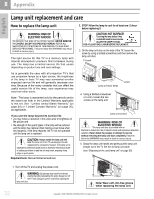
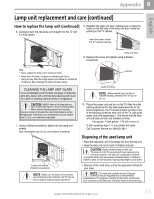
English Appendix 8 Lamp unit replacement and care (continued) How to replace the lamp unit (continued) 6. Carefully insert the new lamp unit straight into the TV until it is fully seated. 8. Reattach the lamp unit door, making sure to insert the hooks on the left side of the lamp unit door inside the opening in the TV cabinet. Insert the hooks inside the TV cabinet opening. Lamp unit door 9. Replace the screw and tighten using a Slotted screwdriver. Note : • Never subject the lamp unit to excessive shock. • Never touch the lamp unit glass or otherwise get it dirty. Doing so may affect the image quality and reduce the service life of the lamp. See "Cleaning the lamp unit glass" below. CLEANING THE LAMP UNIT GLASS If you accidentally touch the lamp unit glass or otherwise get it dirty, wipe it with a lint-free lens cleaning cloth (such as a cloth for cleaning camera lenses or eyeglasses). Screw Lamp unit door NOTE : Make sure the lamp unit door is installed securely, otherwise, the TV may not turn on. CAUTION: NEVER clean a hot lamp with any type of flammable liquid or aerosol cleaning agent. Many ordinary cleaning agents (such as glass cleaners) contain chemicals that may be flammable at certain temperatures. If the lamp unit is not allowed to cool for at least one (1) hour, such chemicals may ignite. 7. Using a Slotted screwdriver, tighten the two lamp unit screws. Note: Hand-tighten only. Do not use an electric screwdriver. 10. Plug in the power cord and turn on the TV. After the initial warmup period (which may take several seconds for full picture brightness), the TV should operate normally. If any of the following conditions exist, turn off the TV, unplug the power cord, and repeat steps 1-9 to ensure that the lamp unit and lamp unit door are installed correctly: • No picture • Dark picture • TV will not turn on If, after repeating steps 1-9, the problem still exists: Call Customer Service at 1-800-631-3811. Disposing of the used lamp unit • Place the used lamp unit in the empty box from the new unit. • Keep the lamp unit out of reach of children and pets. Lamp unit screws (Slotted screwdriver) CAUTION: The ligAhtlwninagyssymhabonldinlethtehterialnagmlepteullsnyitouwtihthat cthaere. The lamp uvnolittagine itnhsiisdeTtVhiswparosdudcet smiagynbeedstfroonrgseanfoeugrehptolacement by cause an electric shock. DO NOT TRY TO SERVICE consumersT;HhISoPwReOvDeUrC, TifYtOhUeRlSaEmLFp. unit is subjected to intentional or accidental abuse (such as excessive mechanical abuse or handling by children or pets), the unit may break, exposing sharp edges or pinch points. The exclamation mark in the triangle tells you that important operating and maintenance instructions • Dispose of the used lamp follow this symbol. unit by the approved method for your area. NOTE : Make sure the lamp unit and screws are installed securely; otherwise, the TV may not turn on and the lamp life may be shortened. NOTE :The lightning symbol in the triangle tells you that the voTlthagee ilnasmidepthuisnpirtocduocnt mtaaiynbse smtroenrgceunroyu.gDh tiosposal of mercurcyaumseaayn ebleectrriecgshuolcakt.eDdO NdOuTeTRtYoTeOnSvEiRrVoICnEmental considerations. FoTrHdISisPRpOoDsUaClToYOr UrReScEyLcF.ling information, contact your local authorities or the Electronic Industries Alliance (www.eiae.org). The exclamation mark in the triangle tells you that important operating and maintenance instructions follow this symbol. Copyright © 2006 TOSHIBA CORPORATION. All rights reserved. 33
-
 1
1 -
2
-
3
-
4
-
5
-
6
-
7
-
8
-
9
-
10
-
11
-
12
-
13
-
14
-
15
-
16
-
17
-
18
-
19
-
20
-
21
-
22
-
23
-
24
-
25
-
26
-
27
-
 28
28 -
 29
29 -
 30
30 -
 31
31 -
 32
32 -
 33
33 -
 34
34 -
 35
35 -
 36
36
 |
 |