Toshiba 47HL167 Owner's Manual - English - Page 63
Using the PC settings feature, Setting the PC Audio
 |
UPC - 022265000724
View all Toshiba 47HL167 manuals
Add to My Manuals
Save this manual to your list of manuals |
Page 63 highlights
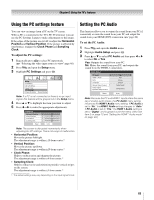
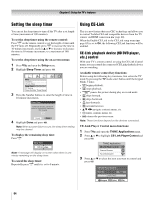
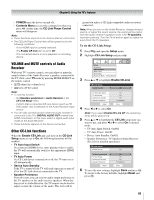
Chapter 6: Using the TV's features Using the PC settings feature Setting the PC Audio You can view an image from a PC on the TV screen. When a PC is connected to the TV's PC IN terminal, you can use the PC Settings feature to make adjustments to the image. If the edges of the picture are cut off, readjust the Horizontal Position and Vertical Position. If the picture is affected by interference, readjust the Clock Phase and Sampling Clock. To adjust the PC settings: 1 Repeatedly press + to select PC input mode (- "Selecting the video input source to view" page 46). 2 Press Y and open the Setup menu. 3 Highlight PC Settings and press T. Setup Installation CE-Link Setup Sleep Timer PC Settings Power-On Mode Power-Saving Note: If a PC is not connected or there is no pc input signal, this feature will be grayed out in the Setup menu. 4 Press B or b to highlight the item you want to adjust. 5 Press C or c to make the appropriate adjustments. PC Settings Horizontal Position Vertical Position Clock Phase Sampling Clock Reset 0 0 0 0 Done Note: The screen is disrupted momentarily when adjusting the PC settings. This is not a sign of malfunction. • Horizontal Position: Moves the picture left/right. The adjustment range is within ±10 from center.* • Vertical Position: Moves the picture up/down. The adjustment range is within ±10 from center.* • Clock Phase: Helps to reduce noise and sharpen the picture. The adjustment range is within ±4 from center.* • Sampling Clock: Helps to reduce noise and minimize periodic vertical stripes on the screen. The adjustment range is within ±5 from center.* * The default settings may vary depending on the input signal format. This function allows you to output the sound from your PC (if connected) or mute the sound from your PC and output the sound from your HDMI (DVI) connection. (- page 22) To set the PC Audio: 1 Press Y and open the Audio menu. 2 Highlight Audio Setup and press T. 3 Press B or b to select PC Audio and then press C or c to select No or Yes. Yes: Outputs the sound from your PC. No: Mutes the sound from your PC, and outputs the sound from the HDMI-1 connection. Audio Setup PC Audio HDMI 1 Audio MTS Language Optical Output Format Dolby Digital Dynamic Range Control No Auto Stereo English Dolby Digital Compressed Reset Done Note: Because the PC and HDMI-1 inputs share the same set of analog audio inputs, the PC Audio menu setting influences the HDMI 1 Audio menu setting. If PC Audio is set to "No," the HDMI 1 Audio setting changes to "Auto." If PC Audio is set to "Yes," the HDMI 1 Audio setting is set to "Digital" and is grayed out in the menu. (Also see item 5 on page 12 and "Setting the HDMI™ Audio mode" on page 43.) 63
-
 1
1 -
2
-
3
-
4
-
5
-
6
-
7
-
8
-
9
-
10
-
11
-
12
-
13
-
14
-
15
-
16
-
17
-
18
-
19
-
20
-
21
-
22
-
23
-
24
-
25
-
26
-
27
-
28
-
29
-
30
-
31
-
32
-
33
-
34
-
35
-
36
-
37
-
38
-
39
-
40
-
41
-
42
-
43
-
44
-
45
-
46
-
47
-
48
-
49
-
50
-
51
-
52
-
53
-
54
-
55
-
56
-
57
-
 58
58 -
 59
59 -
 60
60 -
 61
61 -
 62
62 -
 63
63 -
 64
64 -
 65
65 -
 66
66 -
 67
67 -
 68
68 -
69
-
70
-
71
-
72
-
73
-
74
-
75
-
76
-
77
-
78
-
79
-
80
-
81
-
82
 |
 |
