Toshiba 65HM167 Owners Manual - Page 11
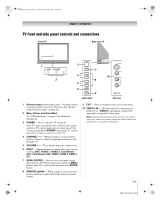
TV front and side panel controls and connections
 |
UPC - 022265000496
View all Toshiba 65HM167 manuals
Add to My Manuals
Save this manual to your list of manuals |
Page 11 highlights
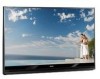
50HM67_EN.book Page 11 Thursday, March 29, 2007 11:28 AM Chapter 1: Introduction TV front and side panel controls and connections Front of TV Right side of TV 1 2 3 7 4 8 5 6 9 Control panel 10 Side panel 1 Remote sensor (behind the screen) - Point the remote control toward this area of the TV screen (- "Remote control effective range" on page 22). 2 Blue, Yellow, and Green/Red See "LED indications" on page 62 for additional information. 3 POWER - Press to turn the TV on and off. If the TV stops responding to the controls on the remote control or TV control panel and you cannot turn off the TV, press and hold the POWER button on the TV control panel for 5 or more seconds to reset the TV. 4 CHANNEL Uu - When no menu is on-screen, these buttons change the channel (programmed channels only; - page 32). 5 VOLUME + - - These buttons adjust the volume level. 6 INPUT - Repeatedly press to change the source you are viewing (ANT, VIDEO 1, VIDEO 2, ColorStream HD1, ColorStream HD2, HDMI 1, HDMI 2, HDMI 3, PC). 7 MENU (ENTER) - Press to access the menu system (- pages 29-30). When a menu is on-screen, the MENU button on the TV's control panel functions as the ENTER button. 8 ARROWS BbC c - When a menu is on-screen, these buttons function as up/down/left/right menu navigation buttons. 9 EXIT - Press to instantly close an on-screen menu. 10 VIDEO-2 IN - The side panel A/V connections are referred to as "VIDEO 2" and include standard A/V inputs plus an optional S-video input. Note: Standard (composite) video and S-video cables carry only video information; separate audio cables are required for a complete connection. 11 HM67 (E/F) Web 213:276
-
 1
1 -
2
-
3
-
4
-
5
-
 6
6 -
 7
7 -
 8
8 -
 9
9 -
 10
10 -
 11
11 -
 12
12 -
 13
13 -
 14
14 -
 15
15 -
 16
16 -
17
-
18
-
19
-
20
-
21
-
22
-
23
-
24
-
25
-
26
-
27
-
28
-
29
-
30
-
31
-
32
-
33
-
34
-
35
-
36
-
37
-
38
-
39
-
40
-
41
-
42
-
43
-
44
-
45
-
46
-
47
-
48
-
49
-
50
-
51
-
52
-
53
-
54
-
55
-
56
-
57
-
58
-
59
-
60
-
61
-
62
-
63
-
64
-
65
-
66
-
67
-
68
-
69
-
70
-
71
-
72
-
73
-
74
 |
 |
