Toshiba D-VR4SU Owners Manual - Page 26
General Settings / Setting the Video
 |
View all Toshiba D-VR4SU manuals
Add to My Manuals
Save this manual to your list of manuals |
Page 26 highlights
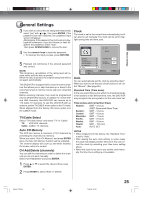
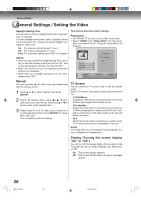
Various settings General Settings / Setting the Video Daylight Saving Time You can set the clock to daylight saving time automatically or manually. To select daylight saving time, select "Daylight Saving Time" and select "On", while to cancel the daylight saving time, select "Off". On: For manual setting (forward 1 hour) Off: For manual setting (back 1 hour) Auto: For automatic setting (read XDS in the signal) NOTES: • When you want to set the Daylight Saving Time manu- ally, on the first Sunday in April you set it to "On", and on the last Sunday in October you set it to "Off". • When the clock is not set, the daylight saving time setting is not available. • When there is no daylight saving time in your area, always select "Off". Manual You can manually set the date, year and present time with the remote control. 1 Press or to select "Manual" and press ENTER. 2 Select the desired items using or (month, date, year, hour, and minute), then press or to set the value of the selected item. 3 Repeat step 2 to set the date, year, present time and Daylight Saving Time. Press ENTER. The Setup Menu will close. This completes clock time setting. This section describes video settings. Preparation: • Turn ON the TV and set it to the video input mode. • Select "VIDEO" from "Setup Menu". For the proce- dure, see steps 1 to 3 in "Using the Setup Menu" on page 23. VIDEO TV Screen Display Line1 Input Line2 Input E.B.L 4:3 Pan&Scan 4:3 LetterBox 16:9 SETUP Select End ENTER Enter RETURN Back TV Screen You can select the TV screen size to suit the screen image. Select "TV Screen" and select screen size from the below. 4:3 Pan&Scan It displays a wide picture across the whole screen with left and right edges automatically cut off. 4:3 LetterBox Select this mode when connecting to a conventional TV. When playing back a wide screen DVD disc, it displays a wide picture with black bands at the top and bottom of screen. 16:9 Select this mode when connecting to a wide-screen TV. A wide-screen picture is displayed in full size. NOTE: If the DVD disc is not formatted in the Pan&Scan format, it displays a 4:3 aspect ratio. Display (Turning the screen display "On" or "Off") You can turn off the screen display that is output to the TV screen by this unit. Select "Display" and select "On" or "Off". On: The screen display appears. Off: Nothing but the Setup Menu and error messages appear. 26 2H5-01 P22-30 26 7/25/05, 23:19
-
 1
1 -
2
-
3
-
4
-
5
-
6
-
7
-
8
-
9
-
10
-
11
-
12
-
13
-
14
-
15
-
16
-
17
-
18
-
19
-
20
-
 21
21 -
 22
22 -
 23
23 -
 24
24 -
 25
25 -
 26
26 -
 27
27 -
 28
28 -
 29
29 -
 30
30 -
 31
31 -
32
-
33
-
34
-
35
-
36
-
37
-
38
-
39
-
40
-
41
-
42
-
43
-
44
-
45
-
46
-
47
-
48
-
49
-
50
-
51
-
52
-
53
-
54
-
55
-
56
-
57
-
58
-
59
-
60
-
61
-
62
-
63
-
64
-
65
-
66
-
67
-
68
-
69
-
70
-
71
-
72
-
73
-
74
-
75
-
76
-
77
-
78
-
79
-
80
-
81
-
82
-
83
-
84
-
85
-
86
-
87
-
88
-
89
-
90
-
91
-
92
 |
 |
