Toshiba DMF102XKU Owner's Manual - English - Page 54
Modify Network Settings, Wi-Fi Settings, Online Service Settings, Using, Online Services
 |
UPC - 022265003084
View all Toshiba DMF102XKU manuals
Add to My Manuals
Save this manual to your list of manuals |
Page 54 highlights
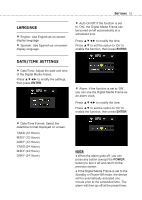
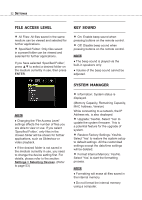
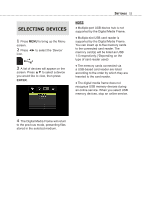
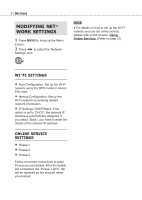
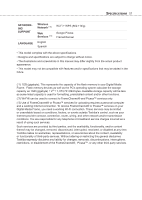
54 SETTINGS MODIFYING NET- WORK SETTINGS 1 Press MENU to bring up the Menu screen. 2 Press ◄► to select the 'Network Settings' icon. NOTE ♦ For details on how to set up the Wi-Fi network and use the online service, please refer to the chapter: Using Online Services. (Refer to page 37) WI-FI SETTINGS • Auto Configuration: Set up the Wi-Fi network using the WPS mode or device PIN code. • Manual Configuration: Set up the Wi-Fi network by entering related network information. • IP Settings: DHCP/Static. If the option is set to 'DHCP', the network IP address is automatically assigned. If you select 'Static', you need to enter the details of the network IP address. ONLINE SERVICE SETTINGS • Picasa 1 • Picasa 2 • Picasa 3 Follow on-screen instructions to enter Picasa account details. After the details are completed, the 'Picasa 1 (2/3) ' tab will be replaced by the account name you entered.
-
 1
1 -
2
-
3
-
4
-
5
-
6
-
7
-
8
-
9
-
10
-
11
-
12
-
13
-
14
-
15
-
16
-
17
-
18
-
19
-
20
-
21
-
22
-
23
-
24
-
25
-
26
-
27
-
28
-
29
-
30
-
31
-
32
-
33
-
34
-
35
-
36
-
37
-
38
-
39
-
40
-
41
-
42
-
43
-
44
-
45
-
46
-
47
-
48
-
 49
49 -
 50
50 -
 51
51 -
 52
52 -
 53
53 -
 54
54 -
 55
55 -
 56
56 -
 57
57 -
 58
58 -
 59
59 -
60
-
61
-
62
-
63
-
64
-
65
-
66
-
67
-
68
-
69
-
70
-
71
-
72
-
73
-
74
-
75
-
76
-
77
-
78
 |
 |
