Toshiba P505 S8940 Resource Guide - Page 44
Inserting an optical disc (tray-type drive), Available on certain models
 |
UPC - 883974252596
View all Toshiba P505 S8940 manuals
Add to My Manuals
Save this manual to your list of manuals |
Page 44 highlights
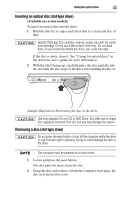
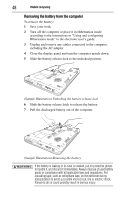
44 Using the optical drive Inserting an optical disc (tray-type drive) (Available on certain models) Before putting on headphones to listen, turn the volume down. Do not set the volume too high when using the headphones. Continuous exposure to loud sound can harm your hearing. To insert an optical disc into the drive: 1 Make sure the computer is turned on. The drive will not open if the computer's power is off. 2 Make sure the drive's in-use indicator light is off. 3 Press the drive's eject button. The disc tray slides partially out of the drive (about 1 inch). 4 Grasp the tray and pull it fully open. 5 Hold the disc by its edges and check that it is free of dust. If the disc is dusty, clean it. 6 Place the disc carefully in the disc tray, label side up. (Sample Illustration) Positioning the disc in the drive 7 Gently press the disc onto the center spindle until it clicks into place. Handle DVDs and CDs carefully, making contact only with the center hole and edge. Do not touch the surface of the disc. Do not stack discs. If you incorrectly handle the discs, you could lose data. 8 Make sure the disc is completely on the spindle and is lying flat on the tray.
-
 1
1 -
2
-
3
-
4
-
5
-
6
-
7
-
8
-
9
-
10
-
11
-
12
-
13
-
14
-
15
-
16
-
17
-
18
-
19
-
20
-
21
-
22
-
23
-
24
-
25
-
26
-
27
-
28
-
29
-
30
-
31
-
32
-
33
-
34
-
35
-
36
-
37
-
38
-
 39
39 -
 40
40 -
 41
41 -
 42
42 -
 43
43 -
 44
44 -
 45
45 -
 46
46 -
 47
47 -
 48
48 -
 49
49 -
50
-
51
-
52
-
53
-
54
-
55
-
56
-
57
-
58
-
59
-
60
 |
 |