Toshiba Portege R30-A PT343C-01N01J Users Manual Canada; English - Page 88
ExpressCard, Inserting an ExpressCard
 |
View all Toshiba Portege R30-A PT343C-01N01J manuals
Add to My Manuals
Save this manual to your list of manuals |
Page 88 highlights
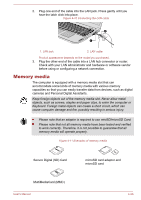
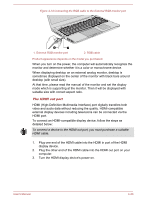
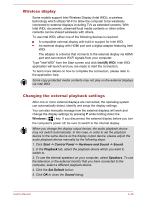
ExpressCard Some models are equipped with a single ExpressCard slot into which any ExpressCard device that meets industry standards, either manufactured by TOSHIBA or another vendor, can be installed. The slot supports hot plug connection and utilizes the PCI Express interface that supports the reading and writing of data at a theoretical maximum rate of 2.5Gbps. Inserting an ExpressCard The Windows hot-install feature allows you to insert ExpressCards while the computer is turned on. Do not insert an ExpressCard while the computer is in Sleep Mode or Hibernation Mode as you may find that some cards do not work properly. To insert an ExpressCard, follow the steps as detailed below: 1. Press the Dummy card in order to eject the Dummy card partially out of the computer. 2. Grasp the Dummy card and draw it. 3. Insert the ExpressCard into the ExpressCard slot on your computer. 4. Press the ExpressCard gently to ensure a firm connection is made. Figure 4-13 Inserting the ExpressCard 1 2 1. ExpressCard slot 2. ExpressCard 5. After inserting the ExpressCard you should refer to its documentation and also check the configuration in Windows in order to ensure that it is correct. Removing an ExpressCard To remove an ExpressCard, follow the steps as detailed below. 1. Open the Safely Remove Hardware and Eject Media icon on the Windows Taskbar. 2. Point to ExpressCard and click the left Touch Pad control button. 3. Press the ExpressCard in order to eject the ExpressCard partially out of the computer. 4. Grasp the ExpressCard and remove it. 5. Insert the Dummy card into the ExpressCard slot. User's Manual 4-40
-
 1
1 -
2
-
3
-
4
-
5
-
6
-
7
-
8
-
9
-
10
-
11
-
12
-
13
-
14
-
15
-
16
-
17
-
18
-
19
-
20
-
21
-
22
-
23
-
24
-
25
-
26
-
27
-
28
-
29
-
30
-
31
-
32
-
33
-
34
-
35
-
36
-
37
-
38
-
39
-
40
-
41
-
42
-
43
-
44
-
45
-
46
-
47
-
48
-
49
-
50
-
51
-
52
-
53
-
54
-
55
-
56
-
57
-
58
-
59
-
60
-
61
-
62
-
63
-
64
-
65
-
66
-
67
-
68
-
69
-
70
-
71
-
72
-
73
-
74
-
75
-
76
-
77
-
78
-
79
-
80
-
81
-
82
-
 83
83 -
 84
84 -
 85
85 -
 86
86 -
 87
87 -
 88
88 -
 89
89 -
 90
90 -
 91
91 -
 92
92 -
 93
93 -
94
-
95
-
96
-
97
-
98
-
99
-
100
-
101
-
102
-
103
-
104
-
105
-
106
-
107
-
108
-
109
-
110
-
111
-
112
-
113
-
114
-
115
-
116
-
117
-
118
-
119
-
120
-
121
-
122
-
123
-
124
-
125
-
126
-
127
-
128
-
129
-
130
-
131
-
132
-
133
-
134
-
135
-
136
-
137
-
138
-
139
-
140
-
141
-
142
-
143
-
144
-
145
-
146
-
147
-
148
-
149
-
150
-
151
-
152
-
153
-
154
-
155
-
156
 |
 |