Toshiba Portege R30-A PT343C-01N01J Users Manual Canada; English - Page 90
Removing a Smart Card, External Display, Connecting an external display
 |
View all Toshiba Portege R30-A PT343C-01N01J manuals
Add to My Manuals
Save this manual to your list of manuals |
Page 90 highlights
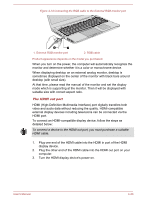
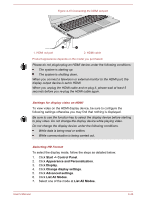
Removing a Smart Card To remove a Smart Card, follow the steps as detailed below: 1. Open the Safely Remove Hardware and Eject Media icon on the Windows Taskbar. Before removing the Smart Card, confirm that the Smart Card is not working with any program or system. Be careful not to bend the Smart Card while removing it from the computer. 2. Point to Smart Card and click the left Touch Pad control button. 3. Grasp the Smart Card and remove it. External Display Your computer video capabilities can be enhanced with additional displays. External displays allows you to share your desktop or extend the desktop area. As the port operation of all external monitors have not been confirmed, some display devices may not function properly. Connecting an external display Your computer comes with a built-in display, but you can also connect other external displays via available ports on the computer. External RGB monitor port An external analog monitor can be connected to the External RGB monitor port on the computer. To connect an external analog monitor, follow the steps as detailed below: 1. Connect the RGB cable to the External RGB monitor port. There are no fastening screws for an external monitor cable on the External RGB monitor port. However, external monitor cables which have connectors with fastening screws can still be used. 2. Turn the external monitor's power on. User's Manual 4-42
-
 1
1 -
2
-
3
-
4
-
5
-
6
-
7
-
8
-
9
-
10
-
11
-
12
-
13
-
14
-
15
-
16
-
17
-
18
-
19
-
20
-
21
-
22
-
23
-
24
-
25
-
26
-
27
-
28
-
29
-
30
-
31
-
32
-
33
-
34
-
35
-
36
-
37
-
38
-
39
-
40
-
41
-
42
-
43
-
44
-
45
-
46
-
47
-
48
-
49
-
50
-
51
-
52
-
53
-
54
-
55
-
56
-
57
-
58
-
59
-
60
-
61
-
62
-
63
-
64
-
65
-
66
-
67
-
68
-
69
-
70
-
71
-
72
-
73
-
74
-
75
-
76
-
77
-
78
-
79
-
80
-
81
-
82
-
83
-
84
-
 85
85 -
 86
86 -
 87
87 -
 88
88 -
 89
89 -
 90
90 -
 91
91 -
 92
92 -
 93
93 -
 94
94 -
 95
95 -
96
-
97
-
98
-
99
-
100
-
101
-
102
-
103
-
104
-
105
-
106
-
107
-
108
-
109
-
110
-
111
-
112
-
113
-
114
-
115
-
116
-
117
-
118
-
119
-
120
-
121
-
122
-
123
-
124
-
125
-
126
-
127
-
128
-
129
-
130
-
131
-
132
-
133
-
134
-
135
-
136
-
137
-
138
-
139
-
140
-
141
-
142
-
143
-
144
-
145
-
146
-
147
-
148
-
149
-
150
-
151
-
152
-
153
-
154
-
155
-
156
 |
 |