Toshiba Qosmio F45-AV410 User Guide - Page 134
Using the Bridge Media Adapter Slot, Inserting memory media
 |
View all Toshiba Qosmio F45-AV410 manuals
Add to My Manuals
Save this manual to your list of manuals |
Page 134 highlights
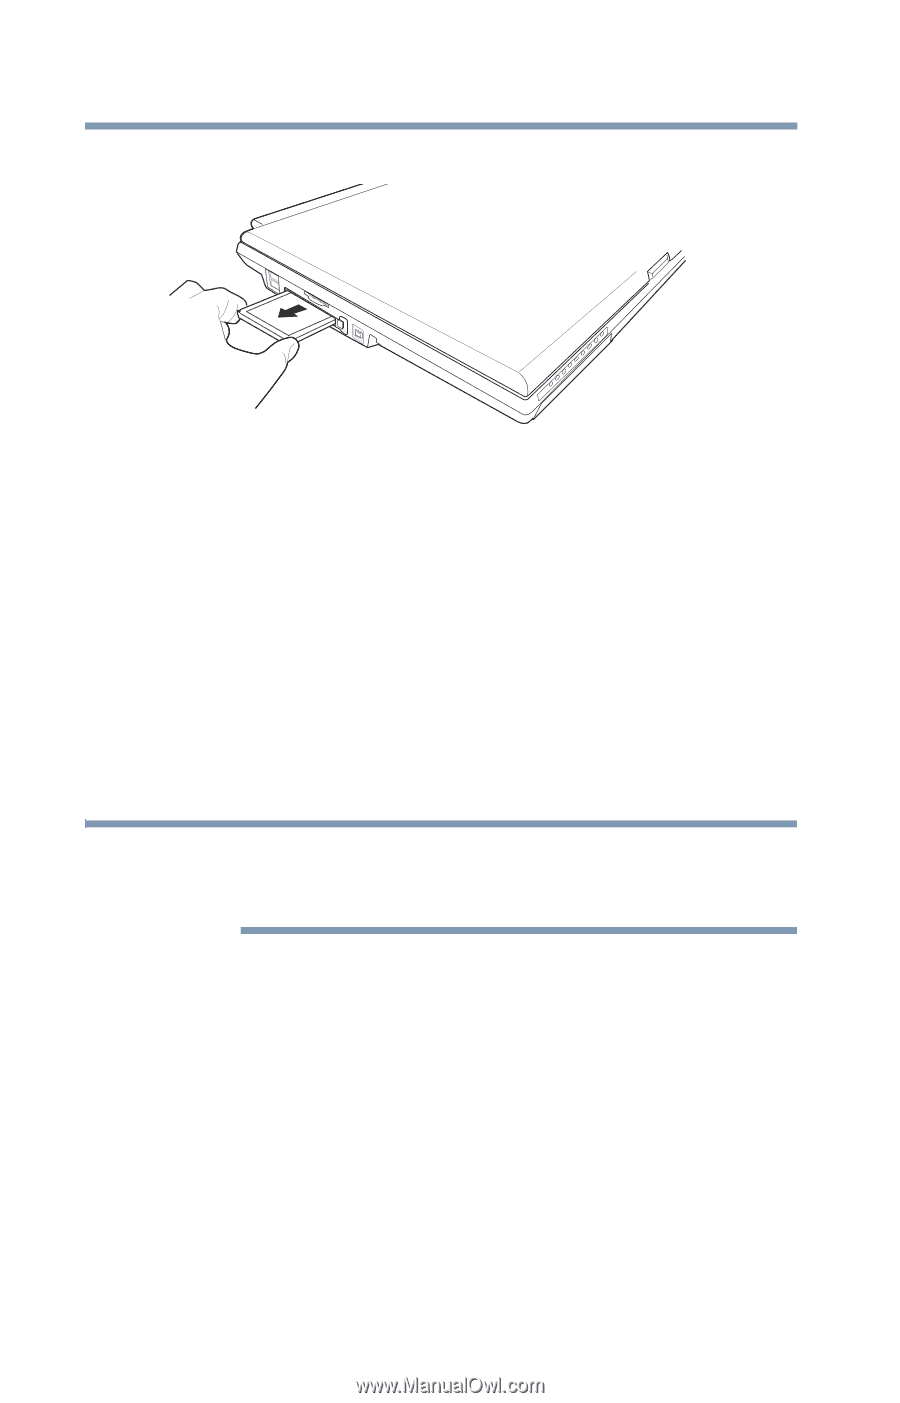
134 Exploring Your Computer's Features Using the Bridge Media Adapter Slot 4 Grasp the edges of the ExpressCard and slide it out of the slot. (Sample Illustration) Removing an ExpressCard Using the Bridge Media Adapter Slot (Available on certain models) The Bridge Media Adapter slot (available on certain models) supports the use of Memory Stick™, Memory Stick™ PRO, Secure Digital™ (SD™), MMC™ (MultiMediaCard™), or xD-Picture Card™ media. These media can be used with a variety of digital products: digital music players, cellular phones, PDAs, digital cameras, digital video camcorders, etc. The Bridge Media Adapter slot may also support other types of media. For a complete list of supported media, visit Toshiba's Web site at accessories.toshiba.com. NOTE Do not use the Copy Disk function for this type of media. To copy data from one media to another, use the drag-and-drop feature of the Windows® operating system. Inserting memory media The following instructions apply to all types of supported media devices. 1 Turn the media so that the contacts (metal areas) are face down.
-
 1
1 -
2
-
3
-
4
-
5
-
6
-
7
-
8
-
9
-
10
-
11
-
12
-
13
-
14
-
15
-
16
-
17
-
18
-
19
-
20
-
21
-
22
-
23
-
24
-
25
-
26
-
27
-
28
-
29
-
30
-
31
-
32
-
33
-
34
-
35
-
36
-
37
-
38
-
39
-
40
-
41
-
42
-
43
-
44
-
45
-
46
-
47
-
48
-
49
-
50
-
51
-
52
-
53
-
54
-
55
-
56
-
57
-
58
-
59
-
60
-
61
-
62
-
63
-
64
-
65
-
66
-
67
-
68
-
69
-
70
-
71
-
72
-
73
-
74
-
75
-
76
-
77
-
78
-
79
-
80
-
81
-
82
-
83
-
84
-
85
-
86
-
87
-
88
-
89
-
90
-
91
-
92
-
93
-
94
-
95
-
96
-
97
-
98
-
99
-
100
-
101
-
102
-
103
-
104
-
105
-
106
-
107
-
108
-
109
-
110
-
111
-
112
-
113
-
114
-
115
-
116
-
117
-
118
-
119
-
120
-
121
-
122
-
123
-
124
-
125
-
126
-
127
-
128
-
 129
129 -
 130
130 -
 131
131 -
 132
132 -
 133
133 -
 134
134 -
 135
135 -
 136
136 -
 137
137 -
 138
138 -
 139
139 -
140
-
141
-
142
-
143
-
144
-
145
-
146
-
147
-
148
-
149
-
150
-
151
-
152
-
153
-
154
-
155
-
156
-
157
-
158
-
159
-
160
-
161
-
162
-
163
-
164
-
165
-
166
-
167
-
168
-
169
-
170
-
171
-
172
-
173
-
174
-
175
-
176
-
177
-
178
-
179
-
180
-
181
-
182
-
183
-
184
-
185
-
186
-
187
-
188
-
189
-
190
-
191
-
192
-
193
-
194
-
195
-
196
-
197
-
198
-
199
-
200
-
201
-
202
-
203
-
204
-
205
-
206
-
207
-
208
-
209
-
210
-
211
-
212
-
213
-
214
-
215
-
216
-
217
-
218
-
219
-
220
-
221
-
222
-
223
-
224
-
225
-
226
-
227
-
228
-
229
-
230
-
231
-
232
-
233
-
234
-
235
-
236
-
237
-
238
-
239
-
240
-
241
 |
 |