Toshiba Satellite A350 Maintenance Manual - Page 167
Do not apply pressure to the top or bottom of the drive., Removing the main HDD plate
 |
View all Toshiba Satellite A350 manuals
Add to My Manuals
Save this manual to your list of manuals |
Page 167 highlights
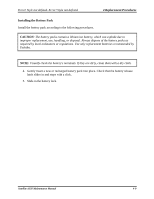
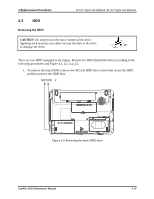
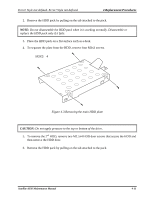
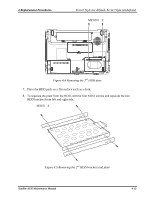
Error! Style not defined. Error! Style not defined. 4 Replacement Procedures 2. Remove the HDD pack by pulling on the tab attached to the pack. NOTE: Do not disassemble the HDD pack when it is working normally. Disassemble or replace the HDD pack only if it fails. 3. Place the HDD pack on a flat surface such as a desk. 4. To separate the plate from the HDD, remove four M3x3 screws. M3X34 Figure 4.3 Removing the main HDD plate CAUTION: Do not apply pressure to the top or bottom of the drive. 5. To remove the 2nd HDD, remove two M2.5x4 HDD door screws that secure the HDD and then remove the HDD door. 6. Remove the HDD pack by pulling on the tab attached to the pack. Satellite A350 Maintenance Manual 4-11
-
 1
1 -
2
-
3
-
4
-
5
-
6
-
7
-
8
-
9
-
10
-
11
-
12
-
13
-
14
-
15
-
16
-
17
-
18
-
19
-
20
-
21
-
22
-
23
-
24
-
25
-
26
-
27
-
28
-
29
-
30
-
31
-
32
-
33
-
34
-
35
-
36
-
37
-
38
-
39
-
40
-
41
-
42
-
43
-
44
-
45
-
46
-
47
-
48
-
49
-
50
-
51
-
52
-
53
-
54
-
55
-
56
-
57
-
58
-
59
-
60
-
61
-
62
-
63
-
64
-
65
-
66
-
67
-
68
-
69
-
70
-
71
-
72
-
73
-
74
-
75
-
76
-
77
-
78
-
79
-
80
-
81
-
82
-
83
-
84
-
85
-
86
-
87
-
88
-
89
-
90
-
91
-
92
-
93
-
94
-
95
-
96
-
97
-
98
-
99
-
100
-
101
-
102
-
103
-
104
-
105
-
106
-
107
-
108
-
109
-
110
-
111
-
112
-
113
-
114
-
115
-
116
-
117
-
118
-
119
-
120
-
121
-
122
-
123
-
124
-
125
-
126
-
127
-
128
-
129
-
130
-
131
-
132
-
133
-
134
-
135
-
136
-
137
-
138
-
139
-
140
-
141
-
142
-
143
-
144
-
145
-
146
-
147
-
148
-
149
-
150
-
151
-
152
-
153
-
154
-
155
-
156
-
157
-
158
-
159
-
160
-
161
-
 162
162 -
 163
163 -
 164
164 -
 165
165 -
 166
166 -
 167
167 -
 168
168 -
 169
169 -
 170
170 -
 171
171 -
 172
172 -
173
-
174
-
175
-
176
-
177
-
178
-
179
-
180
-
181
-
182
-
183
-
184
-
185
-
186
-
187
-
188
-
189
-
190
-
191
-
192
-
193
-
194
-
195
-
196
-
197
-
198
-
199
-
200
-
201
-
202
-
203
-
204
-
205
-
206
-
207
-
208
-
209
-
210
-
211
-
212
-
213
-
214
-
215
-
216
-
217
-
218
-
219
-
220
-
221
-
222
-
223
-
224
-
225
-
226
-
227
-
228
-
229
-
230
-
231
-
232
-
233
-
234
-
235
-
236
-
237
-
238
-
239
-
240
-
241
-
242
-
243
-
244
-
245
-
246
-
247
-
248
-
249
-
250
-
251
-
252
-
253
-
254
-
255
-
256
-
257
-
258
-
259
-
260
-
261
-
262
-
263
-
264
-
265
-
266
-
267
-
268
-
269
-
270
-
271
-
272
-
273
-
274
-
275
-
276
-
277
-
278
 |
 |

Error! Style not defined.
Error! Style not defined.
4 Replacement Procedures
2.
Remove the HDD pack by pulling on the tab attached to the pack.
NOTE:
Do not disassemble the HDD pack when it is working normally. Disassemble or
replace the HDD pack only if it fails.
3.
Place the HDD pack on a flat surface such as a desk.
4.
To separate the plate from the HDD, remove four M3x3 screws.
M3X3
4
Figure
4
.
3 Removing the main HDD plate
CAUTION:
Do not apply pressure to the top or bottom of the drive.
5.
To remove the 2
nd
HDD, remove two M2.5x4 HDD door screws that secure the HDD and
then remove the HDD door.
6.
Remove the HDD pack by pulling on the tab attached to the pack.
Satellite A350 Maintenance Manual
4-11