Toshiba Satellite L630-BT2N22 User Manual - Page 87
Writing CD/DVDs on BD Combo Drive, Important Message BD Combo Drive, Before Writing or Rewriting
 |
View all Toshiba Satellite L630-BT2N22 manuals
Add to My Manuals
Save this manual to your list of manuals |
Page 87 highlights
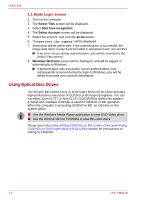
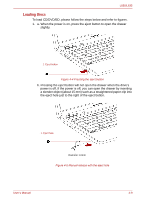
L630/L635 Setting the Optical Drive Auto Lock Right click the Optical Drive Power icon in the Taskbar to change the Optical Drive Auto Lock settings. Enabling and Disabling Optical Drive Auto Lock 1. Right click on the Optical Drive Power icon on the Taskbar. 2. Click Optical Drive Auto Lock -> Enable or Disable. Lock Time Settings for Optical Drive Auto Lock This sets the amount of time required to pass before the optical disc drive eject button unlocks when the Computer detects vibration or other shock. 1. Right click on the Optical Drive Power icon on the Taskbar. 2. Click Unlock time settings -> 1s or 3s or 5s. ■ When the Optical Drive Auto Lock is engaged, the Eject Buttons on application screens are disabled. ■ Optical Drive Auto Lock is not enabled immediately after the computer is started or the disc tray is closed. Writing CD/DVDs on BD Combo Drive Some models are equipped with a full-size BD Combo Drive, which can be used to write data to either CD-R/-RW or DVD-R/-RW/+R/+RW/-RAM/+R DL/-R DL discs. The following applications for writing are supplied: TOSHIBA Disc Creator, and Corel DVD MovieFactory for TOSHIBA, which is a product of Corel Corporations. Important Message (BD Combo Drive) Before you write or rewrite to CD-R/-RW or DVD-R/-RW/+R/+RW/-RAM/+R DL/-R DL disc, read and follow all setup and operating instructions in this section. If you fail to do so, the BD Combo Drive may not function properly, and you may fail to write or rewrite, lose data or incur other damage. Before Writing or Rewriting ■ Based on TOSHIBA's limited compatibility testing, we suggest the following manufacturers of CD-R/-RW and DVD-R/+R/-RW/+RW/-RAM/+R DL/-R DL disc. However, in no event does TOSHIBA guarantee the operation, quality or performance of any disc. Disc quality can affect write or rewrite success rates User's Manual 4-13
-
 1
1 -
2
-
3
-
4
-
5
-
6
-
7
-
8
-
9
-
10
-
11
-
12
-
13
-
14
-
15
-
16
-
17
-
18
-
19
-
20
-
21
-
22
-
23
-
24
-
25
-
26
-
27
-
28
-
29
-
30
-
31
-
32
-
33
-
34
-
35
-
36
-
37
-
38
-
39
-
40
-
41
-
42
-
43
-
44
-
45
-
46
-
47
-
48
-
49
-
50
-
51
-
52
-
53
-
54
-
55
-
56
-
57
-
58
-
59
-
60
-
61
-
62
-
63
-
64
-
65
-
66
-
67
-
68
-
69
-
70
-
71
-
72
-
73
-
74
-
75
-
76
-
77
-
78
-
79
-
80
-
81
-
 82
82 -
 83
83 -
 84
84 -
 85
85 -
 86
86 -
 87
87 -
 88
88 -
 89
89 -
 90
90 -
 91
91 -
 92
92 -
93
-
94
-
95
-
96
-
97
-
98
-
99
-
100
-
101
-
102
-
103
-
104
-
105
-
106
-
107
-
108
-
109
-
110
-
111
-
112
-
113
-
114
-
115
-
116
-
117
-
118
-
119
-
120
-
121
-
122
-
123
-
124
-
125
-
126
-
127
-
128
-
129
-
130
-
131
-
132
-
133
-
134
-
135
-
136
-
137
-
138
-
139
-
140
-
141
-
142
-
143
-
144
-
145
-
146
-
147
-
148
-
149
-
150
-
151
-
152
-
153
-
154
-
155
-
156
-
157
-
158
-
159
-
160
-
161
-
162
-
163
-
164
-
165
-
166
-
167
-
168
-
169
-
170
-
171
-
172
-
173
-
174
-
175
-
176
-
177
-
178
-
179
-
180
-
181
-
182
-
183
-
184
-
185
-
186
-
187
-
188
-
189
-
190
-
191
-
192
-
193
-
194
-
195
-
196
-
197
-
198
-
199
-
200
-
201
-
202
-
203
-
204
 |
 |
