Toshiba Satellite M30X-S171ST Maintenance Manual - Page 148
Installing the CPU, If you remove the heat sink, you should use the CPU grease tool to remove
 |
View all Toshiba Satellite M30X-S171ST manuals
Add to My Manuals
Save this manual to your list of manuals |
Page 148 highlights
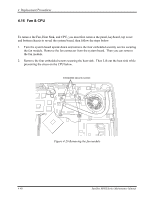
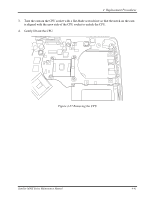
4 Replacement Procedures Installing the CPU To install the CPU, follow the steps below and refer to the figures in the preceding section. CAUTION: If you remove the heat sink, you should use the CPU grease tool to remove the grease on the CPU and heat sink. Reapply fresh grease before installing the heat sink. 1. Make sure that the notch on the cam is aligned with the open position. 2. Seat the CPU to align the triangle mark on the CPU with the one on the CPU socket. Make sure the alignment is exact to avoid damaging pins on the CPU. 3. Press the CPU softly with your fingers and turn the cam on the CPU socket to the closed position with a flat-blade screwdriver to secure the CPU. 4. Seat the heat sink over the CPU and secure with four screws in the order indicated on the heat sink. 5. Seat the fan module and secure with four embedded screws. 6. Attach the fan connector. 4-42 Satellite M30X Series Maintenance Manual
-
 1
1 -
2
-
3
-
4
-
5
-
6
-
7
-
8
-
9
-
10
-
11
-
12
-
13
-
14
-
15
-
16
-
17
-
18
-
19
-
20
-
21
-
22
-
23
-
24
-
25
-
26
-
27
-
28
-
29
-
30
-
31
-
32
-
33
-
34
-
35
-
36
-
37
-
38
-
39
-
40
-
41
-
42
-
43
-
44
-
45
-
46
-
47
-
48
-
49
-
50
-
51
-
52
-
53
-
54
-
55
-
56
-
57
-
58
-
59
-
60
-
61
-
62
-
63
-
64
-
65
-
66
-
67
-
68
-
69
-
70
-
71
-
72
-
73
-
74
-
75
-
76
-
77
-
78
-
79
-
80
-
81
-
82
-
83
-
84
-
85
-
86
-
87
-
88
-
89
-
90
-
91
-
92
-
93
-
94
-
95
-
96
-
97
-
98
-
99
-
100
-
101
-
102
-
103
-
104
-
105
-
106
-
107
-
108
-
109
-
110
-
111
-
112
-
113
-
114
-
115
-
116
-
117
-
118
-
119
-
120
-
121
-
122
-
123
-
124
-
125
-
126
-
127
-
128
-
129
-
130
-
131
-
132
-
133
-
134
-
135
-
136
-
137
-
138
-
139
-
140
-
141
-
142
-
 143
143 -
 144
144 -
 145
145 -
 146
146 -
 147
147 -
 148
148 -
 149
149 -
 150
150 -
 151
151 -
 152
152 -
 153
153 -
154
-
155
-
156
-
157
-
158
-
159
-
160
-
161
-
162
-
163
-
164
-
165
-
166
-
167
-
168
-
169
-
170
-
171
-
172
-
173
-
174
-
175
-
176
-
177
-
178
-
179
-
180
-
181
-
182
-
183
-
184
-
185
-
186
-
187
-
188
-
189
-
190
-
191
-
192
-
193
-
194
-
195
-
196
-
197
-
198
-
199
-
200
-
201
-
202
-
203
-
204
-
205
-
206
-
207
-
208
-
209
-
210
-
211
 |
 |
