Toshiba Satellite M30X-S171ST Maintenance Manual - Page 62
Procedure 1, Audio CD check, Drive cleaning check, Software check, Diagnostic test
 |
View all Toshiba Satellite M30X-S171ST manuals
Add to My Manuals
Save this manual to your list of manuals |
Page 62 highlights
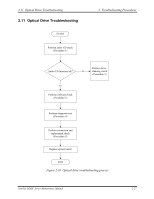
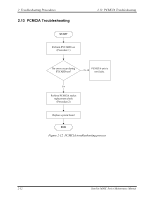
2 Troubleshooting Procedures 2.11 Optical Drive Troubleshooting This section describes how to determine if the computer's internal optical drive is functioning properly. The Satellite P10 module bays can accommodate the following optical drives: • DVD-R/RW device • DVD-ROM device • DVD Multi-drive device • COMBO device Figure 2-11 outlines the process. Perform the steps below starting with Procedure 1 and continue with the other procedures as required. Procedure 1: Audio CD test Procedure 2: Drive cleaning check Procedure 3: Software check Procedure 4: Diagnostic test Procedure 5: Connection and replacement check Procedure 1 Audio CD check First, insert an audio CD into the CD/DVD drive. If it works, the problem is not with the drive. Go to Procedure 3. If the audio CD does not work, go to Procedure 2. If the CD/DVD LED on the front panel does not light when the disc is played and the drive gives no response, go straight to Procedure 3. Procedure 2 Drive cleaning check Insert a CD/DVD drive-cleaning disk into the drive clean according to the drive-cleaning product instructions. If the problem persists, go to Procedure 3. Procedure 3 Software check Ensure that the appropriate driver has been installed on the computer for the CD/DVD drive. Procedure 4 Diagnostic test The audio test program stored in the Diagnostics Disk will test the drive's ability to play an audio CD. See Chapter 3 for details. If any errors occur while executing the diagnostic program, go to Procedure 5. 2-28 Satellite M30X Series Maintenance Manual
-
 1
1 -
2
-
3
-
4
-
5
-
6
-
7
-
8
-
9
-
10
-
11
-
12
-
13
-
14
-
15
-
16
-
17
-
18
-
19
-
20
-
21
-
22
-
23
-
24
-
25
-
26
-
27
-
28
-
29
-
30
-
31
-
32
-
33
-
34
-
35
-
36
-
37
-
38
-
39
-
40
-
41
-
42
-
43
-
44
-
45
-
46
-
47
-
48
-
49
-
50
-
51
-
52
-
53
-
54
-
55
-
56
-
 57
57 -
 58
58 -
 59
59 -
 60
60 -
 61
61 -
 62
62 -
 63
63 -
 64
64 -
 65
65 -
 66
66 -
 67
67 -
68
-
69
-
70
-
71
-
72
-
73
-
74
-
75
-
76
-
77
-
78
-
79
-
80
-
81
-
82
-
83
-
84
-
85
-
86
-
87
-
88
-
89
-
90
-
91
-
92
-
93
-
94
-
95
-
96
-
97
-
98
-
99
-
100
-
101
-
102
-
103
-
104
-
105
-
106
-
107
-
108
-
109
-
110
-
111
-
112
-
113
-
114
-
115
-
116
-
117
-
118
-
119
-
120
-
121
-
122
-
123
-
124
-
125
-
126
-
127
-
128
-
129
-
130
-
131
-
132
-
133
-
134
-
135
-
136
-
137
-
138
-
139
-
140
-
141
-
142
-
143
-
144
-
145
-
146
-
147
-
148
-
149
-
150
-
151
-
152
-
153
-
154
-
155
-
156
-
157
-
158
-
159
-
160
-
161
-
162
-
163
-
164
-
165
-
166
-
167
-
168
-
169
-
170
-
171
-
172
-
173
-
174
-
175
-
176
-
177
-
178
-
179
-
180
-
181
-
182
-
183
-
184
-
185
-
186
-
187
-
188
-
189
-
190
-
191
-
192
-
193
-
194
-
195
-
196
-
197
-
198
-
199
-
200
-
201
-
202
-
203
-
204
-
205
-
206
-
207
-
208
-
209
-
210
-
211
 |
 |
