Toshiba TLP-B2 Ultra User Guide - Page 18
Installation and, connection, Connect the power cord., Take off the lens cover.
 |
UPC - 022265951118
View all Toshiba TLP-B2 Ultra manuals
Add to My Manuals
Save this manual to your list of manuals |
Page 18 highlights
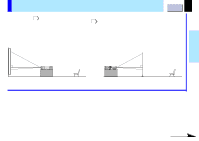
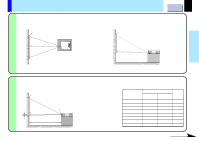
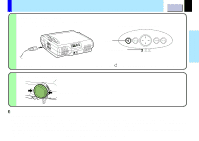
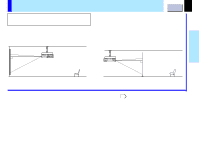
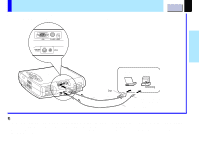
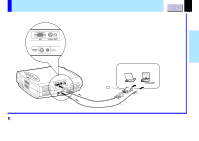
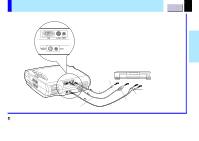
Installation and connection Floor-mounted projector placement (Continued) 3 Connect the power cord. • Insert one end in the AC IN socket on the projector. • Insert the other end in a wall outlet. Control panel on the main unit CONTENTS 18 Light Light (Orange) The ON indicator lights in orange and the projector turns to standby mode. The mark of ON/STANDBY on the main unit will also light. 4 Take off the lens cover. Push both sides of the lens cover to take off. Notes • Select a room that can be darkened. • When the projector is moved from a cold location to a warm location, or when the ambient temperature in the projection room has risen suddenly, moisture may condense on the lens or the mirror to blur the projected pictures. In such a case, leave the projector for an adequate time (1 to 2 hours, depending on the room's condition) before using it so it adjusts to the ambient temperature. • If the screen is exposed to direct sunlight or other strong light, the projected picture becomes too faint to see. Shut out the light with curtains or other means. • If the screen and the projector are not installed properly, the projected picture may be distorted.
-
 1
1 -
2
-
3
-
4
-
5
-
6
-
7
-
8
-
9
-
10
-
11
-
12
-
 13
13 -
 14
14 -
 15
15 -
 16
16 -
 17
17 -
 18
18 -
 19
19 -
 20
20 -
 21
21 -
 22
22 -
 23
23 -
24
-
25
-
26
-
27
-
28
-
29
-
30
-
31
-
32
-
33
-
34
-
35
-
36
-
37
-
38
-
39
-
40
-
41
-
42
-
43
-
44
-
45
-
46
-
47
-
48
-
49
-
50
-
51
-
52
-
53
-
54
-
55
-
56
-
57
-
58
-
59
-
60
-
61
-
62
-
63
-
64
-
65
 |
 |
