Toshiba TLP-X4500U User Manual - Page 21
Remote Control, About The Laser Pointer, Putting Batteries
 |
View all Toshiba TLP-X4500U manuals
Add to My Manuals
Save this manual to your list of manuals |
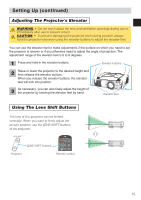
Page 21 highlights
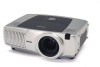
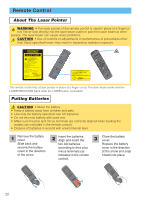
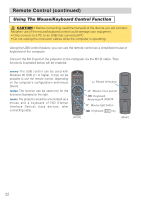
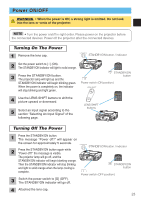
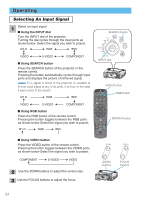
Remote Control About The Laser Pointer WARNING • The laser pointer of the remote control is used in place of a finger or rod. Never look directly into the laser beam outlet or point the laser beam at other people. The laser beam can cause vision problems. CAUTION • Use of controls or adjustments or performance of procedures other than those specified herein may result in hazardous radiation exposure. AVOID EXPOSURE-LASER RADIATION IS EMITTED FROM THIS APERTURE CAUTION LASER RADIATION DO NOT STARE INTO BEAM WAVE LENGTH: 640-660nm MAX OUTPUT: 1mW CLASS 2 LASER PRODUCT Comples with 21 CFR, 1040.10 AND 1040.11 IEO60825-1:1993+A1:1997+A2:2001 LASER-STRAHLING NICHT IN DEN STRAHL BLICKEN LASER KLASSE 2 WAVE LENGTH:640-660nm MAX OUTPUT:1mW Ϩʔβʔޫ 4 N8 ON MODEL:H-IRC4 MANUFACTURER: B MANUFACTURED INTERLINK K.K. JANUARY,2003 1-10-7 HIGASHIKANDA CHIYODA-KU,TOKYO,JAPAN 101-0031 MADE IN CHINA LASER INDICATOR VIDEO RGB + STANDBY/ON ZOOM + - + - - LENS SHIFT FOCUS ASPECT LASER BLANK NEXT PREVIOUS MOUSE INTERLINK ELECTRONICS JQA P S C MADE IN CHINA MENU AUTO ESPCOSITMIOANGNOFNRYOESFEFPTinFPREKEEZYVESOTLOUNMMEEUTSEEARCH 1 2 3 ID CHANGE This remote control has a laser pointer in place of a finger or rod. The laser beam works and the LASER INDICATOR lights while the LASER button is pressed. Putting Batteries CAUTION • About the battery • Keep a battery away from children and pets. • Use only the battery specified: two AA batteries. • Do not mix new battery with used one. • Make sure the plus and minus terminals are correctly aligned when loading the battery (as indicated in the remote control). • Dispose of batteries in accord with environmental laws. 1 Remove the battery cover. Slide back and remove the battery cover in the direction of the arrow. 2 Insert the batteries. Align and insert the two AA batteries according to their plus minus terminals (as indicated in the remote control). 3 Close the battery cover. Replace the battery cover in the direction of the arrow and snap it back into place. 20
-
 1
1 -
2
-
3
-
4
-
5
-
6
-
7
-
8
-
9
-
10
-
11
-
12
-
13
-
14
-
15
-
 16
16 -
 17
17 -
 18
18 -
 19
19 -
 20
20 -
 21
21 -
 22
22 -
 23
23 -
 24
24 -
 25
25 -
 26
26 -
27
-
28
-
29
-
30
-
31
-
32
-
33
-
34
-
35
-
36
-
37
-
38
-
39
-
40
-
41
-
42
-
43
-
44
-
45
-
46
-
47
-
48
-
49
-
50
-
51
-
52
-
53
-
54
-
55
-
56
-
57
-
58
-
59
-
60
-
61
-
62
-
63
-
64
-
65
-
66
-
67
-
68
-
69
-
70
-
71
-
72
-
73
 |
 |
