Toshiba TLP-X4500U User Manual - Page 30
Displaying The Child Window, Selecting An Audio Input, P.INP. INPUT
 |
View all Toshiba TLP-X4500U manuals
Add to My Manuals
Save this manual to your list of manuals |
Page 30 highlights
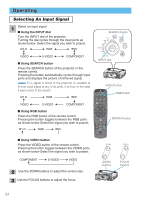
Operating (continued) Displaying The Child Window memo This feature called "PinP (Picture in Picture)" is available only when a RGB signal is selected to main screen. 1 Press the PinP button. The child window with a picture of a video signal will appear. 2 Press the PinP button again to change the size of the child window or close the window. Small child window Large child window LASER INDICATOR STANDBY/ON VIDEO RGB ++ LENS SHIFT FOCUS -- + ZOOM - BLANK ASPECT LASER PREVIOUS NEXT MOUSE No child window memo You can select the video signal to display in the child window, and the position of the child window. Please refer to the items "P.INP. INPUT" and "P.INP. POSIT." of the table of the section "INPUT Menu". ESC MENU POSITION RESET AUTO MAGNFY PinP VOLUME ON FREEZE MUTE OFF KEYSTONE SEARCH 1 2 3 ID CHANGE PinP button Selecting An Audio Input memo This feature is available only when the child window is on the screen. 1 When the child window is on the screen, press the VOLUME button. As illustrated on the right, a dialog will appear on the screen. VOLUME RGB Video 2 Use the cursor buttons / to select an audio input. 16 RGB (Audio input for the main screen) Video (Audio input for the child window) memo You also can adjust the volume using the cursor buttons / . Please refer to the section "Adjusting The Volume". LASER INDICATOR STANDBY/ON VIDEO RGB ++ LENS SHIFT FOCUS -- + ZOOM - BLANK ASPECT LASER PREVIOUS NEXT MOUSE ESC MENU POSITION RESET AUTO MAGNFY PinP VOLUME ON FREEZE MUTE OFF KEYSTONE SEARCH 1 2 3 ID CHANGE Cursor buttons VOLUME button 3 Press the VOLUME button again to close the dialog and complete this operation. memo Even if you don't do anything, the dialog will automatically disappear after a few seconds. 29
-
 1
1 -
2
-
3
-
4
-
5
-
6
-
7
-
8
-
9
-
10
-
11
-
12
-
13
-
14
-
15
-
16
-
17
-
18
-
19
-
20
-
21
-
22
-
23
-
24
-
 25
25 -
 26
26 -
 27
27 -
 28
28 -
 29
29 -
 30
30 -
 31
31 -
 32
32 -
 33
33 -
 34
34 -
 35
35 -
36
-
37
-
38
-
39
-
40
-
41
-
42
-
43
-
44
-
45
-
46
-
47
-
48
-
49
-
50
-
51
-
52
-
53
-
54
-
55
-
56
-
57
-
58
-
59
-
60
-
61
-
62
-
63
-
64
-
65
-
66
-
67
-
68
-
69
-
70
-
71
-
72
-
73
 |
 |
