Toshiba Tecra R10 PTRB3C-02401V Users Manual Canada; English - Page 76
Power and Power-Up Modes, if required.
 |
View all Toshiba Tecra R10 PTRB3C-02401V manuals
Add to My Manuals
Save this manual to your list of manuals |
Page 76 highlights
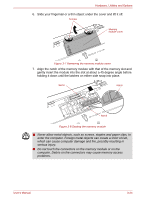
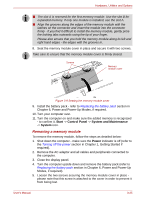
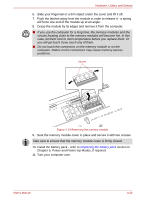
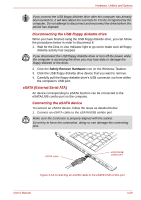
Hardware, Utilities and Options 6. Slide your fingernail or a thin object under the cover and lift it off. 7. Push the latches away from the module in order to release it - a spring will force one end of the module up at an angle. 8. Grasp the module by its edges and remove it from the computer. ■ If you use the computer for a long time, the memory modules and the circuits locating close to the memory modules will become hot. In this case, let them cool to room temperature before you replace them. Or you will get burnt if you touch any of them. ■ Do not touch the connectors on the memory module or on the computer. Debris on the connectors may cause memory access problems. Latches Figure 3-10 Removing the memory module 9. Seat the memory module cover in place and secure it with two screws. Take care to ensure that the memory module cover is firmly closed. 10. Install the battery pack - refer to Replacing the battery pack section in Chapter 6, Power and Power-Up Modes, if required. 11. Turn your computer over. User's Manual 3-26
-
 1
1 -
2
-
3
-
4
-
5
-
6
-
7
-
8
-
9
-
10
-
11
-
12
-
13
-
14
-
15
-
16
-
17
-
18
-
19
-
20
-
21
-
22
-
23
-
24
-
25
-
26
-
27
-
28
-
29
-
30
-
31
-
32
-
33
-
34
-
35
-
36
-
37
-
38
-
39
-
40
-
41
-
42
-
43
-
44
-
45
-
46
-
47
-
48
-
49
-
50
-
51
-
52
-
53
-
54
-
55
-
56
-
57
-
58
-
59
-
60
-
61
-
62
-
63
-
64
-
65
-
66
-
67
-
68
-
69
-
70
-
 71
71 -
 72
72 -
 73
73 -
 74
74 -
 75
75 -
 76
76 -
 77
77 -
 78
78 -
 79
79 -
 80
80 -
 81
81 -
82
-
83
-
84
-
85
-
86
-
87
-
88
-
89
-
90
-
91
-
92
-
93
-
94
-
95
-
96
-
97
-
98
-
99
-
100
-
101
-
102
-
103
-
104
-
105
-
106
-
107
-
108
-
109
-
110
-
111
-
112
-
113
-
114
-
115
-
116
-
117
-
118
-
119
-
120
-
121
-
122
-
123
-
124
-
125
-
126
-
127
-
128
-
129
-
130
-
131
-
132
-
133
-
134
-
135
-
136
-
137
-
138
-
139
-
140
-
141
-
142
-
143
-
144
-
145
-
146
-
147
-
148
-
149
-
150
-
151
-
152
-
153
-
154
-
155
-
156
-
157
-
158
-
159
-
160
-
161
-
162
-
163
-
164
-
165
-
166
-
167
-
168
-
169
-
170
-
171
-
172
-
173
-
174
-
175
-
176
-
177
-
178
-
179
-
180
-
181
-
182
-
183
-
184
-
185
-
186
-
187
-
188
-
189
-
190
-
191
-
192
-
193
-
194
-
195
-
196
-
197
-
198
-
199
-
200
-
201
-
202
-
203
-
204
-
205
-
206
-
207
-
208
-
209
-
210
-
211
-
212
-
213
-
214
-
215
-
216
-
217
 |
 |
