Tripp Lite 9PXEBM180RT Eaton 9PX 5000 9PX 6000 9PX 6000 G 9PX EMB 180 V Instal - Page 20
Tower installation
 |
View all Tripp Lite 9PXEBM180RT manuals
Add to My Manuals
Save this manual to your list of manuals |
Page 20 highlights
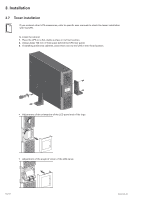
3. Installation 3.7 Tower installation If you ordered other UPS accessories, refer to specific user manuals to check the tower installation with the UPS. To install the cabinet: 1. Place the UPS on a flat, stable surface in its final location. 2. Always keep 150 mm of free space behind the UPS rear panel. 3. If installing additional cabinets, place them next to the UPS in their final location. • Adjustment of the orientation of the LCD panel and of the logo. • Adjustment of the angle of vision of the LCD panel. Page 20 5-6kVA US_EN
-
 1
1 -
2
-
3
-
4
-
5
-
6
-
7
-
8
-
9
-
10
-
11
-
12
-
13
-
14
-
 15
15 -
 16
16 -
 17
17 -
 18
18 -
 19
19 -
 20
20 -
 21
21 -
 22
22 -
 23
23 -
 24
24 -
 25
25 -
26
-
27
-
28
-
29
-
30
-
31
-
32
-
33
-
34
-
35
-
36
-
37
-
38
-
39
-
40
-
41
-
42
-
43
-
44
-
45
-
46
 |
 |

Page 20
5-6kVA US_EN
3. Installation
3.7
Tower installation
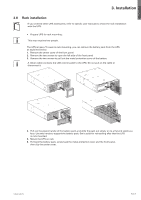
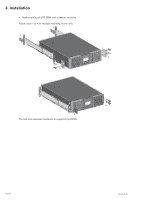
•
Adjustment of the orientation of the LCD panel and of the logo.
•
Adjustment of the angle of vision of the LCD panel.
If you ordered other UPS accessories, refer to specific user manuals to check the tower installation
with the UPS.
To install the cabinet:
1.
Place the UPS on a flat, stable surface in its final location.
2.
Always keep 150 mm of free space behind the UPS rear panel.
3.
If installing additional cabinets, place them next to the UPS in their final location.